|
Lab 3A: “Device Validation: Body Temperature, Blood Pressure, and Heart Rate”
You have just graduated with your BME degree and have been hired by a start-up company called “Suntronic”. They are developing new personalized health monitoring devices and want to check out the competition. They have chosen two devices to investigate. One measures heart rate and blood pressure and the other measures temperature. Your assignment is to assess how valid and reliable the devices are as well as identify and design flaws by comparing the readings on the devices to those of proven devices.
Device 1: Body Temperature
1. Take 5 temperature readings in the lab from one of your lab mates. One every two minutes using both the sensor and the oral thermometer at the same time.
2. Walk around campus and take one reading every five minutes from the same person using both the sensor and oral thermometer at the same time (12 measurements).
3. Return to the lab and take 5 temperature readings, one every two minutes using both the sensor and the oral thermometer at the same time.
4. Enter your results into Google Doc on Blackboard under your group number.
5. Calculate the mean and standard deviation for both the oral thermometer and sensor.
6. Calculate the correlation coefficient (Pearson’s r) between the oral thermometer and sensor.
7. Run a t-test between the oral thermometer and sensor.
8. Graph all your results.
9. Write a summary of your results including any conclusions you have made from your analysis and summarize any design flaws you have noted during test.
10. Make recommendations as to how you would improve the device.
Materials:
RAIIN sensor
Vitals Monitor App installed on an iPhone
Oral thermometer
Procedures:
Setting Up The Device (images on Blackboard):
A. Download the Vitals Monitor from the iPhone Apps store (it’s free).
B. Turn on blue tooth in your iPhone.
C. Press the On Button at the bottom of the device for 1 second to turn it on.
D. Set the temperature to Fahrenheit and the min to 89 degrees and max to 104 degrees.
E. Tape the device beneath the arm pit of one of your team members.
F. Link your iPhone to the sensor.
Note: Make sure the iPhone is always within a few feet of the sensor.
Device II: Heart Rate and Blood Pressure:
1. Take 5 blood pressure and heart rate readings in the lab from one of your lab mates (subjects). One every two minutes using the watch sensor. Take the same measurements using the medical grade devices provided (traditional blood pressure cuff and pulse oximeter).
2. Have the subject walk around campus at a brisk rate for 15 minutes and return to the lab and take one reading every five minutes from the same person using both the watch sensor and gold-standard medical devices at the same time (12 measurements).
3. Enter your results into the Google Doc on Blackboard under your group number.
4. Calculate the mean and standard deviation for both the watch sensor and the gold standard device for your group.(Use systolic readings.)
5. Calculate the correlation coefficient (Pearson’s r) between the watch sensor and the appropriate gold standard device. (Use systolic readings.)
6. Run a t-test between the watch sensor and the gold standard device. (Use systolic readings.)
7. Graph all your results.
8. Write a summary of your results including any conclusions you have made from your analysis and summarize any design flaws you have noted during test.
9. Make recommendations as to how you would improve the watch sensor device.
Materials:
• Omron Watch Sensor
• Blood Pressure Cuff
• Pulse Oximeter
Procedure for using Omcron Watch Sensor.
1. Place on your left wrist.
2. Make sure you are seated.
3. Hold the watch close to your chest and grasp your left elbow with right hand.
4. Press start and remain still until the measurement is completed.
Procedure for Pulse Oximeter:
1. Place on finger.
2. Press white button to start.
Procedure for Blood Pressure Cuff:
1. Place on right arm.
2. Be seated and still.
3. Have operator press start button.
Peer Evaluation: https://docs.google.com/a/asu.edu/forms/d/1H6xitKy3v29GWqJ1glcOoEZB2dyz7LM1REYQciJl-wQ/viewform

HW: Lab Report 3A due 2/19&20/14 (through OpenWetWare)
Grading Scheme:
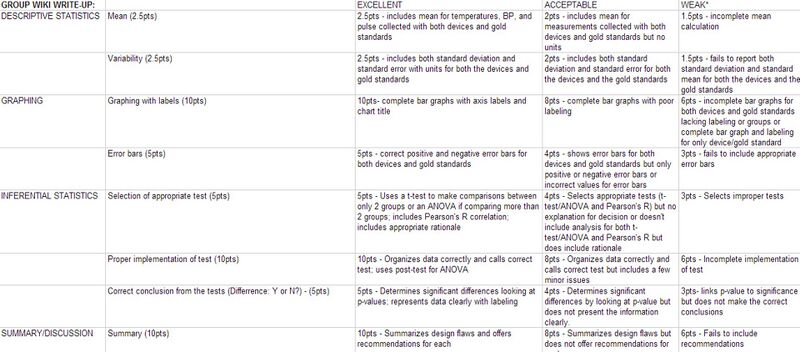
5 points – Descriptive Statistics
15 points – Graphing with labels and error bars
20 points – Inferential Statistics
10 points - Summary including design flaws and recommendations
50 points – Peer Evaluation
Lab 3B: “Device Development and Marketing”
You have assessed the competition’s devices (RAIING Temperature Sensor and Omron Blood Pressure and Pulse Sensor) and have decided to move forward on designing your own body monitoring device. Based on the obvious flaws in your competition’s devices, design an improved body monitoring device. There are two components to this lab. The first is the written component in which you present your design, “data”, and analysis. The second is the commercial that will be shown in class where you market your device to a target population.
Assignment:
1. Identify a target population and need in that population for your body monitoring device.
2. Draw a diagram of your device using any graphics program you like.
3. Create a fictitious data set (in Excel) showing what you did to test the device.
4. Analyze your data using the appropriate statistics and graph the results.
5. Create a Logo and slogan for your device.
6. Create a 30 second TV commercial in which you market your device to your target audience presenting your compelling data and ingenious design. Use any movie making software you like.
Materials:
Your imagination
HW: Lab Report 3B (through OpenWetWare)/commercial due 03/05/14, 03/06/14
Grading Scheme: Written report
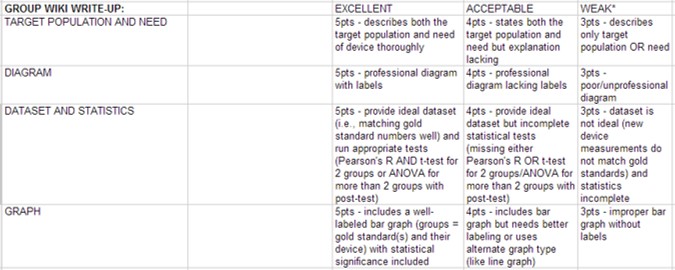
5% - Target Population and Need
5% - Diagram of the device
5% - Data set and statistics
5% - Graph
20% - Peer Evaluation: https://docs.google.com/a/asu.edu/forms/d/1bvhDyemBc6-0J6ajuo_Lh7ejxxNO9dQlY1UzWWYvSU8/viewform

Grading Scheme: Commercial (Grading by Peers and Instructors)
10% - Branding (Logo and slogan)
10% - Positioning (identifying and attempting to occupy a market niche)
10% - Target market
10% - Messaging
10% - Placement (price, promotion, distribution, packaging, and competition)
10% - Overall Impression
Score scaled to 20points
Wednesday
Look for your Group's lab report link in the list of links on the right. If it is red instead of blue, do not click on it!
If the link is red, type the name of your Group's lab report link exactly as shown in the following text field and click the Create Page button.
This should open up an Edit page that is pre-populated with a lab report template code.
<createbox>
preload=Template:ASUBME103_s2014_L3
prefix=BME100_s2014:
width=25
buttonlabel=Create Page
</createbox>
|
|
Thursday
Look for your Group's lab report link in the list of links on the right. If it is red instead of blue, do not click on it!
If the link is red, type the name of your Group's lab report link exactly as shown in the following text field and click the Create Page button.
This should open up an Edit page that is pre-populated with a lab report template code.
<createbox>
preload=Template:ASUBME103_s2014_L3
prefix=BME100_s2014:
width=25
buttonlabel=Create Page
</createbox>
|
|
| 
