BISC209: Enrichment: Difference between revisions
| Line 156: | Line 156: | ||
Once you have pure isolates, begin to examine the cellular morphology, structure, and metabolism of your isolates as described in LAB 5.</LI></UL> | Once you have pure isolates, begin to examine the cellular morphology, structure, and metabolism of your isolates as described in LAB 5.</LI></UL> | ||
Revision as of 02:12, 2 February 2010
American Society of Microbiology (ASM) Image library of bacterial colony morphologies
Perhaps we can add to this wonderful library of images of colonies of culturable microorganisms. [1]. The images can enhance your ability to select for desired Genera based on colony morphology.
Background
The composition of medium is an important factor when attempting to culture microorganisms. The components and pH can be manipulated to favor the nutritional requirements of particular bacterial groups present if the desired microbes are unlikely to be successfully isolated in a general purpose medium. Keep in mind that the composition of selective enrichment media, particularly the difference between it and general purpose media, provides valuable information about the metabolic range of the microbes isolated on it.
The recipe for each enrichment medium described here includes its composition (each ingredient is described in grams of component per liter of distilled and/or deionized water) and the desired final pH. Deionized (filtered) water is generally used unless a particular medium requires a purer type of water (distilled or salt-free, for example). Tap water is not used in media preparation because it may contain undesirable compounds such as chlorine, copper, lead, and detergents. Some of the media or reagents described here can be purchased from companies such as BBL Microbiology Systems or Difco Laboratories in a dehydrated, premixed form. If commercially purchased in dehydrated form, the manufacturer provides the instructions for preparation.
Pourite™ is an anti-foaming agent from American Scientific Products that is commonly added to non-commercial medium containing agar. One drop of Pourite™ is added to volumes up to 800 ml and 2 drops to volumes of more than 800 ml to prevent foaming.
General Purpose Media
Nutrient broth and agar:
Nutrient agar is a moderately rich, general purpose, solid medium that meets the nutritional requirements of many culturable bacteria. It contains beef extract and enzymatically digested gelatin to support the growth of a wide variety of chemoheterotrophic organisms. Fungal growth is reduced in this media. In broth form, the solidifying agent (agar) is not included.
Dilute Nutrient broth and agar
Dilute nutrient agar is a solid medium with the same formulation as nutrient agar except that it contains a lower concentration of each component. It also a general purpose medium, but lowering its nutrient concentration further limits fungal growth and favors soil bacterial culture. In broth form, the solidifying agent (agar) is not included.
Enrichment media and Isolation protocols (Starting with either SOIL or SOIL EXTRACT)
Actinomycetes enrichment
Use both Glycerol Yeast Extract Media and Arginine-Glycerol-Salt (AGS) medium (AGS)
It is important that we isolate representatives of this diverse group of organisms so make sure both soil samples from your habitat are enriched for Actinomycetes using both of the media described, Glycerol Yeast and AGS. Most of the
Enrichment media and Isolation protocols (Starting with SOIL)
The following enrichment protocols start with a SOIL Sample:
Violacein-producing bacteria:
Isolate from soil sample on rice grains using cycloheximide in the soil to reduce competition from eukaryotic microbes
Some bacteria produce beautiful soluble purple pigments (violaceins). Studies indicate that the production of the pigments is a response to a quorum-sensing molecule N-Hexanoyl homoserine lactone. Violacein pigments have antibiotic properties that reduce predation of the bacterium by amoebae and by other protozoan eukaryotes. These compounds may also have anticancer activities.
The group of bacterial producing violaceins include the genera Chromobacterium and Janthinobacterium. They were first cultivated in the 1800's; they are common in soils and water, but in low numbers. They are chemoorganotrophs that can use a large variety of carbohydrates, sugars, and organic molecules, including solvents, for growth.
Providing the appropriate fermentable sugars and carbohydrates for growth and inhibiting fungi with cycloheximide during the enrichment period should provide us with some good isolates.
-
Enrichment:
Loosely pack soil into an empty sterile petri dish until it is 1/4 full. You will need to be careful not to contaminate this soil with flora from your skin so wear gloves. (Make sure that you have not touched the part of the glove that will come in contact with the soil) - Wet the soil with 5ml of 50μg/ml cycloheximide in water. You will find premeasured 5ml aliquots of cycloheximide in sterile water available in small test tubes in the preparation area.
- Wear gloves when handling cycloheximide. It is toxic.
- Add enough dilute cycloheximide to dampen the soil, but don't leave standing water in the soil or make it "soggy". (You may need to use more than 1 tube of cyclohexide.)
- Using flame sterilized forceps (find this sterile tool in your small orange drawer), pick 5-10 rice grains and place them on the surface of the soil. Make sure each has full contact with the soil by tamping them down lightly with the forceps. Don't cover the rice with the soil. Cover the Petri dish and incubate at RT. Reflame your forceps before putting them away and between all contacts with soil.
- Check the rice grains for signs of coloration. After 5-7 days you should see dark purple patches on the rice grains. If not keep incubating for another week before giving up on this enrichment. You may have to add a little more sterile water with cycloheximide after a week. Don't let the plate completely dry out.
- If you see purple areas, pick up several of these purple patches with the sharp end of a sterile toothpick or with a sterile cooled inoculating needle.
-
Isolation:
Transfer and streak section 1 of a labeled isolation streak plate of nutrient agar. Some members of this group have "pickier" nutritional requirements and may not grow when subcultured from the rice. Save your soil/rice plate and consult with your instructor about alternative media you might try if your purple colony won't grow on nutrient agar. Minimal media with glucose or succinate as carbon sources might work or Luria-Bertoni agar. The purple color will vary on different media. - These colonies are "tough" due to the production of an exo-polymer, however, some lose the ability to make this polymer after repeated isolation streaking and will become easier to transfer.
- Take pictures of your plates with your digital camera or borrow one of the lab's cameras.
- Use a dissecting microscope or magnifying glass to examine your colonies. Take pictures.
-
Identification:
Once pure cultures are obtained, genomic ID is the best way to identify these bacteria. - If you isolate a colony that is easy to transfer, examine its cellular morphology, structure, and metabolism as described in LAB 5.
Fruiting Myxobacteria:
Initially, use TMXCV enrichment media and later a different isolation (CTPM) and confirmation medium (TPM). The 3 types of Myxobacterium media are: (enrichment (TMXCV); isolation (CTPM); and starvation (TPM))
Aerobic members of this group include the genera Myxococcus,Stigmatella, Nannocystis, and Chondromyces. They are of interest because of their unique, complex life cycle and their ability to produce antibiotics. When nutrient starved, 100,000 plus cells will aggregate to produce a structure called a fruiting body. These structures are colorful (orange, yellow, or even red) and visible to the naked eye. You may have spotted them on tree trunks in the forest immediately following heavy rains. A simple fruiting body is composed of a glistening, colored droplet made of thick walled cells called microcysts or myxospores. The myxospores are resistant to drying, heat etc. Some fruiting bodies are even more complex and look like tiny trees.
The vegetative cell is a non-flagellated, Gram-negative rod that can glide over solid surfaces. If we successfully isolate these bacteria, the colonies will have a unique elaborate swirling pattern. While we are attempting to isolate only aerobic Myxobacteria, their are also anaerobic genera. Many Myxobacteria can digest cellulose, so we should be able to find them in our soil samples.
Successful enrichment uses soil, leaf, or bark extracts in the medium. Most often these bacteria are isolated from the soil surface and in areas rich in nitrogen. (Our medium contains sterilized rabbit dung pellets.) Try to avoid overgrowth by other non-desired groups of bacteria by transfering potential Myxobacteria colonies to fresh medium as soon as you suspect you have a Myxobacterium colony.
FYI: a. Sterilized rabbit dung pellets act as bait (a nitrogen source) for the gliding vegetative cells.
b. We have added cycloheximide to the medium to inhibit eukaryotic cells.
c. Starvation medium will induce fruiting and will confirm successful isolation of a Myxobacterium.
-
Enrichment:
Label a plate of Myxobacteria Enrichment Medium (TMXCV) containing embedded rabbit dung pellets. -
Wear gloves and sprinkle 1 g of soil over the surface of the TMXCV medium near (but not on) the embedded pellets of rabbit dung.
Incubate the plate at 30C. - Observe the plate every few days, scanning it with a magnifying glass or use a dissecting scope.
- Watch for formation of fruiting body structures. (Find images of these structures in chapter 188 of the Prokaryotes Volume IV or do a Google image search).
-
Isolation:
When you see colored "dots" of emerging fruits, use a sterile toothpick to carefully touch the growth and transfer it to section 1 of a labeled Myxobacteria Isolation Medium (CTPM) Plate. - Isolation streak through the remaining plate sections following the Streaking for Isolation procedure, using your flame sterilized inoculating loop.
- If you successfully isolate Myxobacteria, spreading, flat colonies will appear on the rich medium within a few days.
-
Identification:
You can confirm this identification by transferring some of the growth from the CTPM medium to Myxobacterium Starvation medium (TPM) agar. TPM is a starvation medium that should induce fruiting bodies in a day or two. - Take pictures.
Ammonia Nitrifying Bacteria:
Use Nitrifying Enrichment media
The chemoautotrophic Nitrifying bacteria grow by consuming inorganic nitrogen compounds like ammonia. We will try to isolate common soil genera Nitrosomonas and/or Nitrobacter, the most important soil bacteria performing Nitrification. They are Gram-negative, short or long rods. The nitrification process requires complex internal membrane systems to locate key enzymes needed in the nitrification process. These enzymes include ammonia monooxygenase, which oxidizes ammonia to hydroxylamine, and nitrite oxidoreductase, which oxidizes nitrite to nitrate. As you can imagine, these bacteria are important in wastewater treatment facilities.
Soil rich in nitrogenous compounds is a good source of nitrifying bacteria. They are found in highest numbers where considerable amounts of ammonia are present, including areas with extensive protein decomposition, such as sewage treatment plants. The enrichment medium we have selected and the dilution technique we will use are both designed to avoid overgrowth by faster growing heterotrophic bacteria.
-
Enrichment:
Add 1 gram of soil (collected in LAB 2) to a 250 ml flask containing 100 ml liquid Nitrifying enrichment media. - Incubate on a rotary shaker for 1 week.
- About 1 week after incubation:
- Swab section 1 of a labeled isolation streak plate of Nitrifying enrichment solid medium as described in Streaking for Isolation. Follow the steps for Streaking for Isolation using a flame sterilized inoculating loop.
- Allow the inoculum in section 1 to absorb into the agar before you,
- Invert, and incubate the plate at RT.
- Check your plate for the presence of colonies regularly. This is important to prevent overgrowth by other heterotropic bacteria. To distinguish colonies of Nitrosomonas and Nitrobacter from non-nitrifying bacteria that may grow on your plate, research the appearance of these bacteria in colonial form in The Prokaryotes or by doing a Google image search.
-
Isolation:
Select appropriate colony morphologies and perform a Gram stain. Look for Gram negative rods that match the description of Nitrifying bacteria such as: Nitrifying bacteria link. - Isolation streak these colonies onto new Nitrifying enrichment plates (one colony/plate) using your inoculating loop.
- Continue to isolation streak until pure culture isolates are obtained.
-
Identification:
Once you have pure isolates, test them for Ammonification following the procedure in: Tests to determine the role of a soil isolate. Select and perform other tests you think might help with their characterization.
Denitrifying methylotrophs (hyphomicrobia) Bacteria :
Use Hyphomicrobium medium (MHM)
The bacteria in this group have two very distinct morphological forms (dimorphic): a motile, swarmer cell and a stalked, stationary, prosthecate cell. The motile cell is flagellated, typically with a polar or subpolar flagellum. The sessile cell attaches to the surface of some solid material using either an adhesive or a specialized outgrowth at one pole called a prostheca. Reproduction occurs by budding from the prosthecae and results in one motile and one sessile offspring.
Hyphomicrobia are facultative aerobes and chemoorganotrophs in the alpha-Proteobacteria group. They are common in aquatic environments and in nitrate rich environments. In nitrate-rich non-aquatic sites, such as soil, these organisms rely on other bacteria to degrade local organic molecules to a useable form. They use C1 carbons for nutrients and reduce nitrate to N2 for their energy needs.
In pure culture, you should be able to find both morphologic forms in about equal ratio. Genera of this group we might find in soil include: Caulobacter, Asticcacaulis, Hyphomicrobium, Pedomicrobium, Hyphomonas, and Thiodendron (see the Prokayotes).
Isolation is based on their inability to grow on nutrient agar while they have the ability to grow anaerobically in the presence of methanol, while reducing nitrate to N2. (We will use Pfennig bottles or screw cap tubes)
-
Enrichment:
Weigh 1 g of soil (collected in lab 2) and add it to a completely full screw cap tube or Pfennig bottle containing Modular hyphomicrobium medium. - Tighten the cap.
- Incubate at 30°C for several days to 1 week.
- Watch the culture for the development of turbidity.
- When the solution begins to look turbid, slowly loosen the cap while watching for the appearance of bubbles rising in the liquid. The bubbles appear because of decreased pressure from loosening the cap and indicate the production of N2 gas by the organism.
- Make a wet mount of the culture by taking a loop of liquid (after scraping the sides of tube with your inoculating loop). This scraping will help you collect prosthecate as well as motile cells.
-
Secondary enrichment:
If prosthecate cells (Hyphomicrobium) are present, take a picture (through the microscope ocular) and perform the following 2 procedures: - a. Transfer 2 ml of the culture liquid to a fresh screw cap tube (or Pfennig bottle) of modular hyphomicrobium medium and incubate at 30°C. Incubate for several days. (This is a secondary enrichment.)
- b. Check for Nitrogen bubbles, as described previously, and then isolation streak a plate of modular hyphomicrobium solid medium, without methanol. Incubate in a closed jar containing an open tube of methanol. Incubate at 30°C.
-
Isolation:
After 3 days or so, examine the streaked plates using a dissection microscope or magnifying glass. Look for tiny, glassy (hyaline) colonies, possibly volcano shaped). - Photograph the colones.
-
Identification:
Select a few colonies and streak for isolation additional modular hyphomicrobium medium solid medium plates, until you have pure colony isolates. (Other organisms can overgrow the hyphomicorbia and mix in so that it is difficult to separate them in the streak plates.) Hyphomicrobia tend to attach to other bacteria. Reduce the chance of contamination by transferring newly arising colonies as soon as you see them. Finally, when you feel confident you have a pure isolate of hyphomicrobia, perform an isolation streak on nutrient agar. If anything grows, you do not have a pure colony of methylotrophic hyphomicrobia, as this organism can not grow on nutrient agar. - Once you believe you have pure isolates, begin to examine the cellular morphology, structure, and metabolism of your isolates as described in LAB 5.
Azotobacteria
Use Azotobacteria Medium
Azotobacteria, important nitrogen cycling bacteria, are able to aerobically use N2 as their source of Nitrogen without a symbiotic partner. They use mannitol as their sole carbon source. They are generally Gram-negative, large rods, or ovoid cells.
-
Enrichment:
Measure 0.5 g of soil (collected in LAB 2) into 25 ml of liquid NFM medium. (This is already aliquoted for you in small flasks with cotton plugs or a loose cover.) - Mix well
- Place the flask in your closed bench cabinet so the culture will incubate in the dark at RT.
-
Secondary enrichment:
Take a loopful of the slime and place it in 1 ml of sterile water in a small tube. Cap the small tube and place the capped tube into an empty 16 mm tube. - Vortex the tube to disperse the sample. (Vortexing in this way helps break up the other microbes that will be embedded in the slimy material. The other microbes are taking advantage of the by-products of Nitrogen compounds excreted by the N2 fixers. )
- Isolation streak a sample of the diluted, vortexed slime suspension following the protocol in Streaking for Isolation onto NFM agar medium.
- Incubate at room temp or at 30 °C.
-
Isolation:
Watch for the appearance of isolated, slimy colonies. -
Continue to isolation streak until you think you have pure isolates.
To test for purity from contaminants: The contaminants should be detectable on nutrient agar, so streak from an isolated colony onto nutrient agar. If more than one type of colony appears Gram stain them (because the Azotobacters may not appear slimy on nutrient agar) then restreak the colony with the correct morphology onto NFM medium. -
Identification:
Once you have pure isolates, begin to examine the cellular morphology, structure, and metabolism of your isolates as described in LAB 5.
Lactic acid bacteria:
Use could probably successfully use any enriched medium. We will use Nutrient Agar (not the dilute version).
The products of sugar fermentation are often used in classical culturable microbiology as one step in the identification process. Among these sugar fermenting organisms there are some bacteria that produce only lactic acid as the product of sugar catabolism.
- We will not have to use selective or enrichment media that is specific for this group as they grow well on nutrient agar. Steak your soil extract onto nutient agar and it is likely that you will isolate some of these bacteria from this medium or from other media.
- The characterization of this group is based on colony morphology, cell morphology, biochemical screening tests, and information in The PROKARYOTES or Bergey's Manual.
Any organisms that tests positive in the OxFERM test may belong to this group and should also be tested on other available carbohydrate media for differentiation.
- Select colonies that you isolate from your nutrient agar streak plate (or dilution plates). A combination of your Gram Stain data and OX-Fem test will indicate if these are aerotolerant microbes that ferment glucose to produce lactic acid under anaerobic conditions.
Enrichment media and Isolation protocols (Starting with SOIL EXTRACT)
The following enrichment protocols start with SOIL EXTRACT:
Bioluminescent Bacteria
Use modified enrichment media (MBLB)
Are there light emitting bacteria from the genera Vibrio and Photobacterium in greenhouse soils? These light emitting genera are commonly isolated from marine environments and from the GI tracts of marine animals (Marine Biological Labs, Woods Hole, MA). We will attempt to enrich and isolate bioluminescent soil bacteria using a modified version of Sea Water Complete media. If you are succesful, you must view the pure colony isolates in the dark to see their light producing capability.
-
Enrichment:
Soak a sterile cotton swab in the SOIL EXTRACT (Collected in LAB 2). - Swab section 1 of a labeled isolation streak plate of MBLB solid medium as described in Streaking for Isolation .
- Follow the steps for Streaking for Isolation using a flame sterilized inoculating loop.
- Allow the sample in section 1 to absorb into the agar before you,
-
invert, and incubate the dish at RT.
Check your plate for the presence of light emitting bacteria 18-36 hours. (Examine it in the dark: a good place to do this is the darkroom adjacent to E301, the genetics and molecular biology lab.) It is important not to incubate too long before checking for bioluminescence, as overgrowth by motile spreading bacteria will rapidly engulf and inhibit the light emitters. - If you see luminescent colonies, while you are still in the dark, use a Sharpie to mark the position of these colonies on the bottom of the plastic plate. If possible, also note the relative luminescent intensity of the different light emitting colonies.
- Back in the lab, select obviously different colony morphologies from among those marked as luminescence.
-
Isolation:
Isolation streak these colonies onto new MBLM plates (one colony/plate) using aseptic streaking for isolation technique. - Incubate for another 18-36 hours.
-
Identification:
Continue to check for luminescence as you sub-culture until pure-culture isolates are obtained. - Once you have pure isolates, examine the cellular morphology, structure, and metabolism of your isolates as described in LAB 5.
Gliding Bacteria
Use Cytophagia medium
The gliding bacteria belong to a large group of Gram-negative bacteria that are strictly aerobic or facultatively anaerobic. This group includes Flavobacterium and Bacteroides species as well as the unicellular Cytophaga that we will enrich for with this protocol.
Cytophaga are commonly found in terrestrial and marine environments and are very important in biomass turnover because they can degrade complex organic macromolecules such as cellulose, chitin, agar, and proteins. Most of their colonies are brightly colored yellow, orange, or red because they produce carotenoids. One difference observed between most terrestrial and freshwater habitat strains compared to marine stains is a flexirubin-type pigment in the terrestrial and freshwater strains.
Low nutrient, solid medium is used in isolating these organisms because it promotes the rapid spreading growth of these organisms while delaying the growth of other bacteria and eukaryotes. Cycloheximide is added to inhibit fungi and other eukaryote growth.
-
Enrichment:
Soak a sterile cotton swab in the SOIL EXTRACT (Collected in LAB 2). - Label a plate of Cyclophagia agar
-
Using a flame sterilized inoculating loop, streak 3 fine lines of the Soil Extract across the plate as illustrated below:

Incubate the plate at room temperature. - Examine the plates every few days. Use a dissecting scope or a strong magnifying glass to detect the development of colored colonies that appear to be gliding out of the steaks and across the agar plate. To avoid selecting other types of motile bacteria, look for a pattern of fine flamelike projections at the edge of the swarm. Most flagellate colonies have an edge that is entire or coarsely lobed.
- Make a wet mount from the colored or spreading colones or prepare a hanging drop slide for viewing with your brightfield microscope. Look for rod shaped bacteria with tapering or rounded ends.
-
Isolation:
Purify the strains you suspect are Cytophaga by transfering material from the edge of a pigmented, swarming colony to 2 ml of FW medium in a small tube and vortex to separate the cells. - Then follow Streaking for Isolation on FW LTY Agar plates
- continue sub-culturing until you have pure isolates.
-
Identification:
Once you have pure isolates, examine the cellular morphology, structure, and metabolism of your isolates as described in LAB 5. - Check for the presence of flexirubin-type pigments by using a sterile toothpick to pick up an isolated colony. Place the growth on a glass slide. Add a drop of 10% KOH solution to the colony. If flexirubin-type pigments are present, yellow or orange colonies should turn a deeper color such as deep red, purple or brown.
- Take pictures.
- Genomic 16srRNA gene sequencing is needed to identify these bacteria.
Enrichment media and Isolation protocols (Starting from a Colony from your Standard Plate Count, or a colony from the initial inoculation on general purpose media: NA, or diluteNA )
The following enrichment protocols start with a colony from general purpose media:
Aerobic spore forming bacteria enrichment media
The genus Bacillus, a member of the Firmicutes is one genus in a large group of Gram positive organisms. It is known for the ability of the vegetative cell to produce a metabolically inactive state (a spore). It is likely you will find several subgroups of Bacillus growing on many if not all of the media we use. Once you are familiar with the colony morphology of Bacillus you will recognize likely candidates on your plates and will be able to compare and contrast its presence and abundance in each medium. You may use any medium as the source for colonies of Bacillus but we suggest you check the isolation steak colonies from the 10-3 nutrient agar serial dilution pour plate after 12, 24, and 36 hours.
-
Enrichment:
Follow the instructions for Serial Dilution of the Soil Extract (lab 2) onto nutrient agar. - After incubating the plates for 24, 36, etc. hours examine the 10-3 and/or 10-4 plates until you see likely candidates of Bacillus colonies based on the colony description and Gram or Spore stains.
-
Isolation:
Repeat isolation streaking on same medium using the inoculating loop until you have pure colony isolates. - Bacillus spp are often able to spread across the surface of the agar, so isolation is sometimes difficult. Shorten the incubation time so you can find the colonies when they are still small.
-
Identification:
Once you believe you have pure isolates, begin to examine the cellular morphology, structure, and metabolism of your isolates as described in lab 5.
Enrichment media and Isolation protocol (Starting with plant leaves)
The following enrichment protocol starts with Plant leaves:
Aerobic Methanol Oxidizing Bacteria:
Use Methanol Oxidizer medium
The organisms in this group are able to use C1 carbon compounds for their energy and carbon requirements. There are specific and specialized metabolic pathways associated with this ability. There are a few distinct subgroups of methylotrophs within the proteobacteria and firmicutes. We are interested in those subgroups that are capable of using methanol. We will attempt to select for these. Methanol users play an important role in methane cycling. One genus, Methylobacterium, is a common epiphyte on plants. In culture it produces pink-pigmented colonies. We will attempt to isolate this genus directly from leaves.
-
Enrichment:
Collect a few living leaves from inconspicuous areas of the local vegetation in your sampling area. Record the location and types of plants. Remover the waxy cuticle of the leaves with fine sandpaper. - Press small leaf pieces onto the surface of of a labeled plate of modular Methanol Oxidizer medium.
- Remove the leaf and invert, and incubate the plate.
- Check your plate for the presence of pink-pigmented colonies forming on the area of the agar where the leaves were imprinted, particularly on the leaf vein areas.
- Observe plates for up to 2 weeks
- Transfer colonies as you find them to fresh plate of methanol oxidizer medium. Photograph the colonies.
-
Isolation:
To isolate a methylotroph, select a few promising colonies and streak additional Methanol Oxidizer solid medium plates, sub-culturing until you have pure colony isolates. -
Identification:
When you have pure isolates, begin to examine the cellular morphology, structure, and metabolism of your isolates as described in LAB 5.
Media Recipies
Nutrient Agar:
Beef extract 3.0g/L, Peptone 5.0g/L, Agar 15.0g/L; Deionized water to 1 L at pH 6.6- 7.0 at 25°C. This medium is commercially available.
Nutrient Broth: A general purpose liquid medium.
Beef extract 3.0g/L, Peptone 5.0g/L. Commercially available and identical to Nutrient agar without the 15.0 g of solidifying Agar.Dilute nutrient agar:A general purpose liquid growth medium designed to inhibit the growth of fungi present in the sample.
0.08 g/l nutrient broth (purchased as a dehydrated powder), 15g/l agar. We will use the commercially available Nutrient Agar in a more dilute form.
Dilute nutrient Broth: A general purpose liquid growth medium designed to inhibit the growth of fungi present in the sample.
0.08 g/l nutrient broth (purchased as a dehydrated powder), 15g/l agar. We will use the commercially available Nutrient Broth in a more dilute form.
Modified Bioluminescent Bacteria enrichment media (MBLB)
- bacto tryptone 5 g, yeast extract 1g, glycerol 3 ml, 1 liter water, agar 15 g pH 7.0.
Actinomycetes enrichment media options
-
Arginine-Glycerol-Salt Agar medium (AGS) enriches for Actinomycetes, possibly favoring Streptomycetes sp. (from El-Nakeeb, M. and H. Lechevalier. 1963. Selective Isolation of Aerobic Actinomycetes. Applied Microbiology Vol 11. 75-77.)
- Arginine monohydrochloride 1.0 g; glycerol (sp gr not less than 1.249 at 25 C) 12.50 g; K2HPO4, 1.0 g; NaCl, 1.0 g; MgSO4-7H20, 0.5 g; Fe2(S04)3.6H20, 0.010 g; CuSO4 *5H20, 0.001 g; ZnSO4 - 7H20, 0.001 g; MnSO4-H20, 0.001 g; and agar, 15.0 (pH 6.9 to 7.1) bring to 1 liter with distilled water.
- (modified) AGS version from Marine Biological Labs:
- 100X FWB 10 ml; 1 M MOPS, pH 7.2 20 ml; Arginine monohydrochloride 1 g; Glycerol 12.5 ml; trace elements solution 1 ml, 1 M Na2SO4 0.2 ml; 150 mM potassium phosphate pH 7.2 1 ml; Agar 15 g. bring up to liter with distilled water. Autoclave then add: 0.1 ml multivitamin mix; 0.1 ml B12 solution; 1 ml 50 mg/ml cyclohexamide: (to inhibit fungal growth)
- Glycerol Yeast Extract Agar (general enrichment medium for Actinomycetes)
- Glycerol 5.0 ml, Yeast Extract 2.0g/L, Dipotassium phosphate 1.0g/L, Agar 15.0 g/L, deionized water to 1 Liter.
Nitrifying Enrichment medium(adapted from Lewis and Pramer, 1958)
- Na2HP04, 13.5 g; KH2P04, 0.7 g; MgSO4 7 H20, 0.1 g; NaHCO3, 0.5 g; (NH4)2S04, 2.5 g; FeCl3.6H02, 14.4 mg; CaCl2-2H20, 18.4 mg; distilled water, 1000 ml.pH 8.0
- The (NH4)2S04 was sterilized separately and added aseptically.
- For solid medium add agar 15 g before autoclaving. Add the separate (NH4)2S04 just prior to pouring plates.
- 100x FWB (fresh water base) 10 ml; 0.5 M NH4Cl 10 ml; 150 mM K phosphate solution 10 ml; 1 M sodium sulfate 1 ml; 1 M MOPS Buffer pH 7.2, 5 ml; Trace elements 1 ml; Vitamin solution 10 ml; washed agar 15g; milliQ-water add to 1 liter total vol. autoclave
- After cooling add: multivitamin solution 0.1 ml; cycloheximide (final conc 25 ug/ml) 0.5 ml of 5 mg/ml stock; methanol 2 ml (0.2% v/v).
Hyphomicrobium medium (MHM) (MBL recipe)
- 100X FWB (fresh water base) 10.0 ml; 1 M MOPS, pH 7.2 20.0 ml; Trace element solution 1.0 ml; 1 M Na2SO4 0.2ml; 150 mM Potassium phosphate (pH 7.2) 1.0 ml; 0.5 M NH4Cl 10 ml; KNO3 5.0 g; Bring to 1 liter with deionized water. pH 7. Autoclave then add: 2.5 ml FRESH methanol (oxidized methanol becomes toxic formaldehyde over time). vitamin mix 10 ml . Dispense into sterile Pfennig bottles or full screw cap tubes?.
- For solid medium add agar 15 g before autoclaving.
- Maintenance medium (we may not use this): PyCM agar (0.25% peptone, 0.05% yeast extract, 1 mM CaCl2, 2 mM MgSO4, 1% agar)
Myxobacteria Enrichment (MBL)
-
Enriched isolation Medium (TMXCV)
- 1 M Tris pH8 (final conc 25 mM) 25 ml; MgSO4-7H2O (final conc. 5 mM) 1.23 g; crystal violet 0.1 g (final conc. 0.1% w/v); 1.5% Bacto agar 15 g; Autoclave
- add to sterilized medium while still molten: cycloheximide 0.5 ml (final conc 25 ug/ml)
- ADD sterilized (autoclaved) rabbit dung (100 pellets)
- When pouring plates, aseptically place 4 sterile dung pellets in an empty petri dish. Pour the prepared TMXCV agar until the dung pellets (order from: Carolina 156382) are half immersed and allow it to solidfy.
Myxobacteria Isolation Medium (CTPM)
- Bacto Casitone (BBL-Difco: BD 225930) (final conc 1%) 10g; 1 M Tris ph 8 (final conc 25 mM) 25 ml; MgSO4-7H2O (final conc. 5 mM) 1.23 g; 150 mM KPhos stock solution (1.5 mM final) 10 ml; 1.5 %Bacto Agar 15 g. Fill to 1 liter with deionized water.
- Use CTPM without the casitone.
Gliding Bacteria enrichment
-
Cytophagia Media
Cytophagia Media for Gliding bacteria
l/L :
0.5g tryptone T
0.5g yeast extract
0.2g beef extract
0.2g sodium acetate trihydrate (Sigma)
pH 7.2 after adjustment
Agar with 9.0g/L agar
Freshwater LTY Agar (FW LTY)
100 mg/L Tryptone (Difco); 100 mg/L Yeast Extract (Difco); 15g/L BactoAgar; Set to 1 liter in artificial freshwater base; pH 7.2. Autoclave, cool to 60°C, add 50 ug/ml cycloheximide (final conc). Pour into plates
Azotobacteria enrichment medium
- Azotobacter N-Free Media (1 L)
Solution A K2HPO4 : 1.6 g KH2PO4: 0.4 g
Add distilled water to make 0.5 L
Solution B MgSO4: 0.4 g CaSO4: 0.2 g FeSO4/7H2O: 0.006 g MoO3: 0.002 g sucrose: 10 g
Add distilled water to make 0.5 L
Aseptically combine 1A:1B after autoclaving; for plate version, add 15 g agar to solution B prior to autoclaving. After autoclaving, media will contain some solid material that should be swirled prior to pouring plates
-
- 100X Freshwater base (FWB) 10 ml; 1 M MOPS pH 7.2 20 ml; Trace elements solution 1 ml; 1 M Na2SO4 0.2 ml; 150 mM Potassium phosphate pH 7.2) 1.0 ml; Sodium molybdate 50 mg; Sodium vanadate 50 mg; ddH2O up to 1000 ml. Dispense into small bottles (25 ml per bottle. Autoclave then add: 0.25 ml multivitamin mix/ 0.1 ml Benzoate (stock solution: 0.347 M (final concentrationin 25 ml is 13.88 mM)
- Add 15 g/liter agar to NFM medium
- (OR alternativey from Boomer, Sarah 2006: Prepare solution A: K2HPO4 1.6 g; KH2PO4 0.4 g; add to 500 ml distilled water. Solution B: MgSO4 0.4 g; CaSO4 0.2g; FeSO4-7H2O 0.0006g; MoO3 0.002g; Sucrose 10.0 g; add distilled water to 500 ml. Combien A and B after autoclaving each. Add 15 g agar to solution B prior to autoclaving for solid media. Media will contain some soid media after autoclaving, swirl to mix prior to pouring plates.)
-
(source: Scott, Christina, C.L., and W.R. Finnerty. 1975. A comparative Analysis of the Ultrastructure of Hydrocarbon-oxidizing Micro-organisms. J. of GEn. Micro. 94, 342-350.)
- 2g (NH4)2SO4, 4g KH2PO4, 4g Na2HPO4 0.2g MgSo47H2, 0.001gCaCl2, 0.001g FeSO47H2O, pH 7.8.
- Supplement this medium with the desired hydrocarbons. e.g. 0.5% (v/v) hexadecane for Acinetobacter sp., 1%(v/v) hexadecane Arthrobacter sp, or Corynebacterium.
Cellulitic enrichment-
Oatmeal agar: (to enrich for Streptomycetes)
Oatmeal extract: 20g oatmeal (from grocery store) 1 liter distilled water. Autoclave 30min (put flask in a tray with with couple inches water), strain through cheesecloth. Place 250 mls of extract into 500 ml flasks and reautoclave and store RT until needed: Use 500 ml oatmeal extract and 500 ml distilled water, add 15 g agar. Autoclave and cool. Add 10 cycloheximide (to inhibit fungi) if desired, swirl to mix gently. makes 65 or so 15 ml plates.
-
Emerson agar: (to enrich for Streptomycetes)
yeast extract, 1.0 g; beef extract, 4.0 g; Bacto-peptone, 4.0 g; NaCI, 2.5 g; cerelose, 10 g; agar 20 g. (add Cycloheximide)
-
STOCK: Cycloheximide solution (1000 ug/ml in 70% ethanol).
cycloheximide inhibits the growth of eukaryotic cells (e.g. fungi). It inhibits protein biosynthesis by interfering with peptidyl transferase activity of the 60S ribosome, preventing protein elongation. Use caution when working with cycloheximide.-
Add 74ml 95% ethanol and 26 ml sterile distilled water to a Sterile 250 ml flask. Add 1gram cycloheximide powder. Store at 4 degrees. Dilute to 50mg/ml stock as needed.
Unless otherwise noted add 1 ml of 50 mg/ml stock to 1 liter of medium = 50ug/ml final concentration in medium.
1x PBS:
8 g/l NaCl, 0.2 g/l KCl, 1.43 g/l Na2HPO4, 0.24 g/l KH2PO4
Pourite: An antifoaming agent used to prevent bubbles in agar containing media that is not commercially available This agent helps reduce foaming and bubbles when pouring agar plates. On drop for volumes up to 800 ml and 2 drops up to 1 liter. Purchase this from American Scientific Products.
Freshwater broth medium (FWB) peptone, 5 g; yeast extract, 1 g; FeP04.4H20,O.Ol; NaC1, 5 g; and distilled water, 1,OOO ml (pH 7.6).
Additional misc test reagent media
Luria Bertoni Broth
- Add the following to 800ml H2O; Bacto-tryptone 10 g; yeast extract 5 g; NaCl 10 g. Adjust pH to 7.5 with NaOH. Adjust volume to 1L with dH2O. Sterilize by autoclaving.
Sulfur Reduction/Indole Production/Motility media (SIM)
- Approximate Formula* Per Liter Pancreatic Digest of Casein 20.0 g; Peptic Digest of Animal Tissue 6.1 g; Ferrous Ammonium Sulfate 0.2 g; Sodium Thiosulfate 0.2 g; Agar 3.5 g. reference: MacFaddin. 1985. Media for isolation-cultivation-identification-maintenance of medical bacteria,
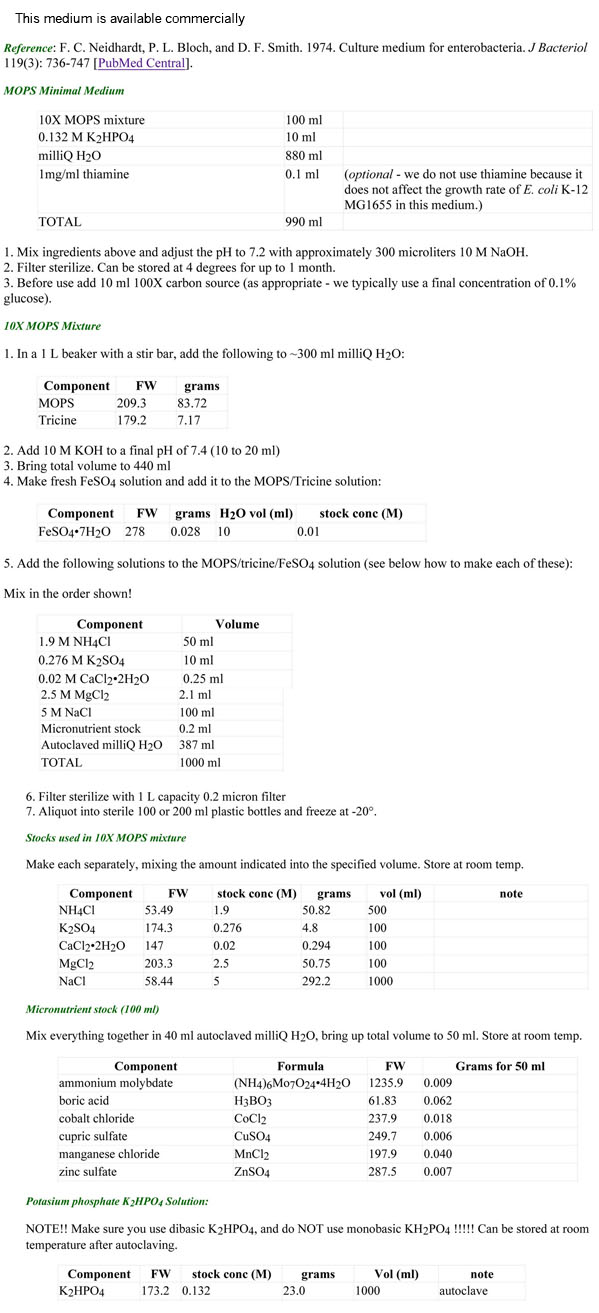
MOPS recipe
Links to Labs
Lab 1
Lab 2
Lab 3
Lab 4
Lab 5
Lab 6
Lab 7
Lab 8
Lab 9
Lab 10
Lab11
Lab 12
-
Add 74ml 95% ethanol and 26 ml sterile distilled water to a Sterile 250 ml flask. Add 1gram cycloheximide powder. Store at 4 degrees. Dilute to 50mg/ml stock as needed.


