BISC209/S13: Microscopy
MICROSCOPY: Care and Use of the Compound Brightfield Microscope
The compound light microscope can magnify to about 1000 times the actual size of the specimen and can resolve details as fine as 0.2µm.
A. CARE OF THE MICROSCOPES
A compound microscope is available for each student's use. Remember at all times that your microscope is a precision optical instrument and must be handled carefully. When removing the microscope from its storage cabinet, do not jar or drop it, always carry it upright with one hand below the base and the other hand on the arm of the microscope. Place the microscope at least 6 inches from the edge of the bench. When returning the microscope to storage, check that:
1. the microscope light is turned off before the microscope is unplugged;
2. all lenses have been cleaned with lens paper, especially the oil immersion lens;
3. the lowest objective lens is near the stage and the stage itself is lowered; and
4. the microscope is covered (if there is a cover available).
B. PARTS OF THE MICROSCOPES
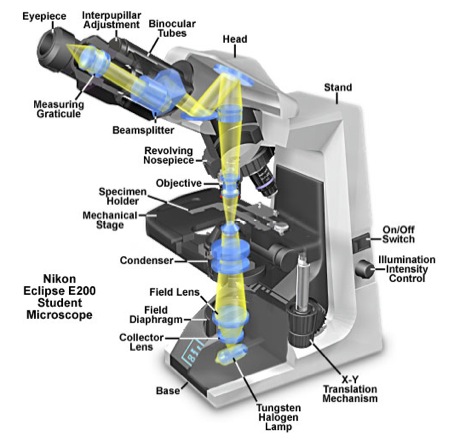
Figure 1 contains a diagram of a compound microscope and may help you locate some of the parts referred to in the following explanation. The compound microscope derives its name from the two sets of lenses it uses to magnify objects. These lenses are the objective lens, which can be found on the rotating nosepiece near the stage of the microscope, and the ocular lens, which is in the eyepiece. Your microscopes are equipped with several objective lenses, ranging from low to high magnification, including one oil immersion lens. The microscope magnifies by shining light from the light source through the iris diaphragm that limits the diameter of the light beam. The condenser lens focuses the light through the specimen that is on the stage. The stage is movable in order to view different parts of the specimen. The image we see is formed under the ocular lens by the objective lens and is a mirror image of the actual specimen.
C. REGULATION OF ILLUMINATION
1. The illumination intensity can be adjusted with a slider or with a knob.
2. Another way of adjusting illumination is by changing the position of the condenser lens. The condenser lens adjustment knob is located below the specimen stage and on the left side. It allows the user to move the condenser lens assembly up or down. As you move the condenser lens up, closer to the specimen, it concentrates (condenses) more light on your specimen. You will need to make this adjustment as you go up in magnification, so that you will have sufficient illumination.
3. The condenser aperture diaphragm is located below the specimen stage on the condenser lens assembly. It is an adjustable opening, which allows you to make fine adjustments in illumination. The lever, which adjusts the size of the aperture, faces the user. By sliding the lever to the left or right, you may adjust the illumination to the correct level for your specimen. Changing the size of this aperture also affects the amount of contrast in the image. Thus, adjusting the condenser aperture involves finding the brightness level, which gives you the best combination of illumination and contrast. This is the method used most often in adjusting illumination in the light microscope.
4. Another method of adjusting illumination is by using the field aperture diaphragm,which allows the user to obtain illumination that is uniformly bright and free from glare (Köhler illumination).
D. HOW TO LOCATE SPECIMENS USING A COMPOUND LIGHT MICROSCOPE
1. Place specimen slide on microscope stage and secure with clamping arm.
2. Use the 10x objective lens to find the specimen and focus it using first the coarse and then the fine adjustment knobs.
3. We will NOT use the 40x objective (high dry) because of the risk of getting immersion oil on that lens. Since bacteria are so small you should go directly to oil after focusing in low power by rotating the 10x objective away from the slide, putting a drop of oil on the center of the field of view, and then rotating the nosepiece so that the 100X objective lens comes in contact with the oil. Focus using the fine adjustment knob ONLY.
4. Never use the course adjustment when focusing a specimen with the oil objective because doing so could result in damage to the 100X objective lens or to the slide. All traces of oil must be removed from the lens before putting away the microscope. Only lens paper should be used to remove oil from the 100X objective.
E. CALCULATION OF TOTAL MAGNIFICATION
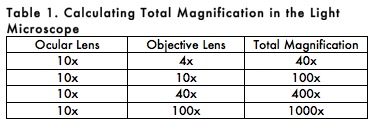
Total magnification of the specimen is determined by multiplying the magnifying power of the ocular and objective lenses. For example, a 10X ocular and a 100X objective together give a total magnification of 1,000X (Table 1). This means that the specimen appears 1000 times larger when viewed with a microscope than its actual size.
F. MEASUREMENT OF SIZE
Cell size can be measured using an ocular micrometer. A micrometer is sometimes found in one of the ocular lenses of each microscope. It looks like a small ruler with both large and small units. The large units are numbered 1, 2, 3, etc. The small units are subdivisions of the large units and are not numbered. There are 10 small units per large unit. The small units represent different lengths depending on the objective lens in use. You measure cellular structures in small units only, and then convert to metric units (µm = micrometers) using the conversion values below.
Therefore, if you are observing a cell with the 100X objective, and this cell spans 2.5 small units on the ocular micrometer scale, then the size of the cell is calculated by multiplying 2.5 small units x 1µm/small unit = 2.5µm.
Figure 1. A Cutaway Diagram showing the beam path of the Nikon Eclipse E200 Compound Light Microscope. [SOURCE: http://micro.magnet.fsu.edu/primer/anatomy/nikone200cutaway.html]


