BME100 s2018:Group2 W1030 L6
| Home People Lab Write-Up 1 | Lab Write-Up 2 | Lab Write-Up 3 Lab Write-Up 4 | Lab Write-Up 5 | Lab Write-Up 6 Course Logistics For Instructors Photos Wiki Editing Help | ||||
OUR COMPANY
LAB 6 WRITE-UPBayesian StatisticsOverview of the Original Diagnosis System
Calculations 1 and 2 imply that the reliability of the individual PCR replicates for concluding correctly the presence of the SNP is not as high as it should be. For example, the positive test results were around 50% conclusive, and the negative results were around 75% conclusive. Equations 3 and 4 imply that the reliability of PCR for predicting the development of the disease (diagnosis) is close to 1.00 (100%). There are multiple sources of human and mechanical error that could have impacted the Bayes results in a negative way. Primarily, contamination was a very large error possibility. PCR is highly susceptible to contamination and it is very likely that at one point the samples were contaminated. Secondly, errors in data analysis and data interpretation to conclude positive or negative could be at fault for some error. A possible third error could come from faulty photos. The stand was not optimal and the cameras were not the same for all groups. This could cause one group to have significantly better photos--and therefore analysis--as compared to another group. An unlikely error could also be a false diagnosis by the doctor. Intro to Computer-Aided Design3D Modeling Our Design
Feature 1: ConsumablesThe consumables provided in our kit will be as follows:
A limited amount of PCR mix will be provided so that initial reactions can take place (this can be discarded if the lab has their own)
A primer solution will be provided with the lab however this can also be discarded if the lab is using different or special primers
The Magnesium buffer will be provided in order to help increase the function of Taq polymerase
The glass slides provided are for use in the fluorimeter during the imaging stage
Feature 2: Hardware - PCR Machine & FluorimeterOur group did not alter the Open PCR machine, and solely focused on the fluorimeter design. Our system will provide an Open PCR machine in the package but it will be unaltered. Strength And Weakness of Fluorimeter System: Strength: The users are able to use the camera on the smartphones to take a picture of the sample. The setup was very simple and allowed for quick photos to be taken and the lab to be completed quickly. The box was movable so there was easy access to the slides and the camera. Weakness: The camera stand was very difficult to keep in place. Users constantly have to adjust the height and placement of the stand during the experiment resulting in different distances between the sample and the camera for every picture. Also, the lid did not close completely and in the end allowed some light to get into the box. On top of this, the who box had to be moved for access in the photo area. This was not a huge issue because once it was removed there was a large amount of space to work with, but then after you used set up the new sample, the group had to move the box back to the initial position to cover the sample and allow the next picture to be taken.
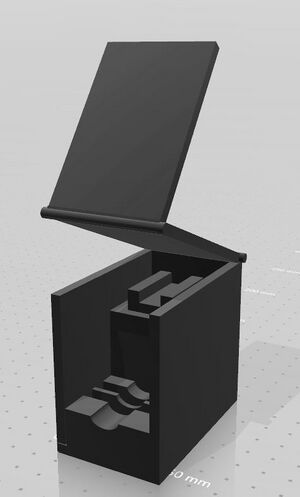
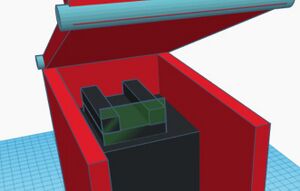
One of the major weaknesses in the Fluorimeter is that the camera stand had to be readjusted multiple times with different sized plastic boxes during the experiment. To ensure the stability of the camera stand, our design will have an improved camera stand that will allow the users to modify the distance easily and can adjust the size of the camera holder for any smartphone. This provides the camera with a stable platform that is greater than the minimum recommended distance between the sample and camera to insure quality photos. The lid in the current fluorimeter system doesn't close completely. Our design will have a lid with hinges that allow the users to close the lid easily before the picture can be taken. Therefore, no light can enter the box as the phone is being prepared to take a photo. On top of this, the lid opens up the top as well for easy access to the sample that is being photographed. Additionally, our group's design will have new hardware included--transparent filters with different colors (red, blue and green). The quality of the picture would be better so the users of our device won't have to take extra steps in ImageJ to analyze the images they took on their smartphones.
| ||||


