BISC209/S12: Lab7
LAB 7: Examples of Co-operation and Competition in a Soil Community: Bacterial Interactions, Functional Roles in the Nitrogen Cycle
Confirmation of Gram stain results by Selective/Differential Media:
Did each of your isolates grow on PEA or EMB? What does that result mean about the isolate's cell wall composition? Do your Gram stain findings and PEA and EMB data agree? If not, what ideas can you generate to explain discrepancies?
Complete the Motility & MNM Tests & Analyze the Results
Mannitol Nitrate Motility Medium
1% Casein Peptone, 0.75% Mannitol, 0.1% Potassium Nitrate, 0.004% Phenol Red, 0.35% Bacteriological Agar. pH 7.6 at 25°C
MOTILITY
Look for radiating growth around the stab line of inoculation of each isolate in each of your soft agar deeps. Motility detection is possible due to the semisolid nature (low concentration of agar) of these soft agar deeps. Growth radiating out from the central stab inoculation line indicates that the test organism is motile. First hold an E. coli positive control tube up to the light to see an example of radiating growth. Growth appears cloudier than the medium. Compare your positive control to an uninoculated tube and to a negative control culture of a non-motile organism. Non-motile bacteria exhibit growth in a tighter, defined line limited to where the organism was inoculated. In contrast, motile organisms exhibit detectable growth radiating away from the stab inoculation line towards the periphery. Strictly aerobic organisms may show more growth radiating down from the surface of the medium compared to the growth deep in the tube. Consult with your instructor if you are having a hard time deciding whether or not your isolates are motile. Why might it be useful for some soil community members to be motile?
If you have time, you can try to confirm a positive preliminary motility test by doing a hanging drop motility wet mount or a flagella stain. See the Protocols section in the wiki on Motility Tests for directions on performing confirmation tests.
TEST for MANNITOL as a useable carbon source
What functional advantage would bacteria have if they are able to use mannitol as a carbon source? Would having only some soil community members possess this functional capacity be advantageous to the soil community as a whole? How so? Remember that all metabolic processes are "expensive" in terms of energy and raw materials used. Does this testing give us direct rather than theoretical evidence of a community where members have different metabolic capabilities that contribute to the success of the community? Did the assessment we did previously of community carbon source utilization patterns and diversity provide additional evidence for functional metabolic diversity? Do you understand why we did these tests as part of this investigation?
The ability of an isolate to ferment mannitol as a carbon source can be assessed as a color change from red to yellow when the isolate is grown in NMN medium. The NMN medium has a pH indicator that recognizes the acidic byproducts of fermentation and show this as a color change. If this test is positive in an isolate that you originally selected on Azotobacter medium, does that mean that the isolate is more or less likely to be in the Azotobacter group of nitrogen fixing bacteria?
Note that motility and ability to use mannitol as a carbon source should be evaluated before you add the indicator reagent to the tubes to test for nitrate reduction to nitrite as described below.
Test for reduction of NITRATE TO NITRITE
Develop the nitrate to nitrite test in the NMN tube by adding Gries reagent (2 drops of solution A, and then 2 drops of the solution B) to the surface of the medium. Nitrite-positive: The appearance of a pink or red coloration indicates that the nitrates in the medium have been reduced to nitrites. Be careful about interpreting negative reactions as evidence that the organism does not contribute to the nitrogen cycle. We already know that some of these bacteria perform at least one specific role in this crucial cycle. How? Hint: Think about the selective media you used to enrich for nitrogen fixers and ammonium users. Those media provided highly limited nitrogen sources. We have less information about nitrogen cycle contribution for your isolates that weren't selected on Azotobacter medium or Simmons citrate. We aren't testing for all possible roles they might contribute to this cycle. The Gries reagent test on those bacteria grown in MNM may give us evidence of one possible role they play, however, it is possible for bacteria that reduce nitrate to nitrite to give a negative Gries test because the nitrite produced from reduction of nitrate has been further processed and is gone by the time you do your testing. A positive test is meaningful but a negative test may not necessarily be evidence of incapability to reduce nitrate. No color change: Either the organism was unable to reduce the nitrate in the medium to nitrite or the nitrite was reduced to ammonia.
Gries reagent consists of solutions:
Solution A
Sulfanilic Acid 0.8% (v/v) in Acetic Acid 5N
Solution B
Alpha-Naphthylamine (0.001% v/v)
in Acetic Acid 5N
Control Organisms:
| Organism | ATCC | Motility | Mannitol as C source | Nitrate to Nitrite |
|---|---|---|---|---|
| Escherichia coli | 25922 | + | + | + |
| Klebsiella pneumoniae | 13883 | - | + | + |
| Proteus mirabilis | 25933 | + | - | + |
| Acinobacter anitrartum | 17924 | - | - | - |
Testing for Examples of Co-operation and Competition Among your Cultured Isolates
Complete Antibiotic Production & Sensitivity Testing
Week 3
- Examine the plates and look for evidence of a zone of inhibition (no growth or reduced growth) of any of the "control" organisms in an area near the putative antibiotic producer's colonial growth. Evidence of antibiotic production should appear as a measurable zone of inhibition (section of a circle of no growth or reduced growth compared to the growth see on the control plate). The size of the zone of inhibition is indicative of the diffusion potential of the antibiotic and/or an indication of how sensitive the test organism is to the secreted inhibitor. Compare your results to other tested isolates in your lab section. Think about why an antibiotic might work differently on a Gram positive vs. a Gram negative organism or between two bacteria that are both Gram positive or Gram negative.
- Take photos of any plates that show evidence of the presence of antibiotic producers in your soil community. If you found that your isolates did not appear to cause measurable inhibition of growth, does that mean that your isolate does not secrete any antimicrobial compounds? Explain?
Antagonistic and Mutualistic Interactions
*NOTE: You must remember to set up fresh nutrient broth cultures for your isolates 1-3 days before lab to do this test!
The microbial community living in soil is a complex one with many different microorganisms. As is true of any environment, these microbes interact with each other - both functionally and physically. Do selected bacteria from your community help each other or harm each other while trying to find a niche in your soil community? Today, you will try to answer that question by testing your cultured isolates for examples of mutualism or antagonism (co-operation or competition)by culturing them in controlled communities. Some of these bacteria may prevent the growth of others through the production of chemical inhibitors; others might promote the growth of their neighbors by producing metabolites that are needed. We are going to look for both positive and negative interactions.
PREPARING THE ISOLATES:
You will inoculate 50 µl of log phase (young culture) isolate grown in fresh nutrient broth into the assigned well(s). Once again try to control for similar numbers of organisms in your inoculum using the 0.5 McFarland standard, diluting the culture or adding more organisms as needed.
Interaction Assay Set Up
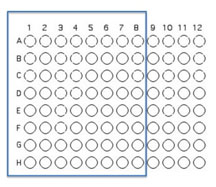
You will use 64 of the wells on a 96 well plate for this assay. Each pair will use 8 unique isolates (4 from each student) to test for interactions. Use the Excel template provided Media:template.xls to record the identifying codes of the organisms that will be inoculated into each well as described and illustrated below.
FOLLOW THE TEMPLATE CAREFULLY!!!!!! It is easy to get this inoculation messed up, but don't!
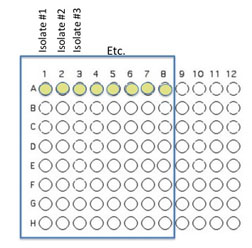
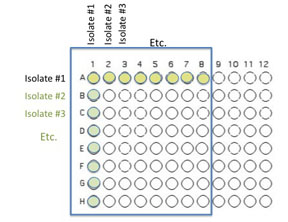
Transfer 50 μL of each of 8 unique isolates to be tested into the illustrated row of wells (A1 is Isolate 1, A2 is Isolate #2 etc through A8)
Beginning with Isolate #2, inoculate a second 50 μl of each of your isolates into the column wells B1, C1, etc. (indicated by the green color).
Add 100 μL of nutrient broth to each of the wells containing your isolates (row wells A1-A8 and column wells B1-H1)
Gently move the 96 well plate in a circular motion to mix.
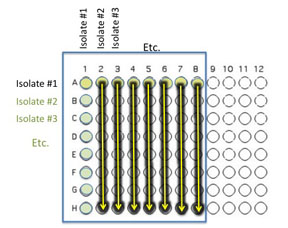
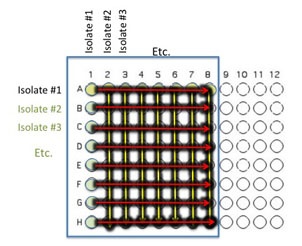
Transfer 10 μl of the contents of the 7 wells - A2 (containing isolate #2 etc) through A8 to the empty wells in each column as indicated by the yellow arrows. You will need to remove the first tip from a multichannel pipette. If you are using the multichannel pipette, be sure that you work slowly and check that each pipette tip is evenly filled. You may need to tighten the tips by hand, if so be sure to only touch the part of the tip that sits on the multichannel pipette, you wouldn't want to contaminate your wells with human organsisms!
Transfer 10 μl of the contents of wells A1 (containing isolate #1 etc) through H1 to each well in the row as indicated by the red arrows.
Again gently mix the contents of the well by moving the plate in gentle circles.
NEXT, we will inoculate a square (NUNC) tray containing nutrient agar medium with about 5 μl of the contents of the wells we just prepared. For this step we will use either a tool called a "frogger" or a multichannel micropipette. If using the frogger, dip the tips into 96 wells to attract a drop of inoculum onto the end of each steel tip and then touch the those tips to the surface of the sterile NA square NUNC plate. Do not break the surface of the agar but make sure your pressure is even so every steel tip has touched the agar surface and deposited the same inoculum. Be sure to disinfect the frogger by dipping it into a series of disinfectant and rinse solutions that you will find at the cleaning station prepared for you .
If the frogger is not available, use an 8 channel multichannel pipet set to 5µl and remove 5μL of culture from each well of your culture dish and deposit all of it onto an area of the NA square agar NUNC plate that is in the same location as in the 96 well culture dish. Again, be sure the tips are on tightly before loading the pipet. Repeat this procedure, with new tips, for each ROW of 8 wells until you have completed depositing the full array in the same orientation as the 48 wells.
7. Wait for your inoculated spots to dry, seal or cover the NUNC square tray, and incubate at Room Temp for a week. The 96 well plate was used only to mix the cultures so you can discard this in the appropriate manner. You will check on your assay and note any differences in the appearance of the colony growth of each isolate, alone vs mixed next lab.
CLEAN UP
1. All culture plates that you are finished with should be discarded in the big orange autoclave bag near the sink next to the instructor table. Ask your instructor whether or not to save stock cultures and plates with organisms that are provided.
2. Culture plates, stocks, etc. that you are not finished with should be labeled on a piece of your your team color tape. Place the labeled cultures in your lab section's designated area in the incubator, the walk-in cold room, or at room temp. in a labeled rack. If you have a stack of plates, wrap a piece of your team color tape around the whole stack.
3. Remove tape from all liquid cultures in glass tubes. Then place the glass tubes with caps in racks by the sink near the instructor's table. Do not discard the contents of the tubes.
4. Glass slides or disposable glass tubes can be discarded in the glass disposal box.
5. Make sure all contaminated, plastic, disposable, serologic pipets and used contaminated micropipet tips are in the small orange autoclave bag sitting in the plastic container on your bench.
6. If you used the microscope, clean the lenses of the microscope with lens paper, being very careful NOT to get oil residue on any of the objectives other than the oil immersion 100x objective. Move the lowest power objective into the locked viewing position, turn off the light source, wind the power cord, and cover the microscope with its dust cover before replacing the microscope in the cabinet.
7. If you used it, rinse your staining tray and leave it upside down on paper towels next to your sink.
8. Turn off the gas and remove the tube from the nozzle. Place your bunsen burner and tube in your large drawer.
9. Place all your equipment (loop, striker, sharpie, etc) including your microfuge rack, your micropipets and your micropipet tips in your small or large drawer.
10. Move your notebook and lab manual so that you can disinfect your bench thoroughly.
11. Take off your lab coat and store it in the blue cabinet with your microscope.
12. Wash your hands.
Assignment
Create an Outline of your Discussion, an Annotated Bibliography of appropriate outside sources (review articles and primary studies), and a preliminary Graphical Abstract summarizing your investigation.
A description and examples of Graphical Abstracts can be found at http://www.elsevier.com/wps/find/authorsview.authors/graphicalabstracts [1]. Pay particular attention to those that are less molecular and more topically ecological. There is a folder in Resources in Sakai, called Images. Your instructor has uploaded images of the Wellesley Greenhouses including the Tropical room that you may use if you wish. NOTE that these images are available as an OPTION. It is not required to use them or even suggested that any be part of your graphical abstract!
There are more instructions for this assignment found at: Assignment: Annotated Bibliography/Graphical Abstract.

