20.109(S10):Testing cell viability (Day3)
Introduction
Promoting appropriate cell life and death is a key part of tisssue engineering. When cells are put into contact with a biomaterial (or into any novel culture condition), their viability may be affected. Some materials are cytotoxic, i.e., deadly to cells. Often, cytotoxicity varies with the concentration of one or more of the chemical components (such as a cross-linker) comprising the biomaterial, and is more or less severe for different cell types. Cell density within a culture is another factor affecting cell livelihood, notably when the number of cells exceeds the nutrient concentrations available in the culture medium. In a 3D culture such as an alginate bead, sufficient nutrients and even oxygen may not be able to diffuse to the center of the bead prior to depletion by cells on the outer rim, even when at a high concentration in the bulk fluid. Finally, note that most cells require certain soluble and/or contact-dependent signals to remain viable. For example, immune cells called naïve T cells require the cytokine IL-7 and contact with self-MHC proteins for survival.

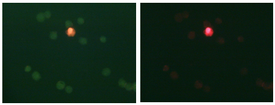
Many assays are available to monitor the numbers of live and dead cells in a culture. The kit you will use today is made by Molecular Probes, a company (now partnered with Invitrogen) that makes a plethora of fluorescent cell stains for various purposes. The principle exploited by the LIVE/DEAD® kit is the relative permeability of cell membranes when the cell is live (intact membrane) or dead (damaged membrane). Ethidium is a nucleic acid stain that you are familiar with from running agarose gels in modules 1 and 2; the ethidium homodimer-2 variant emits red fluorescence, and cannot diffuse past intact cell membranes. The dye SYTO 10, on the other hand, is membrane-permeant, and thus enters both live and dead cells; it emits fluorescence in the green channel. SYTO 10 has lower affinity for nucleic acids than does ethidium, and thus is excluded from dead cells over time, enabling one to distinguish between live (green) and dead (red) cells. Viability can be inferred by monitoring parameters other than cell permeability. For example, some membrane-permeable dyes are only activated to a fluorescent form inside cells that have active esterase enzymes, thus indicating their metabolic activity. Assays that measure cell potentials or redox activity are also available. In general, fluorescence assays are more sensitive than colorimetric assays. Along with sensitivity, stability, toxicity, and ease of scale-up are important factors to consider when choosing an assay.

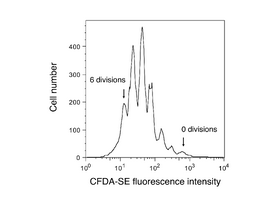
Cell vitality (or lack thereof) tells only one part of a cell culture’s story. For example, kits like the one we are using today cannot determine whether the cells assayed have divided or not. However, other dyes are available that specifically test for cell proliferation, or even distinguish cells based on what part of the cell cycle they are presently in. Proliferation assays are important for drug development, cancer research, and in tissue engineering. Total nucleic acid content is sometimes used as a measure of proliferation – Hoechst is a popular dye for this purpose. Active proliferation can be monitored by addition of 5-bromo-2'-deoxyuridine (BrdU) to cell cultures. BrdU will be incorporated only in recently synthesized DNA (S-phase cells), and can be assessed by antibody-detection after a time lag. For tracking multiple cell divisions, long-lived fluorescent dyes such as the fluorescein derivative CFDA-SE are used: about 6-10 divisions can be seen by flow cytometry (see figure at right).
Remember that cell death is just as important as cell life, and that the type of death also matters. Cells that die due to acute trauma or other tissue damage typically die by necrosis: they swell and finally burst, releasing their contents and often promoting inflammation. Under other circumstances, particularly in development and immunity, many cells undergo a programmed death called apoptosis. Unlike the more disruptive necrotic cells, apoptotic cells condense and then fragment, finally releasing membrane-contained cell bodies. Apoptosis gone awry is implicated in many diseases, and thus researchers are very interested in tracking apoptotic cells in various culture systems. Special dyes can be used to track nuclear fragmentation and other changes in early and late apoptotic cells.
Your objective today is to determine the viabilities of your two different cell cultures, and to gain experience with fluorescence assays. You are likely to encounter fluorescence and other microscopy techniques in many fields of biological engineering research.
Protocols
Today you can stagger your arrivals to lab (see today’s Talk page). Only one group at a time will be able to work on the microscope, and assuming that cell culture setup takes ~ 1 hour, you will each have ~25 minutes to spend on the microscope. Please be respectful of your labmates’ time. Reading the protocol in advance will help you work more quickly, and is strongly recommended.
Before or after performing the viability assay, and/or during incubation steps, you should work on Part 3 of today's protocol.
Part 1: Bead preparation for Live/Dead® fluorescence assay
- Retrieve your 2 six-well dishes from the incubator.
- Begin by counting your beads by eye, and decide how many (1-3 beads per sample) you can spare. Ideally, for RNA and protein isolation, you want at least 10-20 beads remaining.
- Also take this time to describe bead uniformity in your notebook, as this feature may affect your eventual experimental outcomes. Some groups had more luck than others in keeping bead size consistent between their two samples.
- During a later incubation step, you might also take a look at your plate under the microscope, and focus in on cells within the beads. What is cell morphology and density like in each sample?
- Using a sterile spatula, remove the beads (keeping the two samples separate) to two labeled Petri dishes.
- Within the Petri dish, cut your whole beads in half using a spatula or razor blade.
- Per dish, rinse the beads with 3 mL of warm HEPES buffered saline solution (HBSS).
- Aspirate the HBSS - this may be easiest/safest to do with a P1000 - then pipet 200 μL of dye solution right on the beads.
- Incubate for 15 min. with the TC hood light off.
- Remove the entire supernatant with a pipet, and expel it in the conical tube labeled Dye Collection. The dye waste will be disposed of by the teaching faculty. You should also throw the pipet tip into the beaker in your hood; tips will later be moved to the solid waste container in the chemical fume hood.
- Rinse the cells with 3 mL HBSS buffer again. Aspirate off as much liquid as possible, again into the Dye Collection tube.
- Soak in 3 mL of 4% glutaraldehyde solution for 15 minutes.
- Aspirate the solution, then bring your Petri dish to the fluorescent microscope bench in the lab.
- For observation, place the half-bead on a glass slide and then cover with a coverslip.
- You will probably want to look at the beads both flat side up (to see the core) and flat side down (to see the surface).
Part 2: Microscopy
When observing your cells under fluorescence excitation, you should work with the room lights off for best results. You can turn on the working lamp at the microscope bench as you set up your samples, and otherwise when you need to see what you are doing.
- Prior to the first group using the microscope, the teaching faculty will turn on the microscope and allow it to warm up for 15-20 min. First, on the mercury lamp that is next to the microscope, the ‘POWER’ switch will be flipped. Next, the ‘Ignition’ button will be held down for about a second, then released.
- When you arrive, the lamp ready and power indicators should both be lit up – talk to the teaching faculty if this is not the case.
- Place your first sample slide on the microscope, coverslip-side up, by pulling away the left side of the metal sample holder for a moment.
- Begin your observations with the 10X objective.
- Turn on the illumination using the button at the bottom left of the microscope body (on the right-hand side is a light intensity slider).
- Next, turn the excitation light slider at the top of the microscope to ‘DIA-ILL’ (position 4).
- Try to focus your sample. However, be aware that the contrast is not great for your cells, and you might not be able to focus unless you find a piece of debris. Whether or not you find focus, after a minute or two, switch over to fluorescence. Your cells will be easier to find this way.
- First, turn the white light illumination off.
- Next, move the excitation slider to ‘FITC’ (position 3). You should see a blue light coming from the bottom part of the microscope.
- This light can excite both the green and the red dye in the viability kit, and the associated filter allows you to view both colours at once.
- Finally, you must slide the light shield (labeled ‘SHUTTER’) to the right to unblock it. Now you can look in the microscope, and use the coarse focus to find your cells (which should primarily be bright green), then the fine focus to get a clearer view.
- You can also switch the excitation slider over to ‘EthD-1’ (position 2) to see only the red-stained cells. Some of your cells may appear to be dimly red, but the dead ones are usually obviously/brightly stained.
- Be aware that the dyes do fade upon prolonged exposure to the excitation light, so don’t stay in one place too long, and when you are not actively looking in the microscope, slide the light shield back into place.
- You can try looking at your cells with the 40X objective as well if you have time. As you move between objectives and samples, choose a few representative fields to take pictures of. As a minimal data set, try to get 3 fields at 10X of both of your alginate samples.
- To take a picture, remove one eyepiece from the microscope, and replace it with the camera adaptor. Be sure to keep the light shield in place until you are ready to take the picture (to avoid photobleaching)!
- Note that 10X images will reveal a broader field, but 40X images may have better contrast.
- Check with the teaching faculty if you are having difficulty getting clear pictures.
- Later in the module, you will compare the average cell numbers in each sample using the statistical methods we discussed in lecture today.
- Post two well-captioned pictures to the wiki before leaving (one of each sample), so we can discuss the class data in our next lecture. Be sure to note whether the image is at the surface or core of the bead.
Part 3: Research idea discussion
Before or after your fluorescence assay work, find a place (across the hall, in a coffeeshop, etc.) to discuss the five research results you wrote up for homework with your lab partner, guided by the instructions below.
Writing a research proposal requires that you identify an interesting topic, spend lots of time learning about it, and then design some clever experiments to advance the field. It also requires that you articulate your ideas so any reader is convinced of your expertise, your creativity and the significance of your findings, should you have the opportunity to carry out the experiments you’ve proposed. To begin you must identify your research question. This may be the hardest part and the most fun. Fortunately you started by finding a handful of topics to share with your lab partner. Today you should discuss and evaluate the topics you’ve gathered. Consider them based on:
- your interest in the topic
- the availability of good background information
- your likelihood of successfully advancing current understanding
- the possibility of advancing foundational technologies or finding practical applications
- if your proposal could be carried out in a reasonable amount of time and with non-infinite resources
It might be that not one of the topics you’ve identified is really suitable, in which case you should find some new ideas. It’s also possible that through discussion with your lab partner, you’ve found something new to consider. Both of these outcomes are fine but by the end of today’s lab you should have settled on a general topic or two so you can begin the next step in your proposal writing, namely background reading and critical thinking about the topic.
A few ground rules that are 20.109 specific:
- You should not propose any research question that has been the subject of your UROP or research experience outside of 20.109. This proposal must be original.
- You should keep in mind that this proposal will be presented to the class, so try to limit your scope to an idea that can be convincingly presented in a twelve minute oral presentation.
Once you and your partner have decided on a suitable research problem, it’s time to become an expert on the topic. This will mean searching the literature, talking with people, generating some ideas and critically evaluating them. To keep track of your efforts, you should start a wiki catalog on your OpenWetWare user page. How you format the page is up to you but check out the “yeast rebuild” or the “T7.2” wiki pages on OpenWetWare for examples of research ideas in process. As part of your FNT assignment, you will have to print out your wiki page specifying your topic, your research goal and at least two helpful references that you’ve read and summarized.
For next time
1.The first time this module was run, students created single-cell suspensions from their alginate beads by dissolving said beads in EDTA-citrate buffer, and only then stained the cells.
- Given what you have learned in Modules 2 and 3, why does EDTA dissolve alginate beads?
- What additional information about cell viability do you gain by staining whole constructs rather than cell isolates?
2. Read the editorial by Professor Alan Russell about standards in tissue engineering, and come to lecture next time prepared to discuss and/or write about your thoughts. You may find other articles at this link helpful.
3. Begin to define your research proposal by making a wiki page to collect your ideas and resources (you can do this on one page with your partner or split the effort and each turn in an individual page). Keep in mind that your presentation to the class will ultimately need:
- a brief project overview
- sufficient background information for everyone to understand your proposal
- a statement of the research problem and goals
- project details and methods
- predicted outcomes if everything goes according to plan and if nothing does
- needed resources to complete the work
You can organize your wiki page along these lines or however you feel is most helpful. For now, focus on coming up with a research problem and giving a little background about it. Print your user page(s) for next time, making sure it defines your topic, your idea and two or more references you've collected and summarized. Keep in mind that you're not committed to this idea - if you come up with something that you like better later on, that's fine.
Reagent List
- HEPES-buffered saline solution (HBSS)
- 135 mM NaCl
- 5 mM KCl
- 1 mM MgSO4
- 1.8 mM CaCl2
- 10 mM HEPES
- pH 7.4
- 4% glutaraldehyde (GAH) in HBSS
- original stock GAH at 50%, reagent grade
- Live/Dead Reduced Biohazard Viability/Cytotoxicity kit from Invitrogen
- SYTO 10 green nucleic acid stain
- ethidium homodimer-2 red nucleic acid stain
- original dye stocks in DMSO, diluted in HBSS 1:500
