BISC209/F13: Lab7: Difference between revisions
| Line 80: | Line 80: | ||
<font color = "red"> *NOTE: You must remember to set up fresh nutrient broth cultures for your isolates 1-3 days before lab to do this test! </font color = "red"> <br> | <font color = "red"> *NOTE: You must remember to set up fresh nutrient broth cultures for your isolates 1-3 days before lab to do this test! </font color = "red"> <br> | ||
The microbial community living in soil is a complex one with many different microorganisms. As is true of any environment, these microbes interact with each other - both functionally and physically. Do selected bacteria from your community help each other or harm each other while trying to find a niche in your soil community? Today, you will try to answer that question by testing your cultured isolates for examples of mutualism or antagonism (co-operation or competition)by culturing them in controlled communities. Some of these bacteria may prevent the growth of others through the production of chemical inhibitors; others might promote the growth of their neighbors by producing metabolites that are needed. We are going to look for both positive and negative interactions.<br> | The microbial community living in soil is a complex one with many different microorganisms. As is true of any environment, these microbes interact with each other - both functionally and physically. Do selected bacteria from your community help each other or harm each other while trying to find a niche in your soil community? Today, you will try to answer that question by testing your cultured isolates for examples of mutualism or antagonism (co-operation or competition) by culturing them in controlled communities. Some of these bacteria may prevent the growth of others through the production of chemical inhibitors; others might promote the growth of their neighbors by producing metabolites that are needed. We are going to look for both positive and negative interactions.<br> | ||
'''PREPARING THE ISOLATES''':<BR> | '''PREPARING THE ISOLATES''':<BR> | ||
<font size="+1">Interaction Assay Set Up</font size="+1"> | <font size="+1">Interaction Assay Set Up</font size="+1"> | ||
| Line 100: | Line 98: | ||
[[Image:Interactions_slide3.jpg]]<BR> | [[Image:Interactions_slide3.jpg]]<BR> | ||
1. You will inoculate 50 µl of each of the 8 unique isolates to be tested into the illustrated row of wells. Use the concentration adjusted culture tube you made to match the turbidity of the McFarland 0.5 standard since you are trying to control for similar numbers of organisms in your inoculum. (A1 is Isolate 1, A2 is Isolate #2 etc through A8) | |||
[[Image:Interactions_slide4.jpg]] <BR> | [[Image:Interactions_slide4.jpg]] <BR> | ||
Beginning with Isolate #2, inoculate a second 50 μl of each of your isolates into the column wells B1, C1, etc. (indicated by the green color). | 2. Beginning with Isolate #2, inoculate a second 50 μl of each of your isolates into the column wells B1, C1, etc. (indicated by the green color). | ||
<BR> | <BR> | ||
Add 100 μL of nutrient broth to each of the wells containing your isolates (row wells A1-A8 and column wells B1-H1) | 3. Add 100 μL of nutrient broth to each of the wells containing your isolates (row wells A1-A8 and column wells B1-H1) | ||
<BR> | <BR> | ||
Gently move the 96 well plate in a circular motion to mix.<BR> | 4. Gently move the 96 well plate in a circular motion to mix.<BR> | ||
| Line 116: | Line 114: | ||
[[Image:Interactions_slide5.jpg]] <BR> | [[Image:Interactions_slide5.jpg]] <BR> | ||
<BR> | <BR> | ||
Transfer 10 μl of the contents of the 7 wells - A2 (containing isolate #2 etc) through A8 to the empty wells in each column as indicated by the yellow arrows. You will need to remove the first tip from a multichannel pipette. If you are using the multichannel pipette, be sure that you work slowly and check that each pipette tip is evenly filled. You may need to tighten the tips by hand, if so be sure to only touch the part of the tip that sits on the multichannel pipette, you wouldn't want to contaminate your wells with human organsisms!<BR> | 5. Transfer 10 μl of the contents of the 7 wells - A2 (containing isolate #2 etc) through A8 to the empty wells in each column as indicated by the yellow arrows. You will need to remove the first tip from a multichannel pipette. If you are using the multichannel pipette, be sure that you work slowly and check that each pipette tip is evenly filled. You may need to tighten the tips by hand, if so be sure to only touch the part of the tip that sits on the multichannel pipette, you wouldn't want to contaminate your wells with human organsisms!<BR> | ||
<BR> | <BR> | ||
| Line 123: | Line 121: | ||
<BR> | <BR> | ||
Transfer 10 μl of the contents of wells A1 (containing isolate #1 etc) through H1 to each well in the row as indicated by the red arrows. <BR> | 6. Transfer 10 μl of the contents of wells A1 (containing isolate #1 etc) through H1 to each well in the row as indicated by the red arrows. <BR> | ||
Again gently mix the contents of the well by moving the plate in gentle circles.<BR> | 7. Again gently mix the contents of the well by moving the plate in gentle circles.<BR> | ||
<BR> | <BR> | ||
NEXT, we will inoculate a square (NUNC) tray containing nutrient agar medium with about 5 μl of the contents of the wells we just prepared. For this step we will use either a tool called a "frogger" or a multichannel micropipette. If using the frogger, dip the tips into 96 wells to attract a drop of inoculum onto the end of each steel tip and then touch the those tips to the surface of the sterile NA square NUNC plate. Do not break the surface of the agar but make sure your pressure is even so every steel tip has touched the agar surface and deposited the same inoculum. Be sure to disinfect the frogger by dipping it into a series of disinfectant and rinse solutions that you will find at the '''cleaning station''' prepared for you . <BR><BR> | 8. NEXT, we will inoculate a square (NUNC) tray containing nutrient agar medium with about 5 μl of the contents of the wells we just prepared. For this step we will use either a tool called a "frogger" or a multichannel micropipette. If using the frogger, dip the tips into 96 wells to attract a drop of inoculum onto the end of each steel tip and then touch the those tips to the surface of the sterile NA square NUNC plate. Do not break the surface of the agar but make sure your pressure is even so every steel tip has touched the agar surface and deposited the same inoculum. Be sure to disinfect the frogger by dipping it into a series of disinfectant and rinse solutions that you will find at the '''cleaning station''' prepared for you . <BR><BR> | ||
If the frogger is not available, use an 8 channel multichannel pipet set to 5µl and remove 5μL of culture from each well of your culture dish and deposit all of it onto an area of the NA square agar NUNC plate that is in the same location as in the 96 well culture dish. Again, be sure the tips are on tightly before loading the pipet. Repeat this procedure, with new tips, for each ROW of 8 wells until you have completed depositing the full array in the same orientation as the 48 wells.<br><BR> | 9. If the frogger is not available, use an 8 channel multichannel pipet set to 5µl and remove 5μL of culture from each well of your culture dish and deposit all of it onto an area of the NA square agar NUNC plate that is in the same location as in the 96 well culture dish. Again, be sure the tips are on tightly before loading the pipet. Repeat this procedure, with new tips, for each ROW of 8 wells until you have completed depositing the full array in the same orientation as the 48 wells.<br><BR> | ||
10. Wait for your inoculated spots to dry, seal or cover the NUNC square tray, and incubate at Room Temp. The 96 well plate was used only to mix the cultures so you can discard this in the appropriate manner. In 24 hours we will need to transfer a small sample from each colony for analysis by MaldiTof Spectroscopy. If so, your instructor will provide more information. You will check on your assay and note any differences in the appearance of the colony growth of each isolate, alone vs mixed next lab. <br> | |||
==Pictionary® Tournament== | ==Pictionary® Tournament== | ||
Revision as of 13:49, 23 October 2013
LAB 7: Structural Diversity in Cultured Isolates Con't & Testing Isolates for Positive/ Negative Interactions
Confirmation of Gram stain results by Selective/Differential Media:
Did each of your isolates grow on PEA or EMB? What does that result mean about the isolate's cell wall composition? Do your Gram stain findings and PEA and EMB growth patterns agree? If not, how might you explain unexpected findings? If you have time today, repeat Gram stains on any isolates whose PEA or EMB growth did not match your Gram stain finding
MOTILITY
Every isolate should be inoculated into a soft agar deep of nutrient agar with a low agar content. "Soft" agar contains much less solidifying agent (agar) than most solid media (0.35% rather than the usual 1.5%). The growth pattern in this semi-solid NA medium gives information about motility.
A full description of these tests can be found in the protocols section: Motility Tests.
If either of your motility test are positive when we analyze the results, you could try to confirm motility with a hanging drop technique or by trying a flagella stain.
PROTOCOL:
Inoculating a soft agar deep involves a technique you have not yet practiced. You will use an inoculating needle: the wire extending from the handle of the needle will not have a loop on the end.
1) You will need a tube of soft nutrient agar medium for each of your isolates. Each class needs to add 2 extra tubes of soft agar medium to inoculate one with E. coli, an organism that is motile, which will serve as a positive motility control and the other with Staphylococcus epidermidis, an organism that is non-motile, to serve as our negative motility control.
2). Flame sterilize an inoculating needle, cool it for a few seconds, and pick up a barely visible amount of colony growth on the tip of the needle.
3) Stab the needle with the inoculum deeply into the center of the soft agar tube, stopping just before the bottom of the tube or, if you are running out of needle, stab it until the you are almost to the end of the needle.
4) Withdraw the needle through the same inoculation channel. (This procedure is also known as "making a soft agar deep".)
5) Inoculate each of your other isolates using the same technique.
6) Make sure the class has inoculated a positive control tube of E. coliand a negative control tube of S. epidermidis.
7) Incubate all tubes for 24-72 hours. The tubes should be incubated at RT.
8) After sufficient growth is observed in the tube, look for a color change from red to yellow. Use of mannitol as a carbon source results in a pH change that we can see using phenol red indicator (change from red to yellow).
9) Check for motility by looking for diffuse growth radiating from the stab line of inoculation. Compare the motility of each of your isolates to that of the E. coli positive control and the Staph negative control. E. coli are a motile bacteria and all Staphyloccus species are non-motile.
Control Organisms:
| Organism | ATCC | Motility |
|---|---|---|
| Escherichia coli | 25922 | + |
| Klebsiella pneumoniae | 13883 | - |
| Proteus mirabilis | 25933 | + |
| Acinobacter anitrartum | 17924 | - |
McFarland Turbidity Standards
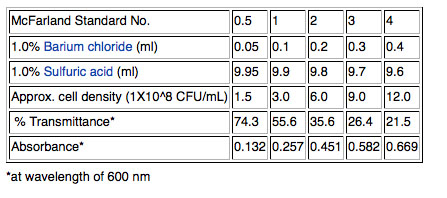
1) Although cell density can be measured more accurately using a spectrophotometer to measure optical density (OD) at 600nm, we will use a quicker method that will work well enough for our purposes. We will use a McFarland 0.5 standard; the 0.5 refers to the approximate concentration of organisms in solutions which is 1.5X10⁸ cfu/mL for the 0.5 standard. Other common standards are shown in the table below.
2) You will use the fresh broth culture of each of your isolates that you prepared prior to lab for both the antibiotic and interactions protocols. We want to apply relatively the same number of organisms in each procedure so we will use McFarland Standard to "correct" turbidity.
3. If your fresh broth is more turbid than the McFarland Standard, pipet one ml of the broth culture into a new empty sterile glass tube and adjust the concentration of the cells by adding NB or sterile water and matching by eye the "cloudiness" (turbidity) of the cells in the glass tube to a standard provided by your instructor.
4) If your fresh broth is less turbid than the McFarland Standard, add bacteria from a freshly grown colony of the isolate grown on solid medium to concentrate the cells.
The ending volume is irrelevant. Vortex to mix.
Test for Antibiotic Production
*NOTE: You must remember to set up fresh nutrient broth cultures for your isolates 1-3 days before lab to do this test!
Many microbes secrete antimicrobial compounds to help them compete with other microorganisms for habitat. Some of the bacteria that are common antibiotic producers are the Actinomycetes (including Streptomycetes species), many of the Bacillus species, and the fruiting myxobacteria, to name just a few among many, many antibiotic producing bacteria. You can also test for the opposite: the sensitivity of your soil organisms (or known stock bacteria) to manufactured or secreted antibiotics.
(This testing will take 3 weeks.)
Week 1:
Identify how many potential antibiotic producers you might have. Definitely test any isolates that are likely to be Actinomycetes, Myxobacteria, or Bacillus. It is wise to test all of your isolates since the soil is the main source of microbes that supply the world's antibiotics. It's possible that you might discover the next great antimicrobial drug and get very rich by selling the patent for your discovery to a drug company. Remember that the discovery of penicillin was completely accidental.
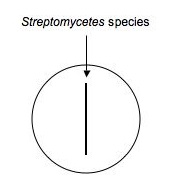
1. Using aseptic technique dip a sterile swab into the concentration adjusted culture tube you made to match the turbidity of the McFarland 0.5 standard and make an inoculation (as shown below) down the middle of a plate of nutrient agar.
2. Make additional plates exactly like the first for each isolate to be tested. Label them carefully and incubate the plates for ~1 week at RT.
Antagonistic and Mutualistic Interactions Analysis
*NOTE: You must remember to set up fresh nutrient broth cultures for your isolates 1-3 days before lab to do this test!
The microbial community living in soil is a complex one with many different microorganisms. As is true of any environment, these microbes interact with each other - both functionally and physically. Do selected bacteria from your community help each other or harm each other while trying to find a niche in your soil community? Today, you will try to answer that question by testing your cultured isolates for examples of mutualism or antagonism (co-operation or competition) by culturing them in controlled communities. Some of these bacteria may prevent the growth of others through the production of chemical inhibitors; others might promote the growth of their neighbors by producing metabolites that are needed. We are going to look for both positive and negative interactions.
PREPARING THE ISOLATES:
Interaction Assay Set Up
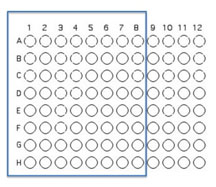
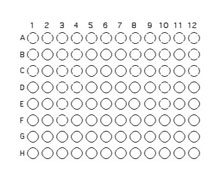
You will use 64 of the wells on a 96 well plate for this assay. to do this each team member will contribute two unique organisms. Each assay will use 8 isolates to test for interactions. Use the Excel template provided Media:template.xls to record the identifying codes of the organisms that will be inoculated into each well as described and illustrated below.
FOLLOW THE TEMPLATE CAREFULLY!!!!!! It is easy to get this inoculation messed up, but don't!
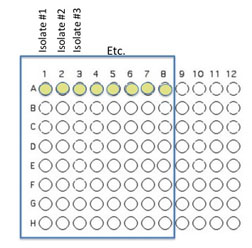
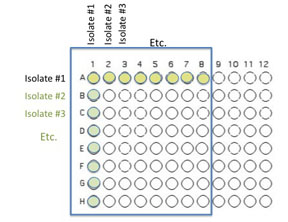
1. You will inoculate 50 µl of each of the 8 unique isolates to be tested into the illustrated row of wells. Use the concentration adjusted culture tube you made to match the turbidity of the McFarland 0.5 standard since you are trying to control for similar numbers of organisms in your inoculum. (A1 is Isolate 1, A2 is Isolate #2 etc through A8)
2. Beginning with Isolate #2, inoculate a second 50 μl of each of your isolates into the column wells B1, C1, etc. (indicated by the green color).
3. Add 100 μL of nutrient broth to each of the wells containing your isolates (row wells A1-A8 and column wells B1-H1)
4. Gently move the 96 well plate in a circular motion to mix.
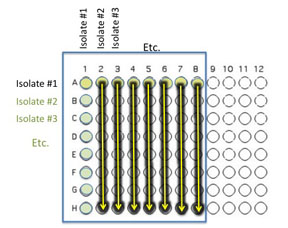
5. Transfer 10 μl of the contents of the 7 wells - A2 (containing isolate #2 etc) through A8 to the empty wells in each column as indicated by the yellow arrows. You will need to remove the first tip from a multichannel pipette. If you are using the multichannel pipette, be sure that you work slowly and check that each pipette tip is evenly filled. You may need to tighten the tips by hand, if so be sure to only touch the part of the tip that sits on the multichannel pipette, you wouldn't want to contaminate your wells with human organsisms!
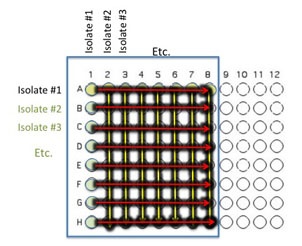
6. Transfer 10 μl of the contents of wells A1 (containing isolate #1 etc) through H1 to each well in the row as indicated by the red arrows.
7. Again gently mix the contents of the well by moving the plate in gentle circles.
8. NEXT, we will inoculate a square (NUNC) tray containing nutrient agar medium with about 5 μl of the contents of the wells we just prepared. For this step we will use either a tool called a "frogger" or a multichannel micropipette. If using the frogger, dip the tips into 96 wells to attract a drop of inoculum onto the end of each steel tip and then touch the those tips to the surface of the sterile NA square NUNC plate. Do not break the surface of the agar but make sure your pressure is even so every steel tip has touched the agar surface and deposited the same inoculum. Be sure to disinfect the frogger by dipping it into a series of disinfectant and rinse solutions that you will find at the cleaning station prepared for you .
9. If the frogger is not available, use an 8 channel multichannel pipet set to 5µl and remove 5μL of culture from each well of your culture dish and deposit all of it onto an area of the NA square agar NUNC plate that is in the same location as in the 96 well culture dish. Again, be sure the tips are on tightly before loading the pipet. Repeat this procedure, with new tips, for each ROW of 8 wells until you have completed depositing the full array in the same orientation as the 48 wells.
10. Wait for your inoculated spots to dry, seal or cover the NUNC square tray, and incubate at Room Temp. The 96 well plate was used only to mix the cultures so you can discard this in the appropriate manner. In 24 hours we will need to transfer a small sample from each colony for analysis by MaldiTof Spectroscopy. If so, your instructor will provide more information. You will check on your assay and note any differences in the appearance of the colony growth of each isolate, alone vs mixed next lab.
Pictionary® Tournament
Your instructor will explain the rules of the Pictionary® game we will play using the knowledge you now have about tools and techniques of microbiologists.
CLEAN UP
1. All culture plates that you are finished with should be discarded in the big orange autoclave bag near the sink next to the instructor table. Ask your instructor whether or not to save stock cultures and plates with organisms that are provided.
2. Culture plates, stocks, etc. that you are not finished with should be labeled on a piece of your your team color tape. Place the labeled cultures in your lab section's designated area in the incubator, the walk-in cold room, or at room temp. in a labeled rack. If you have a stack of plates, wrap a piece of your team color tape around the whole stack.
3. Remove tape from all liquid cultures in glass tubes. Then place the glass tubes with caps in racks by the sink near the instructor's table. Do not discard the contents of the tubes.
4. Glass slides or disposable glass tubes can be discarded in the glass disposal box.
5. Make sure all contaminated, plastic, disposable, serologic pipets and used contaminated micropipet tips are in the small orange autoclave bag sitting in the plastic container on your bench.
6. If you used the microscope, clean the lenses of the microscope with lens paper, being very careful NOT to get oil residue on any of the objectives other than the oil immersion 100x objective. Move the lowest power objective into the locked viewing position, turn off the light source, wind the power cord, and cover the microscope with its dust cover before replacing the microscope in the cabinet.
7. If you used it, rinse your staining tray and leave it upside down on paper towels next to your sink.
8. Turn off the gas and remove the tube from the nozzle. Place your bunsen burner and tube in your large drawer.
9. Place all your equipment (loop, striker, sharpie, etc) including your microfuge rack, your micropipets and your micropipet tips in your small or large drawer.
10. Move your notebook and lab manual so that you can disinfect your bench thoroughly.
11. Take off your lab coat and store it in the blue cabinet with your microscope.
12. Wash your hands.
Assignment
Graded Assignment:
There is no graded assignment for next lab:)
TO DO:
You will need a fresh culture of your bacterial isolates in the next lab for our attempt to identify them using our MALDI-TOF BioTyper. Come into the lab 18-24 hours before lab to set up a fresh sub-culture on a new NA plate for each of your isolates.

