BME100 s2017:Group4 W8AM L6
| Home People Lab Write-Up 1 | Lab Write-Up 2 | Lab Write-Up 3 Lab Write-Up 4 | Lab Write-Up 5 | Lab Write-Up 6 Course Logistics For Instructors Photos Wiki Editing Help | |||||||
OUR TEAM
PCR Power LAB 6 WRITE-UPBayesian StatisticsOverview of the Original Diagnosis System Ten teams of around six students diagnosed two patients each resulting in a total of twenty diagnoses of the disease-associated SNP. The first step was to mix the PCR reaction mix with the each DNA sample, creating three replicates for each patient. These samples were then placed in the PCR machine to heat them and cause the DNA molecules to denature, the primers to anneal to the single stranded DNA, and the polymerase to extend the DNA strands. Then a drop of each sample was placed in a fluorimeter and mixed with SYBR Green I. Images of each drop were taken and analyzed in Image J in order to measure the concentration of DNA in each sample. If the sample resulted in a high amount of concentration, the patient tested positive for the disease SNP and if the sample resulted in a low concentration, the patient tested negative. In order to prevent error, three trials were conducted for each patient and the proper PCR controls were set. To avoid error in the fluorimeter portion of the experiment, different known concentrations were used to calibrate Image J and three images of each drop were taken to give a variation of data. Positive and negative controls were used in order to compare the final results and give conclusions. The class's final data resulted in 18 successful conclusions of either positive or negative and 2 inconclusive results. 6 patients tested positive for the disease SNP, while 12 patients tested negative. There was no blank data present in any test. In a few cases there was variation between the three trials for one patient that led to discrepancy in the final conclusion. This may have been the result of loss of sample on transport or an error image J when testing the concentrations.
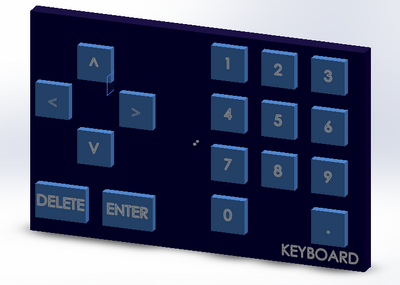
Intro to Computer-Aided Design3D Modeling The group decided to use SolidWorks to build our external part because it was more precise and was easier for us to use than TinkerCad. We were already familiar with SolidWorks so building a simple device was easier with a familiar program, rather than having to learn how to use an entire new software. SolidWorks allowed us to create our part on one plane and then easily extrude the keys out of the keyboard. We were able to personalize the part by adding text to the keys as well as coloring the keyboard. The dimensions and placement of the keys was carefully designed to be simple to navigate by the user. The keys were placed exactly .25 centimeter apart from each other which is approximately the length between keys on a computer keyboard. They are also 1 square centimeter which would fit a standard finger perfectly. The PCR keyboard replicated a computer keyboard so the user would be familiar with keys and will have no trouble when using the device. This part was designed so instead of connecting the PCR machine to a computer to input data, it would directly be on the machine giving the user easy access and less tasks when setting up the machine.
Keyboard made using SolidWorks
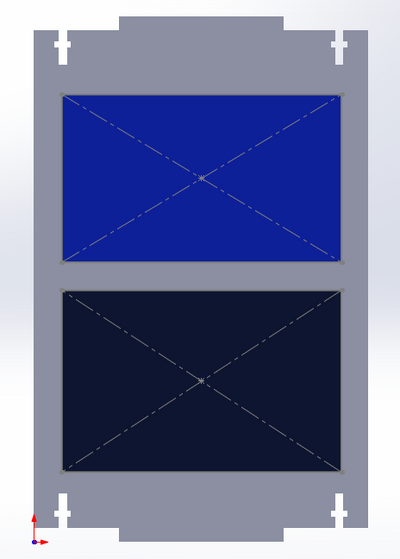
Placement of the screen and keyboard on the front side of the PCR machine -Royal Blue: Where the screen is placed on the PCR machine -Dark Navy Blue: Where the keyboard is placed on the PCR machine
Feature 1: ConsumablesIn our design of the PCR machine, the fluorimeter will remain the same. The previous kit provided will also remain the same, supplying some key consumables that are used. This kit will include the following:
Our design focuses on the PCR machinery itself. This will include attaching a screened keyboard to the machine to avoid using a computer to input data. This too will be included on the PCR machine. Feature 2: Hardware - PCR Machine & FluorimeterFluorimeter Open PCR machine The screen will ask the user to input 12 different parameters (in either degrees celsius or seconds): the temperature of the heated lid, the temperature of the initial step, the number of cycles, the temperature to denature at, the time for the denature temperature, the temperature to anneal at, the time for the anneal temperature, the temperature to extend, the time of this temperature, the temperature of the final step, the time for the temperature of the final step and the final hold temperature. The user will also be able to go back back and forth between questions using the arrows to navigate, delete wrong information entered using the delete key and enter values using the enter key, The information the user inputs will go straight into the settings of the PCR machine. Overall this will greatly improve the design of the experiment as it will no longer require a computer.
| |||||||


