BME100 s2014:T Group13 L4
| Home People Lab Write-Up 1 | Lab Write-Up 2 | Lab Write-Up 3 Lab Write-Up 4 | Lab Write-Up 5 | Lab Write-Up 6 Course Logistics For Instructors Photos Wiki Editing Help | |||||||||||||||||||||||||||
|
OUR TEAM
LAB 1 WRITE-UPInitial Machine TestingThe Original Design
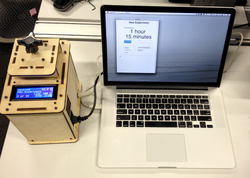
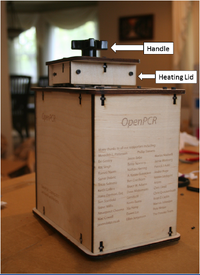
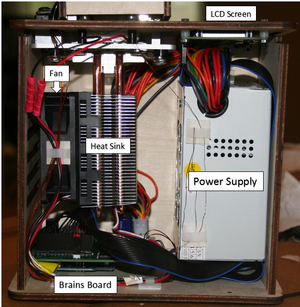
The first image shows the initial set-up between the PCR machine and the MacBook that was used to collect the readings and data. The computer interface allowed the group to set the temperature for each cycle, the duration of each cycle, and the number of cycles to be run. It used the PCR program to run the machine. The PCR machine interface provided details on what cycle/step the machine was on at any given time. The second image shows a close up of the PCR machine. Labels show the handle, used to open and close the machine, as well as the heating lid which raises the temperature of the PCR for the specified cycles. The last image shows the inside layout of the PCR machine. Labels show the power supply, LCD screen, fan, heat sink, and the brains board. The power supply, as the name suggests, gives the machine the power necessary to run the PCR. The LCD screen is the machine interface which shows what is happening in the machine. The fan provides the cooling for the necessary cycles. The heat sink pulls the heat away from the aluminum block. The brains board is the motherboard that connects to the computer, giving the machine directions on what to do.
When we unplugged the screen from the motherboard, the machine's screen turned off. When we unplugged the white wire that connects the motherboard to the cooling plate, the machine's temperature sensor was no longer connected.
We first tested the Open PCR on March 20. The machine operated as designed. It powered on and connected to a Macbook. The software installed and ran well. It displayed the same information that was displayed on the LED screen. We ran the Open PCR for 10 cycles. It completed the cycles without incident. Protocols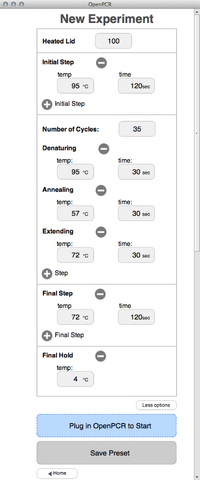 Thermal Cycler Program
Test Tube Lay-out
PCR Reaction Mix
Research and DevelopmentPCR - Functions of Components The first part of this lab involves mixing all the components together in a small micro tube. They are all mixed in the PCR buffer. This buffer not only serves as the liquid environment in which the reactions can take place, but it also serves as a stabilizer which keeps pH levels, ionic strength, and co-factors constant. The magnesium chloride is one such co-factor. It helps to increase the activity of the magnesium dependent enzyme, in this case: Taq DNA polymerase. The Taq DNA polymerase, as stated earlier, is an enzyme. In a PCR, it serves as the synthesizer of the specified, or target, DNA sequence. The dNTPs serve as the building blocks for the polymerase. They provide the ingredients that the Taq DNA polymerase will use to build/synthesize the new copies of DNA. The DNA/primer mix is then mixed into the solution PCR reaction mix. The first part of this is composed of the DNA template. This provides the target sequence that the PCR is designed to amplify. Without this, the reaction has nothing to synthesize. The second part of this primer mix is the forward and reverse primers. These primers are specified to find and latch onto specific parts of a DNA sequence. They serve as markers for the Taq DNA polymerase showing where to start copying a target sequence and where to stop.

| |||||||||||||||||||||||||||


