BME100 f2016:Group1 W1030AM L6
| Home People Lab Write-Up 1 | Lab Write-Up 2 | Lab Write-Up 3 Lab Write-Up 4 | Lab Write-Up 5 | Lab Write-Up 6 Course Logistics For Instructors Photos Wiki Editing Help | ||||||||||||||||||||||||||||||||||||||||||||||||||||||||||||||||||
|
OUR TEAM
LAB 6 WRITE-UPBayesian StatisticsOverview of the Original Diagnosis System In the BME 100 class, 16 teams of 4-5 students each, diagnosed a total of 32 patients. Each team was given 2 patients to diagnose. In our group, one team of 3 did the PCR reaction and another team of 2 focused on the calculations. To prevent error, both a positive and a negative control were used for comparison of the solutions. For each patient, 3 samples of solution were used for more trials in order to prevent error caused by not taking enough samples. With the ImageJ calibration controls, an oval-shape was saved to the ROI manager for each sample so the 3 images for each sample would have the same oval measurements. Also, the green color split image was measured for each of the images. For each concentration of solution, 3 images were used to prevent error in the calculations. The class's final data concluded that there were more negative diagnoses than positive ones. The class had 3 inconclusive results and 4 blank data results were found for the class's final data as well. Group one's data may have been affected by an accidental contamination of the DNA which would cause the data to not portray the conclusions this group received.
Sensitivity is the ability of the test to identify those with the disease--a true positive. Specificity is the ability of the test to identify those without the disease--a true negative.
The sensitivity of the system to predict the disease is described by: Table 3 The specificity of the system to detect the disease SNP is described by: Table 2 The specificity of the system to predict the disease is described by: Table 4
What Bayes Statistics Imply about This Diagnostic Approach
Intro to Computer-Aided Design3D Modeling
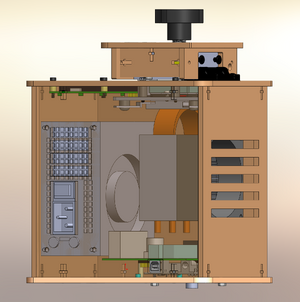
(Any picture can be clicked on to zoom in) SolidWorks PCR Machine
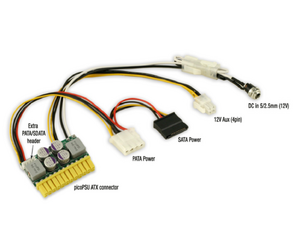
Close-up of the new power supply
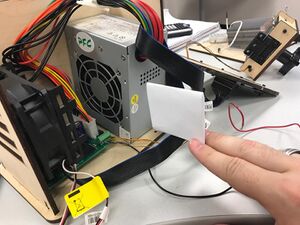
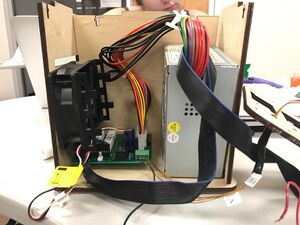
After speaking with Professor Haynes, she told the group to move forward with the idea, showing pictures of the device as a comparison to the original power supply. Our design includes a much smaller power source. The goal the group settled on was to reduce the size of the overall unit, while still allowing for the same number of simultaneous tests. As you can see from all of the above pictures, the new power supply is considerably smaller than the current option. It plugs into the board in the exact same spot (where all the colorful wires are coming out of the white plastic piece plugged into the board) and will quite literally be attached to the board, sticking up about two inches. Looking closely, the yellow tips of the new power supply will go where the white plastic and cords are sticking out of the board. The other cords attached to the new power supply plug into various places, such as the current fan and heat sink. However, a large part of the hot air that is introduced into the system comes from the power supply itself. By removing that, there may be further improvements possible with different fan and heat sink setups. For now, the goal of the group is to replace the giant gray power supply with this new very small design. As one can see, it is compatible with the devices and power supply requirements currently in use in the PCR machine, and it has a small wire that allows a power cord, similar to nearly any laptop power cord on the market, to plug in on an external wall of the device.
Feature 1: ConsumablesA major weakness found with the PCR packaging was its organization considering the amount of steps required to complete it. To combat this problem, in the optimized design, the original PCR lab consumables will remain the same. Included is the PCR mix, SYBR Green Solution, micropipettor, buffer, liquid reagents, glass slides, plastic tubes and the pipette tips. The consumables will be organized in the order they are used in the PCR lab. A pipette tip will be arranged first, followed by the PCR mix, another pipette tip and so on corresponding with the various steps necessary for the PCR lab. This new method of packaging will make the process of completing the lab much easier for each user.
Feature 2: Hardware - PCR Machine & FluorimeterOur PCR machine has nearly the same hardware as the original Open PCR, but has a much smaller power supply. The replacement of the power supply is the major innovation. As a consequence, not only the size of the Open PCR machine is decreased, but also its weight is significantly smaller. The name of the new power supply is The PCR Power Popper (Exclusively used in the PCR Popper design) A dark box with a fixed fluorimeter in it will be included with our device. It can be used to analyze the samples prepared with the Open PCR machine with the help of a smartphone. There is also innovation within, where there is an adjustable stage inside the box, about 10 cm away from the fluorimeter. The stage can be adjusted so that the phone can be raised or lowered, and set farther from or closer to the fluorimeter.
| ||||||||||||||||||||||||||||||||||||||||||||||||||||||||||||||||||


