BISC209/S11: Aseptic Transfer
Aseptic Transfer
Aseptic transfer technique is important to prevent contamination of the culture being maintained as well as yourself. Manipulation of the tubes, plates and transfer tools requires patience and practice and is vital to success in the microbiology laboratory.
Proper use of a Bunsen burner: YouTube demo [1]
Knowing how to adjust the Bunsen Burner flame for the most effective incineration is extremely useful. There are only two parts that you may need to adjust. Watch the YouTube video for a visual demonstration. Find the needle valve that controls the height of the flame on the bottom of the burner, check the integrity of the rubber tubing connecting the gas source to the gas inlet nozzle, and be sure to turn the gas on only when you are ready to light the burner and shut it off properly (at the gas source) whenever you are not using the flame.
Broth to Broth or Broth to Plate Transfer
YouTube demo [2]
1. Label the destination container for the culture (uninoculated sterile broth in a tube or solid medium in a plate).
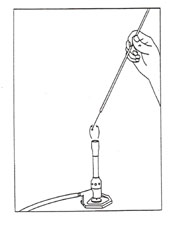
2. Holding your loop like a pencil, insert the loop into the flame as illustrated in Figure 1. The orientation of the loop wire in the flame should be at ~ a 30 degree angle for proper incineration. Keep the wire in the flame until it is red-hot, then move the adjacent nonwire part of the loop lightly through the flame. The wire will now be sterile, and the nonwire part will have any dust burned off that might have fallen into the media during the transfer procedure. Allow the loop to cool for a few seconds in the air before touching it to your culture or medium.

Figure 1: Proper flaming of a loop. Note how the loop handle is held by only the thumb and first two fingers and the loop is inserted into the hottest part of the flame.
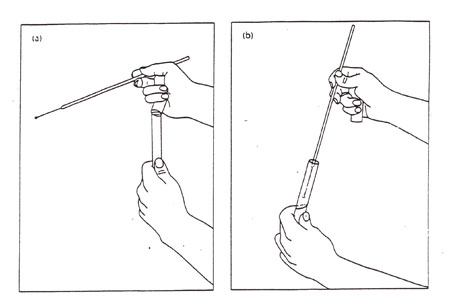
3. Pick up the donor broth culture tube with your other hand, while still holding the sterile loop. With the hand holding the loop, use your little finger against your palm to remove the cover or plug from the culture tube as shown in Figure 2. Do not put the cover or plug down on your bench. If the tube is glass, lightly pass the lip of the tube through the Bunsen burner to burn off any adhering dust and to create a temperature differential that temporarilty prevents dust from falling into your tube. Now, insert the loop into the broth without touching the sides of the tube, and then remove it, carrying a loopful of culture. Pass the top of the culture tube through the flame, replace the tube cover or plug, and return the tube to a rack.

Figure 2: Transferring a culture. (a) Removal of a tube cap while manipulating a loop; (b) Obtaining inoculum from a broth tube while maintaining sterility of the cap (note cap in hand).
4. Pick up the labeled sterile destination tube or plate. Remove its cover, (if it's a glass tube, pass the lip of the tube through the flame),
5. Insert the loop containing the culture into the destination tube of sterile broth, swirl gently and remove. If the destination is a plate of solid medium, follow the directions for streaking for isolation or for a spread plate found in the protocols section of the wiki.
6. Replace the cover and set the newly inoculated broth tube in the rack.
7. Re-sterilize the loop before putting it down by inserting the loop into the flame very slowly! Doing this slowly allows any liquid remaining on the loop to evaporate rather than boil and avoid splattering live bacterial cells all over the bench and you.
Use and Preparation of Stock Cultures on Slants
Agar slants are made from the liquid media best suited to maintain your organism with a small amount of seaweed extract (agar) that solidifies the media. The surface area for growing your microorganisms is maximized by cooling the liquid media and allowing it to solidifying with the tubes placed at an angle. Slants are useful for storing pure cultures of organisms because dehydration is minimized and they don't spill. After inoculation and growth for 24-72 hours (or longer, depending on your organism) at the appropriate temperature, agar slants are stored in the cold room at 4C.
Once a pure culture is established on an agar slant, it is called a stock culture and is used to make subcultures into other media. However, everytime a stock is used, it runs the risk of becoming contaminated so the first inoculation from a stock is to create a replacement stock slant. This practice helps insure a reliable source of healthy, uncontaminated cells over the long term.
Making a Slant to Slant Transfer
Use the inoculating loop and the aseptic transfer technique described above to take a small amount of a pure colony onto your sterile loop and draw it over a new sterile slant in either a zigzag or a straight line pattern (Fig. A3). The zig-zag pattern allows for abundant growth for the creation of many future subcultures while the straight line slant is best for maintaing a stock culture.
The source culture for a new slant can be an isolated colony from a streak plate, from another slant or from a broth culture. In all cases use the inoculating loop and aspetic transfer technique decribed above.

Fig. A-3: The tube on the left uses a zig-zag pattern to encourage lots of growth and is useful when you are inoculating numerous samples. The one on the right uses less surface area for growth and is for maintaining stock cultures.
'
Transfer from a pure colony or culture to a slant
1. Use the growth medium appropriate for your organism as your destination tube. Be sure you label it properly.
2. Select your source: This will either be an isolated “pure” colony on an isolation streak plate or a previously made pure culture slant tube.
3. Following aseptic technique remove the cover of the source plate or slant (remember: do not put any covers on the bench) If the source is a slant you will remove the cover using the little and ring fingers of your dominant hand pressing against the palm as you hold and twist the tube using your non-dominant hand.
4. Use a sterilized, cooled loop either to remove ½ or less of one colony or to touch the slant growth. Replace the lid on the source plate or flame the lip of the source tube briefly before replacing the cap and putting the source plate or tube down properly.
5. Pick up your destination slant tube. Again, holding this tube in your non-dominant hand, remove the cap aseptically using the little and ring fingers on your dominant hand and hold onto the cap.
6. Flame the top of the destination tube by passing it quickly through the flame once.
7. Insert the loop with the inoculum of desired microorganisms into the destination SLANT tube. Avoid touching the sides of the tube. Starting at the lower surface of the agar slant, use either a zig-zag or straight line motion, gently drag the loop across and up the surface of the slant. Avoid digging into the agar, but, if this happens, just lighten your touch and continue with the inoculation.
8. Reflame the lip of the inoculated slant briefly, replace the cap or plug,and flame the loop, set the tube down properly. (Note: If you are using a broth culture to create your new slant, be careful to flame the loop SLOWLY.)
9. Incubate your new slant at the appropriate temperature for the appropriate time.
10. Once grown, refrigerate this newly created stock culture slant or use it for further inoculations. Remember to always make at least one replacement slant stock culture before making any other subcultures.
Once a pure culture is established, continue to use aspetic technique and standard transfer manipulations to refresh your stock cultures regularly.
Links to Labs
Lab 1
Lab 2
Lab 3
Lab 4
Lab 5
Lab 6
Lab 7
Lab 8
Lab 9
Lab 10
Lab11
Lab 12
