20.109(F14): Mod 1 Day 2 Clean and cut DNA
Clean and cut DNA
Introduction
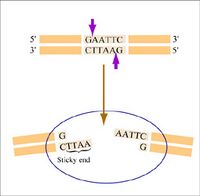
Restriction endonucleases, also called restriction enzymes, cut (“digest”) DNA at specific sequences of bases. The restriction enzymes are named for the prokaryotic organism from which they were isolated. For example, the restriction endonuclease EcoRI (pronounced “echo-are-one”) was originally isolated from E. coli giving it the “Eco” part of the name. “RI” indicates the particular version on the E. coli strain (RY13) and the fact that it was the first restriction enzyme isolated from this strain.
The sequence of DNA that is bound and cleaved by an endonuclease is called the recognition sequence or restriction site. These sequences are usually four or six base pairs long and palindromic, that is, they read the same 5’ to 3’ on the top and bottom strand of DNA. For example, the recognition sequence for EcoRI (see also figure at right) is
5’ GAATTC 3’
3’ CTTAAG 5’
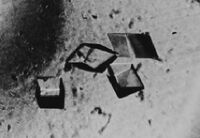
Unlike EcoRI, some other restriction enzymes cut precisely in the middle of the palindromic DNA sequence, thus leaving no overhangs after digestion. The single-stranded overhangs resulting from DNA digestion by enzymes such as EcoRI are called sticky ends, while double-stranded ends resulting from digestion by enzymes such as HaeIII are called blunt ends. HaeIII recognizes
5’ GGCC 3’
3’ CCGG 5’
Before you can use any restriction enzymes on your PCR product you will have to “clean up” your reaction. This is done to remove the Taq polymerase and any residual dNTPs from the product (if you don’t remove them they will refill any sticky ends generated by the restriction enzyme!). Another reason to clean up your PCR product is to change the buffer to one more suitable for the restriction enzyme reaction.
Fortunately cleaning up reactions is simple and efficient (though not inexpensive!) using small spin-columns sold by Qiagen, a company you will hear a lot about in the coming weeks.

The spin-columns have a silica-gel membrane in them to remove salt and contaminants. The membrane binds DNA in the presence of salt, and DNA can be efficiently recovered from the membrane once the salt is removed. All the necessary binding and wash buffers are sold with the Qiagen spin-columns and they have unusual and uninformative names like "PB" and "P2". The contents of these buffers are proprietary so we don’t know precisely what they contain, but there is some information about them that is included as part of the protocol. This should help you understand the steps - be sure to think about the instructions rather than blindly following them.
Today you will use the Qiagen “QIAquick” protocol to clean the DNA you generated by PCR. You will then digest the PCR product as well as some purified plasmid (provided by the teaching faculty). The purified plasmid will be used as a backbone in which to clone the truncated EGFP that you obtained by PCR.
Protocol
Part 1: EHS Training Session
We will start the class today by completing our General Biosafety training from MIT EHS.
Part 2: Cleaning up your PCR product
- Remove 5 ul from each of your PCR tubes and move them into full-sized eppendorf tubes. These will be stored in the –20°C freezer to run on an agarose gel next lab. Discard the PCR tube that served as your no template control.
- Move the remaining volume of your complete PCR sample to a large eppendorf tube and add 5 volumes of PB (e.g. if you moved 50 ul then 5 volumes would be 250 ul). PB is a high salt, low pH buffer added so the DNA in your reactions will bind the silica membrane. The salt in PB is guanidine hydrochloride, a chaotropic salt, meaning it will exclude water from the DNA, effectively precipitating it so it will bind the membrane in step 3.
- Get a QIAquick column and a collection tube from the teaching faculty then pipet the PCR/PB sample into the top. Microfuge the column in the collection tube for 60 seconds. Remember you must balance your tube in the microfuge so find a group ready to spin with you.
- Discard the flow-through in an empty 15 mL conical tube (label the conical tube "Qiagen Waste") and return the spin-column to the same collection tube. Add 750 ul of PE to the top of the column and spin as before. Qiagen sells PE and does not reveal all its contents, but the solution is at least 80% ethanol which keeps the DNA precipitated and on the membrane but washes the salt away.
- Discard the flow-through in your Qiagen Waste tube and return the spin-column to the collection tube once more. Spin for one more minute. Strange as it seems this is a very important step since it removes any residual ethanol from the membrane in the spin-column. If you forget this step the ethanol will elute with your DNA and will inhibit the upcoming restriction digest.
- Trim the cap off a new eppendorf tube and label the side with your team color and the date. Place the spin-column in the trimmed eppendorf and add 30 ul of EB to the center of the membrane. EB is one solution we do know everything about. It’s 10 mM Tris pH 8.5. Since the DNA will solubilize at low salt and high pH, it elutes from the column when EB is added. Lab water can also be used to elute the DNA but it’s worth remembering that the pH is likely to be more acidic than 8.5 and so the company recommends eluting with EB when possible. Allow the column to sit at room temperature for one minute and then spin as before. The material that collects in the bottom of the eppendorf tube is your PCR product, ready to be digested.
Part 3: Digesting DNA
You can read some general and incredibly useful information about setting up digests here and here. Today, you will be cutting both the PCR product and a version of the pCX-EGFP plasmid that lacks the EGFP gene. This plasmid, called pCX-NNX, was created from pCX-EGFP in two steps. To remove the EGFP gene, pCX-EGFP was digested with EcoRI and the backbone was religated. In a separate step some useful restriction sites were inserted, (Nsi1 at 2282, Not1 at 2288 and Xho at 2260). This second step removed the SV40 origin of replication as well as some flanking sequences.
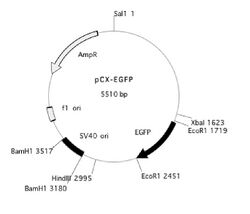
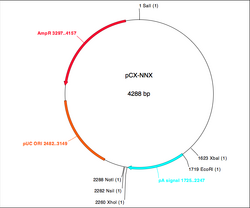
You will prepare double digests (containing both EcoRI and XbaI) for pCX-NNX and the PCR product. You will also prepare single digests (containing EcoRI or XbaI) of the pCX-NNX plasmid. Think about how uncut, single-cut, and doubly-cut plasmids might appear on the gel you will run next time. Note that we will use the high-fidelity (HF) version of EcoRI, and that both enzymes are compatible with CutSmart buffer. The contents of your four digests are
| pCX-NNX (double) | pCX-NNX (single) | PCR product | |
|---|---|---|---|
| DNA | 4 ul (= 2 ug total) | 4 ul (= 2 ug total) | 20 ul (unknown #ug for now) |
| Buffer | 2.5 ul 10X CutSmart | 2.5 ul 10X CutSmart | 2.5 ul 10X CutSmart |
| Enzyme | 0.5 ul EcoRI | 0.5 ul EcoRI or XbaI | 0.5 ul EcoRI |
| Enzyme | 0.5 ul XbaI | 0 μL | 0.5 ul XbaI |
| H2O | to final volume of 25ul (not counting volume of enzyme) | ||
- Assemble the reactions in eppendorf tubes in the following order
- Water
- Buffer
- DNA (you can get pCX-NNX from the teaching faculty)
- Enzymes (you can get these from the teaching faculty)
- It is very important to be thoughtful to your labmates here!
- Use only clean pipet tips when going into the lab stocks of plasmids and enzymes.
- Keep the enzyme stocks cold or they will denature and be useless for everyone.
- Flick your tubes to mix the contents, give them a quick spin in the microfuge if there are droplets stuck in along the wall and incubate the digests at 37°C for the remainder of the lab period. The pCX-NNX digest will be finished almost instantly but PCR products are harder for enzymes to digest and should be allowed to react for at least one hour, in some cases overnight.
Part 4: Plasmid map tutorial for FNT
For the FNT due next time, you'll be asked to use a free piece of software. You may use the lab laptops while you are here and during office hours, and/or you can download the software on your own computer.
The procedure below reflects just one approach you may take to solving this assignment within ApE. Other program features may help you solve the assignment, but be sure not to "black box" any steps that you aren't sure you also understand how to do manually.
- Open ApE (A plasmid Editor, created by M. Wayne Davis at the University of Utah) on the computer of your choice.
- The code for the backbone plasmid, pCX-NNX, may be found under Engelward lab resources
. Prepare an ApE file with this code. Toggle the upper right button from linear to circular if need be. - Using Enzymes → Graphic Map + U, see how well the map compares to that shown in Part 2 above.
- Prepare a separate file with the EGFP ORF that you designed last time, and alter it to reflect the additions and deletions that you made via PCR.
- In the pCX-NNX file, find the restriction enzymes for cloning, and cut away the sequence in between.
- Finally, copy the EGFP insert sequence into pCX-NNX as it should appear after digestion and ligation.
For next week (Due M1D3)
See the FNW description on M1D1.
Reagents list
- PB
- Qiagen reagent with Guanidine HCl
- PE
- Qiagen reagent with Ethanol
- EB
- Qiagen reagent = 10 mM Tris, pH 8.5
- NEB CutSmart (10X)
- 50mM Potassium Acetate
- 20mM Tris-acetate
- 10mM Magnesium Acetate
- 100μg/ml BSA
- pH 7.9@25°C
Navigation Links
Next Day: Mod 1 Day 3: Agarose gel electrophoresis Previous Day: Mod 1 Day 1: DNA engineering using PCR
