User:Eleanor E. Wright/Notebook/Biology 210 at AU
March 22, 2014
The Effects of Nicotine on the Development of Zebrafish Embryos
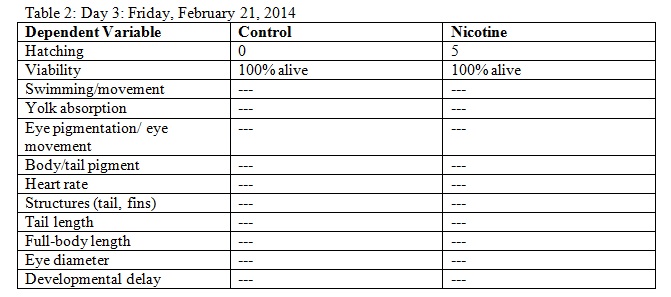
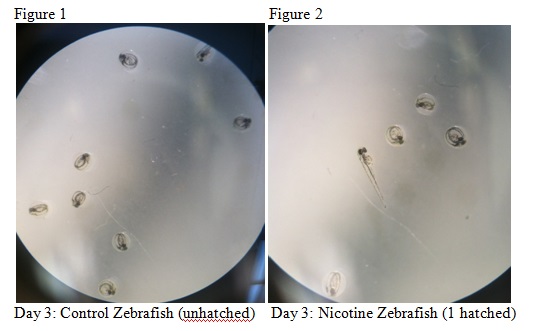
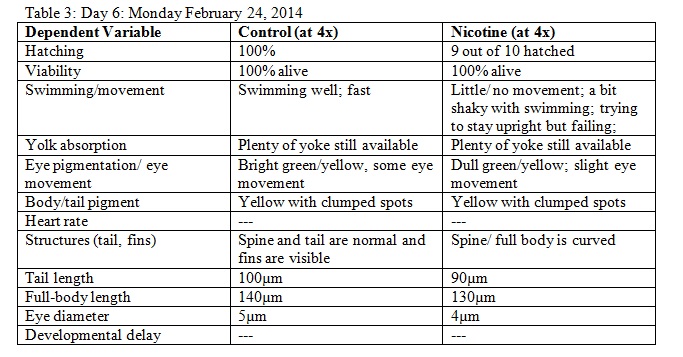
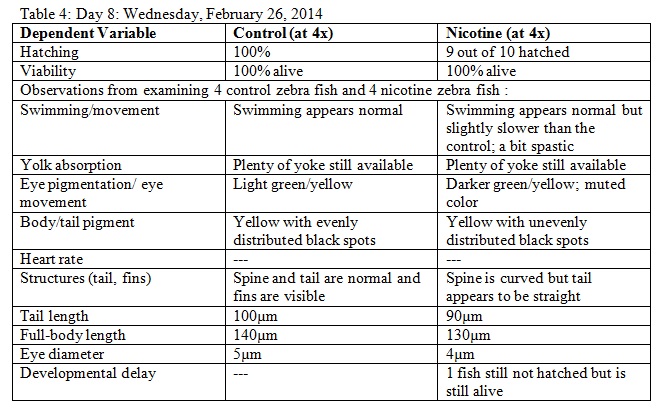
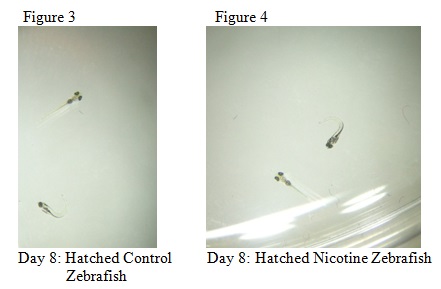
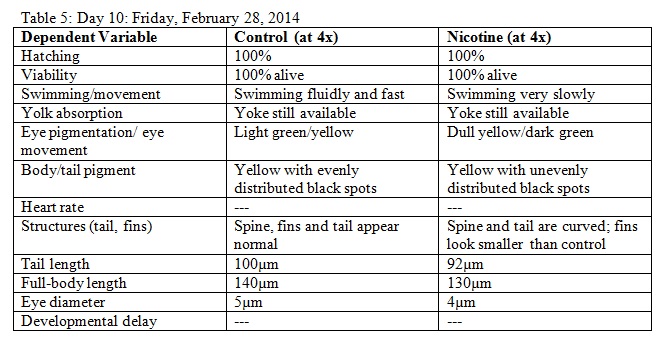
The purpose of this lab was to study the effects of nicotine on the embryonic development of zebrafish. Zebrafish embryos are ideal organisms to study the effects of nicotine because they are very sensitive to their surroundings. After reading published papers about the effects that nicotine can have on zebrafish development, we anticipated that nicotine would display deformations in the eyes as well as the overall body structure. From this study, we found that nicotine especially created irregularities in many physical features, but we were surprised that these differences did not appear to have a significant effect on the mortality of the zebrafish.
Procedure:
1. We filled a Petri dish with 20 mls of Deepark water and transferred 20 zebrafish embryos into the dish using a dropper.
2. Step 1 was repeated with a Petri dish with a 10% solution of nicotine
3. The fish were observed for various observations on dependent variables throughout a two week period. Observations were recorded in tables.
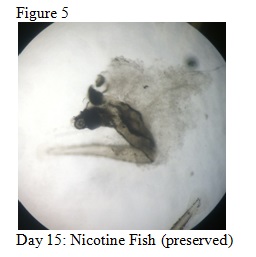
- On Day 8: 4 representative zebrafish were taken from the control and nicotine Petri dishes and observed in a depression slide using a 4x objective. These fish were then preserved in a tube with 1 drop of tricaine solution per ml of water. Paraformaldehyde was added to the tubes.
- On Day 15: The 4 fish (8 total) that were preserved in the paraformaldehyde solution were observed.
4. Dead embryos were removed as necessary as to not contaminate the living zebrafish
5. When the embryos were 4-5 days old in the control (water) Petri dish, 10 mls of water was removed and 25mls of fresh water was replaced. The same procedure was conducted with the nicotine Petri dish.
6.Step 5 was repeated as necessary in order to keep the fish in a fresh aquatic environment.
Results
Conclusion
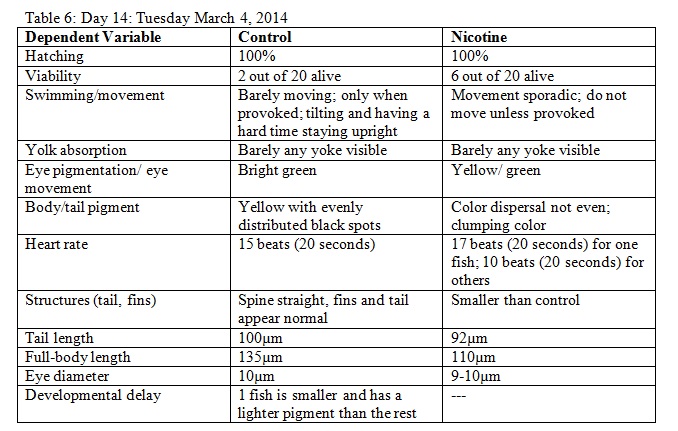
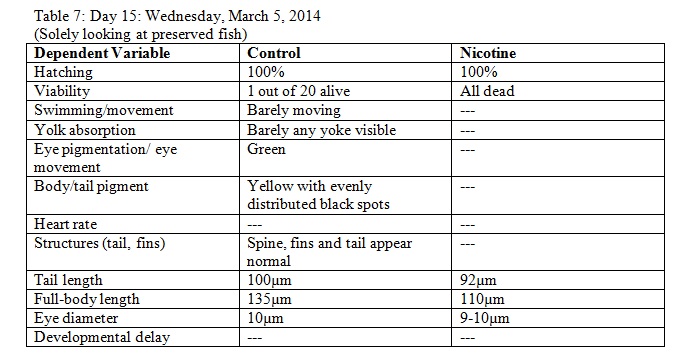
The objective of this experiment was to see how the nicotine would effect zebrafish embryos and compare our results to those of others who have conducted similar experiments with nicotine. It was clear from our data that nicotine had an effect on the eye pigmentation, swimming movement, size, and body pigment of the zebrafish. For all of these dependent variables, the zebrafish displayed clear physical deformations or abnormalities whenever observed. It was surprising, however, that the experimental (nicotine) zebrafish has similar, if not better, mortality rates as those of the control. For instance, as seen in Table 6, on Day 14 six of the experimental fish were alive while only two of the control fish were living. On Day 15 (Table 8) one control fish was living while all of the experimental fish were dead. From these observations, it appears as though the deformations that the experimental fish experienced did not have a significant impact on their mortality rate. However, in our readings of other studies pertaining to the effects of nicotine on zebrafish embryos, the mortality rates of the experimental zebrafish were affected by the physical disadvantages from nicotine. Perhaps there was a flaw in our experiment that led to our results. Something could have happened to the environment of the fish between Day 10 and Day 14 that we were unaware of. Nonetheless, we were successful in observing the physical effects that nicotine can have on zebrafish embryos. Our results may add to the current discussion revolving around the negative effects of nicotine in humans and other species. In the future, we can use this knowledge of nicotine effects and the sensitivity of zebrafish embryos in experiments and apply them to future studies.
EW
_______________________________________________________________________________________________
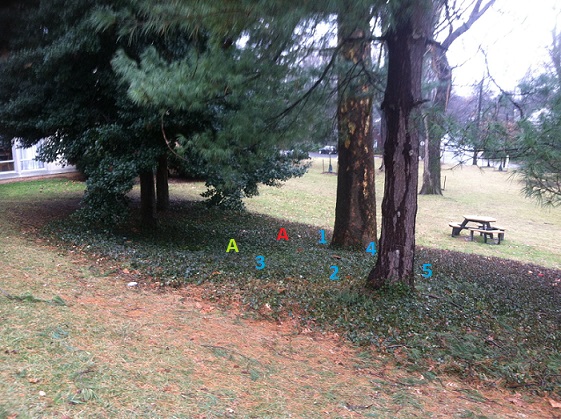
Transect Map
Key:
Green A - Lab 1 sample for Hay Infusion Culture
Red A - Lab 4 sample for Berlese Funnel
1 - Location of Maple Leaf
2 - Location of Eastern White pine needles
3 - Location of Ivy leaf
4 - Location of Sycamore bark
5 - Location of Eastern White pine cone
_________________________________________________________________________________
March 5, 2014
Lab 6: Interpreting the DNA Sequences
In Lab 4, we ran our PCR products in aggarose gel. We then sent our PCR products to Genewiz Inc. for sequencing. In this lab, we observed our sequences and compared them to our prior observations.
Procedure:
1. In Lab 4, our PCR products were purified used a Qiagen kit
2. The PCR products were sent to Genewiz Inc. for sequencing
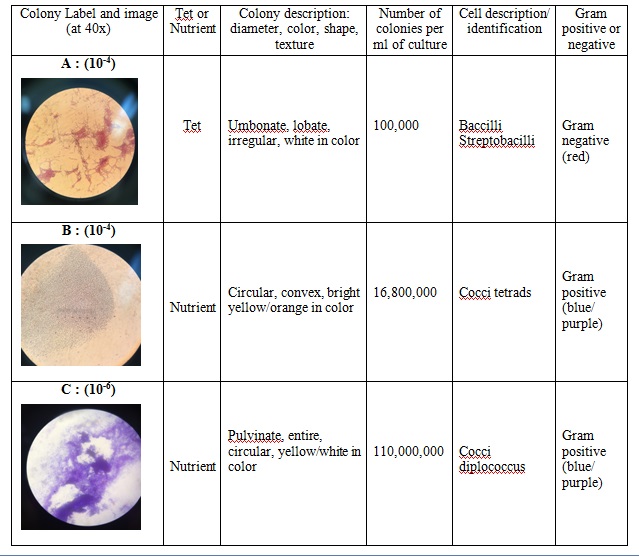
3. We analyzed the sequences once they were returned to us. Our observations are in Table 1 below.
Results
Conclusion
After comparing our in-class observations with what we researched online, both descriptions appear to match-up. The physical descriptions are relatively similar including the gram negative/positive results. Our group was very fortunate that Genewiz Inc. was able to sequence both of our PCR products. Overall, we were successful in our in-class observations, and it was interesting to learn more about the exact name and characteristics of our DNA sequences.
EW
_________________________________________________________________________________
February 25, 2014
Lab 5: Observing Invertebrates and Studying Vertbrates
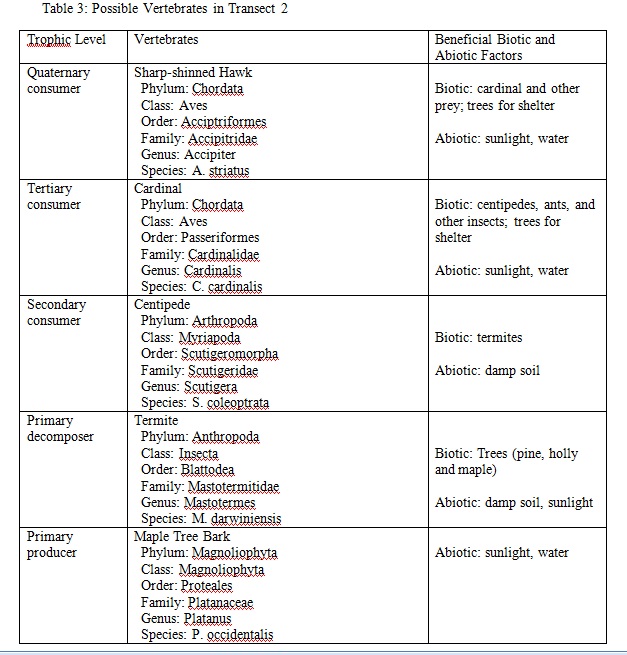
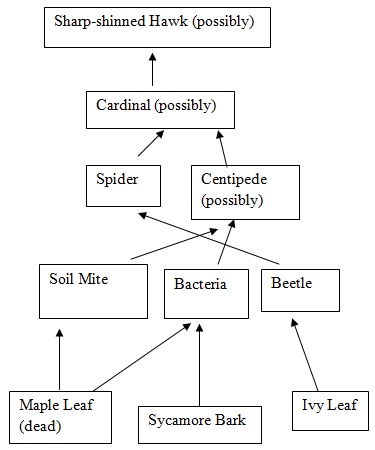
In Lab 4, we created a Berlese Funnel from the sample collected in location Red A (see map above). The purpose of this lab was to learn how to observe invertebrates from the Berlese Funnel and correctly identify them. In addition, we also learned how to classify arthropods in general as well as predict vertebrates in our niche. We were successful in identifying invertebrates from our transect and, consequently, learning more about our niche.
Procedure:
Observing sample invertebrates: Before we looked at the invertebrates from our Berlese Funnel, we observed other types of invertebrates. The exact procedure included:
1. Observe the Planaria
2. Observe the nematodes
3. Observe the Annelida
Observe the invertebrates from the Berlese Funnel:
1. Transfer the preservative solution into a Petri dish.
2. Observe under a microscope and try to identify the invertebrates using the dichotomous keys. Record results.
Results
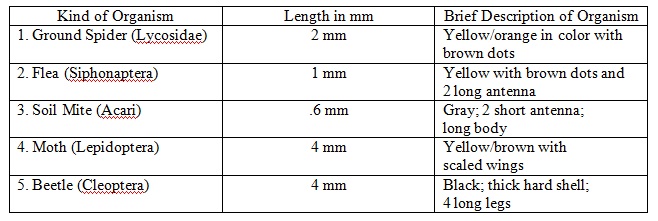
Table 1: Transect Invertebrates
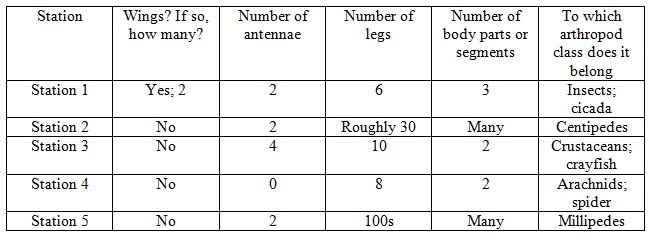
Table 2: Student Handout Unidentified Arthropods
Figure 1: Food Web
Conclusion
In this lab, we were successful in meeting our goal to observe and identify the invertebrates of our transect. We also learned a great deal about the possible vertebrates and arthropods of the transect. In all, these past labs have taught us a great deal about the ecosystem of our niche.
EW
_________________________________________________________________________________________________
February 25, 2014
Lab 4: Identifying Transect Plants, Observing Fungi, and Berlese Funnel Preparation
The purpose of this lab was to understand how plants evolved as well as observe and identify various characteristics in diverse plants in our transect. Considering that our transect had three trees, I was expecting a great deal of diversity. Another objective of this lab was to observe the characteristics of fungi. In this lab, we were successful in learning more about the diverse characteristics of plants and, consequently, learn more about the ecosystem of our transect.
Procedure:
Collecting plant samples/Observing plant samples: We collected plants from our transect and classified them in the lab. At this time we also collected samples to use for the Berlese Funnel. The exact procedure included:
1. Dig into a place in the transect (location Red A on the transect map). Fill a plastic bag with 500g of soil and the rest with various foliage.
2. Take samples of five plants: keep in mind to look for a wide range of plants. Place in plastic bag.
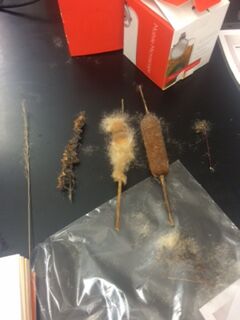
3. In the lab, classify the various plants and record physical observations
Observing fungi: In this lab, we also looked at fungi which are necessary decomposers in an ecosystem. The exact procedure included:
1. Observe the black bread-mold under the microscope
Prepare the Berlese Funnel: In preparation for next week's lab, in which we will observe invertebrates, we prepared a Berlese Funnel. The exact procedure included:
1. Pour 25ml of the 50:50 ethanol/water solution into the bottle
2. Put screening material into the bottom of the funnel
3. Put the funnel into the neck of the square-sided bottle
4. Place the leaf sample (collected from location Red A) in the top of the funnel. Put a 40 watt lamp above the funnel 1-2 inches from the top of the leaf sample
5. Cover everything with foil
Results:
Table 1: Transect Plants
Conclusion:
In this lab, our purpose was to learn more about our transect by observing the diverse characteristics of various plants. We were successful in meeting our goals in this area as well as learning about fungi. An interesting fact that I learned was that fungi sporangia are one of the most important parts of fungi because they enclose spores which are necessary for asexual reproduction. Next week, we will observe invertebrates from the Berlese funnel and, as a result, learn about another interesting aspect of our transect.
EW
____________________________________________________________________________________________________
February 13, 2014
Lab 3: Identifying Bacteria and Starting PCR Preparation
The purpose of this lab was to observe and identify bacteria from the agar plates from the serial dilutions of the Hay Infusion culture. We compared the colonies of bacteria with and without the antibiotic tetracycline. This helped us further understand the nature of bacteria and, therefore, learn more about the ecosystem of our transect. In this lab, we also started PCR Preparation for next week's lab.
Procedure:
Observing the Agar Plates: Before we looked at the bacteria under the microscope, we first observed the number of colonies. The procedure included the following steps:
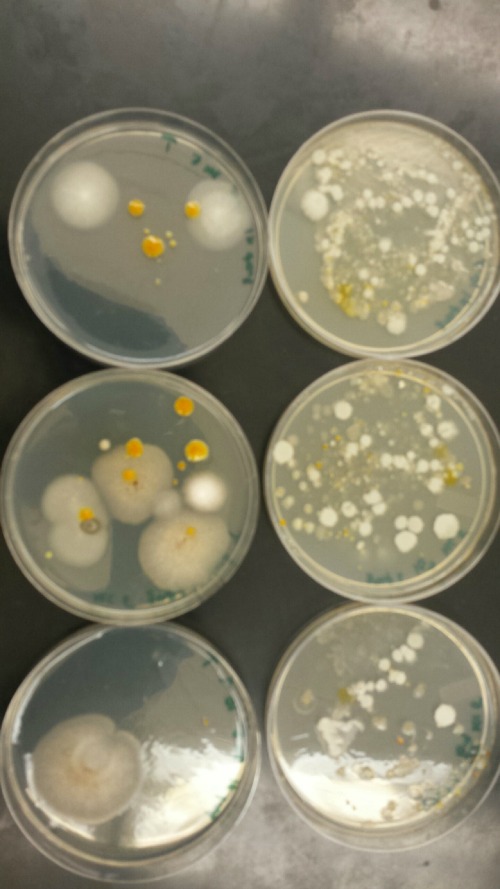
1. Look at the various plates and count the number of colonies observed.
2. Record results in a table (see Table 1 below)
Comparing and Contrasting Tetracycline vs. Non-Tetracycline Plates: We compared the bacteria plates that had the antibiotic tetracycline to the ones that did not. Detailed observations are in the Data section below.
Make a Wet Mount of the Bacteria: We picked two colonies from the nutrient agar plates and one from a tetracycline plate. We then created wet mounts for each and observed them under the microscope. The procedure included the following steps:
1. Scrape a tiny about of a colony from the surface of the agar plate and mix it with a drop of water on a slide
2. Place a cover slip on top of the slide
3. Observe the slide under the microscope and record observations
4. Repeat steps 1-3 with 2 other colonies (total: 1 from a tetracycline plate; 2 from nutrient agar)
Prepare Gram Stains of the Bacteria: Using the same colonies from the previous wet mount procedure, we created gram stains so that we could see the bacteria more clearly. The procedure included:
1. Scrape a tiny about of a colony from the surface of the agar plate and circle the area underneath the slide with a red wax pencil.
2. Bacteria side up, pass the slide through a flame three times
3. Cover the bacteria smear with crystal violet stain for 1 minute
4. Rinse off stain using water
5. Cover bacteria with iodine mordant stain for 1 minute
6. Rinse off stain suing water
7. Cover the bacteria smear with 95% and rinse
8. Cover with bacteria smear with safranin stain and rinse
9. Blot excess water on slide with a paper towel
10. Observe the gram stain slide under the microscope and record observations
Start PCR Preparation: Using the 2 of the nutrient agar plates with the best characterization, we prepared to isolate DNA from the bacteria. However, during the incubation process, one of our prepared tubes of bacteria evaporated. As a result, we only have one remaining tube to use in next week's lab. The procedure included:
1. Transfer a colony of bacteria into 100µl of water in a sterile tube.
2. Incubate the tube at 100 °C for 10 minutes and then centrifuge
3. Put 5µl of supernatant in the PCR reaction
Data:
All of the plates with the antibiotic tetracycline had significantly fewer colonies than those without it. For instance, according the Table 1, the nutrient agar plate with 10-7 dilution had 110,000,000 colonies per ml. In contrast, the tetracycline plate with the same dilution had 0 colonies per ml. This shows that tetracycline fought against the bacteria growing in that plate. Tetracycline is very versatile in terms of what bacteria it can target. Some of the bacteria that tetracycline works against include Streptocouccus sspp and Neisseria gonorrheae. Tetracycline stops bacteria from growing by interfering with their enzyme reactions. Therefore, the bacteria cannot reproduce and multiply.
Table 2: Bacteria Observations
Looking at our Hay Infusion Culture from last week, we noticed some changes:
- smell is worse probably due to more bacteria
- water is darker in color
- thicker layer of dark foliage on the bottom of the jar
- less water in the jar
- No fungi layer on the top of the water
Conclusion:
In this lab, we were successful in observing our colonies of bacteria and identifying them. Originally, I hoped that some archaic species would have grown on the agar plates, but I did not think their environments were extreme enough. By observing the bacteria in this lab, we also met our goal to learn yet another aspect about the ecosystem in our transect. In the next lab, I look forward to running the PCR products in aggarose gel.
EW
________________________________________________________________________________________
February 6, 2014
Lab 2: Classifying Organisms and Plating Serial Dilutions
The primary purpose of this lab was to learn how to use as Dichotomous Key to successfully characterize various organisms from our Hay Infusion Cultures. Going into this lab, I did not have any predictions regarding what organisms I would find. However, since we took samples from various locations in the Hay Infusion Culture, I expected that a range of organisms would be identified. In addition, we prepared serial dilutions and inoculated them on agar and tetracycline plates. The purpose of this portion of the lab was to grow colonies of bacteria that will then be observed in next week's lab.
Procedure:
Dichotomous Key Practice: Before we created and observed wet mounts from the Hay Infusion Cultures, we practiced classifying organisms with a wet mount from another sample. The procedure included the following steps:
1. Make a wet mount from the provided sample
2. Focus on an organism and use the Dichotomous Key to identify it
3. Repeat step 2 with a second organism
Hay Infusion Observations using the Dichotomous Key: We took samples from the Hay Infusion Culture that we prepared last week to create wet slides. We then looked at the wet slides under the microscope and identified six organisms. Instead of taking samples from two different areas, we took samples from 3 different areas because we wanted to look at a sample off of a leaf. Therefore, we identified two organisms from each area instead of three. Specifically, our procedure included the following steps:
1. Take samples from three different areas in the Hay Infusion Culture
2. Make one wet mount per sample (total of 3)
3. Observe each wet mount slide and classify two organisms each using the Dichotomous Key (classify 6 organisms total)
4. Record observations in the lab notebook
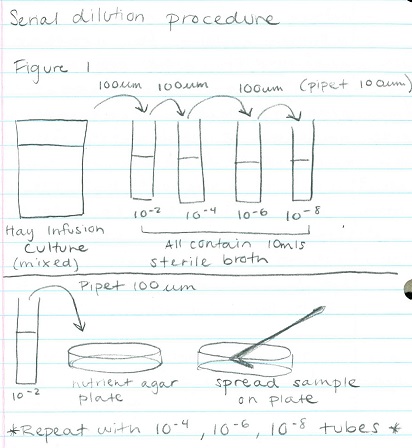
Preparing Serial Dilutions and Plates (Diagram 1): This procedure was preparation for next week's lab in which we will observe bacteria species. This procedure will allow bacteria to grow and form colonies which we will then work with. The procedure included the following steps:
1. Label 4 tubes of 10mls of sterile broth with 2, 4, 6, and 8
2. Label 4 tetracycline plates with 10-3, 10-5, 10-7, and 10-9. Repeat this with the nutrient agar plates
3. Swirl the Hay Infusion Culture then take 100mls and add it to the 10mls tube labeled 2. Swirl tube.
4. Take 100mls from tube 2 and add it to tube 4. Repeat this step with tubes 6 and 8.
5. Take 100mls from tube 2 (now 10-2) and place it on the 10-3 nutrient agar plate and spread it evenly.
6. Repeat step 5: tube 4 = agar plate 10-5, tube 6 = agar plate 10-7, tube 8 = agar plate 10-9
7. Repeat steps 5 and 6 with the tetracycline plates.
Figure 1: Serial Dilution Procedure
Data:
General Hay Infusion Culture Observations:
smell - dirt, earthy, moldy
appearance - semi-clear water, thin layer of fungus on top of water and on leaves underwater, slightly brown/greenish water with floating particles in it, apparent life on the top of the liquid (mold and general movement)
Prepared Wet Slides:
Wet Slide 1 = sample from surface of water
Wet Slide 2 = sample from leaf underwater in the middle of the jar
Wet Slide 3 = sample from the bottom of the jar; dense in foliage and dirt
Wet Slide 1 = surface sample
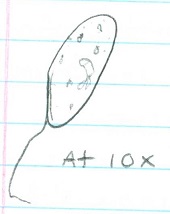
1. Image 1:
Classification: Bursaria Truncatella
Size: 400um
Protist ; no photosynthesis
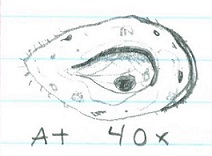
Observations: mobile (cillia covering entire body), wiggling/ vibrating motion, oval shaped, mainly clear, slightly speckled.
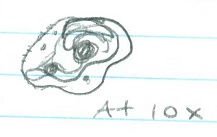
2. Image 2:
Classification: Didinium Cyst
Size: 17.5um
Protist; no photosynthesis
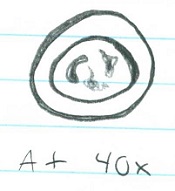
Observations: hardly moving, slow circular motion, perhaps cilia is present?
Wet Slide 2 = leaf underwater
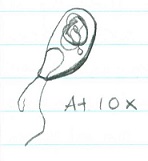
3. Image 3:
Classification: Peranema Sp.
Size: 20um
Protist; no photosynthesis
Observations: colorless, vibrating, flagella, moving quickly
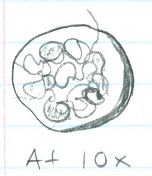
4. Image 4:
Classification: Bursaria truncatella
Size: 300um
Protist; no photosynthesis
Observations: cilia present but not moving as quickly as same organism in Figure 1. smaller in size in comparison to Figure 1. darker in color, speckled, still somewhat clear
Wet Slide 3 = bottom of jar
5. Image 5:
Classification: Chilomonas sp.
Size: 50um
Protist; no photosynthesis
Observations: 2 flagella, very fast, single cell (elogated), one dark spot
6. Image 6:
Classification: Pandorina
Size: 60um
Algae; photosynthesizing
Observations: lots of movement inside cell but cell itself is not moving much, spinning motion, colony containing many cells, greenish color, very dark colored in general
Discussion:
The organisms that I found on plant vs. non-plant matter somewhat surprised me. Organisms that are closer to plant matter are more likely to be algae or some other forms that undergo photosynthesis. Interestingly enough, I did not find such organisms in the Wet Slide 2 sample which was taken off of a leaf. However, I did find Pandorina (Figure 6) in the Wet Slide 3 sample which was taken from the bottom of the jar. It is highly possible that algae could have developed on the bottom of the jar because it was thick with foliage and dirt.
I was glad to see such a variety and abundance of living organisms. The Peranema Sp. was just one of the living organisms I found. As a protist, it acquires and uses energy as a part of survival. This is a fundamental characteristic of living matter. It is also made up of a cell, and cells are necessary in all living organisms. Peranema Sp. have been a part of evolution, as their clear coloring has distinguished them from otherwise extremely similar organisms like Eugelna. Peranema Sp. undergoes asexual reproduction and stores information which also classifies this organism as living.
There are many selective pressures that affected the compositions of our samples. For example, the thick layer of dirt and varieties of leaves on the bottom of the jar had a significant impact on the types of organisms found there. Also, the amount of water, exposure to light, and the air quality all had an impact on the composition of our samples.
Conclusion:
In this lab we successfully met our purpose to identify organisms in our Hay Infusion Culture. If we were to observe the Hay Infusion Culture for another two months, I would expect an increase in bacteria. Consequently, I would expect an increase in protozoa because that is what feeds on bacteria. However, I would only anticipate this growth up until the point where the culture is overpopulated and the organisms do not have enough resources to survive.
This lab, we also successfully prepared nutrient agar and tetracycline plates to use in Lab 3. By observing organisms in the Hay Infusion Culture this week and by observing bacteria colonies next week, we will continue to learn more about aspects in an ecosystem.
EW
________________________________________________________________________
2/6/14, lab 1 notes
Awesome job! Start working on building a map of your transect to detail your land and where your samples are taken from. We will talk about this more Wednesday
AP
January 31, 2014
Lab 1: Observing the Volvocine Line and Transect 5
In this lab, the purpose was to observe evolution through the Volvocine line and learn about other aspects of an ecosystem in our studies of a transect. Specifically, in viewing the transect, our purpose is to observe how factors, such as evolution, have contributed to the diversity in the ecosystem. In the future, we will continue to observe our transect on a regular basis and further investigate how an ecosystem changes over a period of time.
Procedure:
In this experiment, we first observed three organisms that are part of the Volvocine line: Chlamydomonas, Gonium, and Volvox. This procedure included the following steps:
1. Prepare slides of each of the three organisms
2. Observe slide under the microscope. Specifically observe the number of cells, colony size, functional specialization, and any reproductive specialization for each. Also observe patterns or trends in evolution. Record data in table (see below: Table 1).
The next step in this lab was to visit and observe our assigned transects for the first time. We took a sample from the transect to utilize in the lab. Where we took the sample is labeled with a green A on the map above. This procedure included the following steps:
1. Locate the 20ft by 20ft transect (in our case, transect 5)
2. Observe and record the general characteristics of the transect as well as the abiotic and biotic components.
3. Using a sterile 50 ml conical tube, take diverse sample of the soil and vegetation in the transect. Take tube back to the lab.
With the sample from the transect, we then created a hay infusion culture. This procedure included the following steps:
1. Weigh 10-12 grams of the sample and place in provided plastic jar with 500mls of deerpark water.
2. Add .1 grams of dried milk to the jar, place the top on the jar, and mix gently for 10 seconds
3. Remove top, label jar, and place the open jar in a safe place.
Data:
Volvocine Line Data
Table 1: Evolutionary Specialization of Members of the Volvocine Line
  Name ; Number of cells ; Colony size ; Functional specialization of cells ; Describe any reproductive specialization
  Chlamydomonas (@ 40x) ;  3 ; 1 cell= 10um; unicellular. Moves quickly with 2 flagella ;  Isogamy
  Gonium (@40x) ; 2 ;  8 cells= 200um  ; multicellular. Vibrating appearance. Has cillia ; Isogamy
  Volvox (@10x) ; 1 ; Many cells= 400um ; multicellular. Has flagella and is fast moving ; Oogamy
Cell specialization plays a significant role in these three genera. Volvex has oogamy reproductive abilities as well as anterior/postanterior cell poles. This characteristic distinguishes Volvex from the other genera, and it displays that Volvex is moving away from the characteristics of Chlamydomonas and Gonium through the beginnings of cell specialization.
In the Volvocine line, evolution appears to always move towards increased complexity. Chlamydomonas, the origin of the Volvocine line, is the least complex (it is unicellular) and Volvox is the most complex in this line. However, evolution does not always move towards increased complexity in all species.
Transect 5 Data
Figure 1: Picture of Transect 5
Location: Off-campus near the Wesley Theological Seminary. On a downhill slope with a concrete seminary building nearby. Various hedges are uphill from the transect and a picnic area is downhill. Three trees (Figure 1 from left to right: holly, dead oak, pine) put the transect mostly in shade. Thick foliage of various greenery including ivy and dead pine needles (roughly 1 foot deep), cover the entire transect's ground.
Abiotic factors: lack of sunlight through the trees' branches, cold air, run-off from concrete building, dead oak tree, damp soil
Biotic factors: Pine tree, holly tree, thick foliage on ground
No observations on the hay infusion culture at this time. More observations in the next lab.
Conclusions and Future Plans:
In this lab, we observed the Volvocine line in order to study the process of evolution. We then observed an assigned transect which displayed a wide variety of organisms. The diversity in the transect's ecosystem further illustrated how evolution can create a range of related species. For instance, transect 5 had three trees that embodied different characteristics but also shared numerous similar qualities. We were successful in observing the aspects of an ecosystem, especially evolution. In the future, we will further observe aspects of the transect, particularly through the hay infusion culture, and learn more about its ecosystem.
EW
______________________________________________________
January 22, 2014
I successfully entered text.
EW

