BME100 s2015:Group12 12pmL6
| Home People Lab Write-Up 1 | Lab Write-Up 2 | Lab Write-Up 3 Lab Write-Up 4 | Lab Write-Up 5 | Lab Write-Up 6 Course Logistics For Instructors Photos Wiki Editing Help | ||||||
|
OUR COMPANY
LAB 6 WRITE-UPBayesian StatisticsOverview of the Original Diagnosis System An assembly of 26 teams, each composing of around 5 to 6 research team members, were created. Each team was given two patients for data analysis, totaling 52 patients. The use of PCR allowed for the copying of DNA, ensuring that the research conducted was able to use the proper amounts of DNA needed. During the study, each sample collected from the patient was analyzed for SNP, or single nucleotide polymorphism. This was to determine whether each sample was suspectible to disease or if there was a lack of an affliction. The use of the Bayesian equation was critical in providing the conclusions made from the study. It was apparent that some of the teams were unable to secure the data needed for analysis. Due to the high probability of data inaccuracy, the Bayesian method provided assistance in increasing credibility and reducing data ambiguity. One suggestion may be that the technical method of collecting the study's data (the fluorimeter setup, the ImageJ calibration, etc.) may have played a key role in the inconsistencies found during the research. To combat this problem, multiple images were taken of each sample (the standard was 3 per sample). This was done in case some of the images were of poorer quality and needed to be replaced with better representation of the samples.
What Bayes Statistics Imply about This Diagnostic Approach
Computer-Aided DesignTinkerCAD TinkerCAD is a website that uses modeling software to built components. In the research team's collective opinion, TinkerCAD is basically an elementary version of Solidworks. The website was invaluable in providing a visual representation of designs. The team was tasked to create a new concept of how the PCR and fluorescence experiment can be set up and carried out. For the purposes of this assignment, the light box and cradle system for the fluorimeter setup were integrated for efficiency and simplicity. To show this, TinkerCAD provided the needed software and tools to show the changes made.
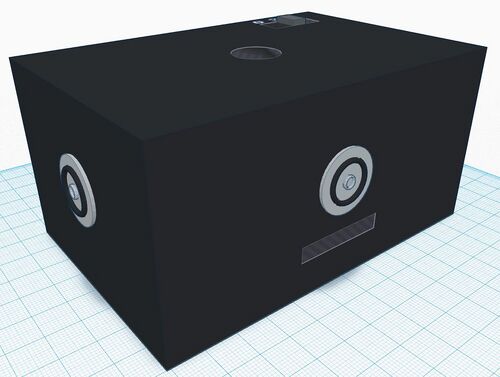
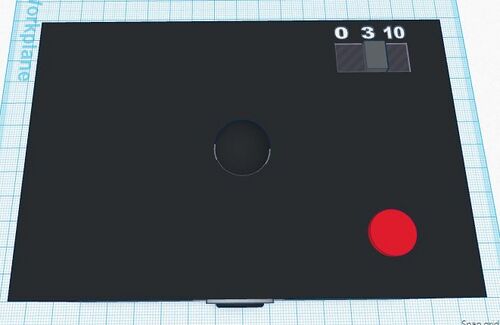
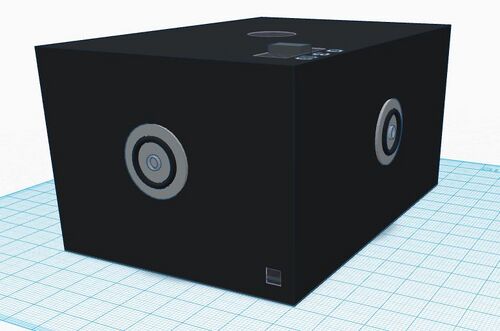
This is the overview of the new light box design for the fluorimeter. There are cameras on each of the four sides that compose the light box. The front of the light box has an opening which allows the panel to be lifted up and down. This will allow the fluorimeter to be placed inside and allow for slides to be switched out. The cameras added to the light box eliminate the need for a smartphone/cradle construct. This is the top view. The center is where the sample can placed on the slide via pipetter without having to open the front panel of the light box; the half-spherical cap can be lifted and closed during this process. The upper right corner is a built in timer for the cameras to take the images of the sample and can be adjusted through the use of the switch. The pictures can be taken instantly or set on a 3 second or 10 second delay. The red button will initiate the picture taking process. These changes were made to reduce the amount of interaction with the smartphone, as well as keeping the fluorimeter in place as much as possible. This is the side where the USB port is located. Once the pictures are taken, they will be uploaded to a smartphone via USB cord where they will be stored on the SD card. The light box's camera settings can be changed manually through the smartphone via app and transmitted to the light box by USB cord.
Feature 1: Consumables Kit
This kit comes with the standard materials to accomplish a laboratory experiment regarding PCR. The research team who conducted this study believes that no changes are warranted for the kit. This is due to the fact that what was provided for the laboratory environment was sufficient in completing the research. The objective is to provide everything an experimental group will need all in one sitting. Positive: The consumables kit was basic, cheap and completed the task it was set out to do. The pipetter was able to extract the fluids from each of the tubes without too much trouble. The pipetter came with disposable tips in order to reduce cross contamination of materials. Downside: The individual tubes were tedious to open and close while wearing safety gloves. This ran the risk of spilling the individual tubes' fluid over the table in the laboratory. Labeling the tubes individually had to be done in order to determine which sample belonged to each tube. The labeling was done with a sharpie which could have been erased easily. The biological materials the study used had to be kept in a certain temperature and environment so as not to damage or ruin them.
Feature 2: Hardware - PCR Machine & FluorimeterPositive: PCR is relatively simple to do, does not seem to require special certification to accomplish properly. ImageJ software was versatile and useful in finding the necessary data for analysis. Downside: It can take several hours for the OpenPCR machine to analyze a few samples. The fluorimeter setup was clumsy and easily susceptible to human error. Special care had to be made so as not to disturb the smartphone and its cradle. The light box's front panel could easily move the fluorimeter and cradle around when it closed off both components of the setup from excess light. The flourimeter's slides were a bit old fashioned in their removal and insertion into the device.
| ||||||


