BISC110/F13: Series 1 Lab 2 Tetrahymena Behavior
Objectives: In this lab you will learn:
- Proper use of the microscope
- Measurement of specimens using the micrometer
- Calculation of effective concentration
- Observation of the model organism Tetrahymena pyriformis
- Experimental design
PART I: Microscopy
Most cells measure about 1–100 micrometers (µm) in diameter. This size is smaller than can be detected by the unaided human eye; therefore, microscopes are needed to visualize cells and their component parts. The compound light microscope can magnify to about 1000 times the actual size of the specimen and can resolve details as fine as 0.2µm. In this part of today’s lab, you will learn to use the compound microscope by examining the unicellular organism Tetrahymena pyriformis.
A. Care of the Microscopes
A compound microscope is available for each student's use. Remember at all times that your microscope is a precision optical instrument and must be handled carefully. When removing the microscope from the cabinet, do not jar or drop it. Always carry it upright with one hand below the base and the other hand on the arm of the microscope. Place the microscope at least 6 inches from the edge of the bench. When returning the microscope to the cabinet, check that:
- The microscope light is turned off before the microscope is unplugged;
- The lowest objective lens is near the stage and the stage itself is lowered; and
- The microscope is covered (if there is a cover available).
B. Parts of the Microscope
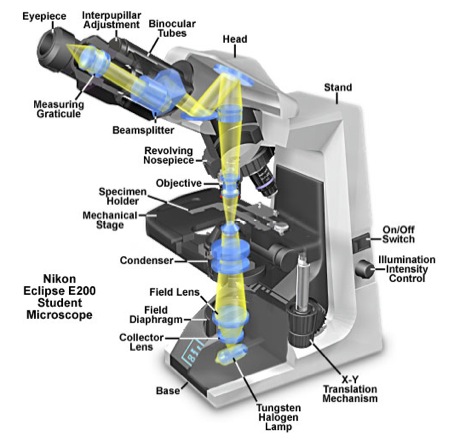
Figure 1 contains a diagram of a compound microscope and may help you locate some of the parts referred to in the following explanation. The compound microscope derives its name from the two sets of lenses it uses to magnify objects. These lenses are the objective lens, which can be found on the rotating nosepiece near the stage of the microscope, and the ocular lens, which is in the eyepiece. Your microscopes are equipped with several objective lenses, ranging from low to high magnification, including one oil immersion lens. The microscope magnifies by shining light from the light source through the iris diaphragm that limits the diameter of the light beam. The condenser lens focuses the light through the specimen that is on the stage. The stage is movable in order to view different parts of the specimen. The image we see is formed under the ocular lens by the objective lens and is a mirror image of the actual specimen.
Figure 1. A Cutaway Diagram showing the beam path of the Nikon Eclipse E200 Compound Light Microscope used in the Biological Sciences 110 Laboratory at Wellesley College. [SOURCE: http://micro.magnet.fsu.edu/primer/anatomy/nikone200cutaway.html]
C. Regulation of Illumination
- The illumination intensity knob is located on the right side of the microscope just below the on/off switch. It has a setting range of 1-10 with 10 being the brightest level. This knob should ordinarily be set to 7.
- Another way of adjusting illumination is by changing the position of the condenser lens. The condenser lens adjustment knob is located below the specimen stage and on the left side. It allows the user to move the condenser lens assembly up or down. As you move the condenser lens up, closer to the specimen, it concentrates (condenses) more light on your specimen. You will need to make this adjustment as you go up in magnification, so that you will have sufficient illumination.
- The condenser aperture diaphragm is located below the specimen stage on the condenser lens assembly. It is an adjustable opening, which allows you to make fine adjustments in illumination. The lever, which adjusts the size of the aperture, faces the user. By sliding the lever to the left or right, you may adjust the illumination to the correct level for your specimen. Changing the size of this aperture also affects the amount of contrast in the image. Thus, adjusting the condenser aperture involves finding the brightness level, which gives you the best combination of illumination and contrast. This is the method used most often in adjusting illumination in the light microscope.
- Another method of adjusting illumination is by using the field aperture diaphragm. This is mentioned here for the sake of completeness, as most light microscopes have an adjustable field aperture. However, the microscopes in the 110 lab lack this adjustability, which allows the user to obtain illumination that is uniformly bright and free from glare (Köhler illumination).
D. How to Locate Specimens Using a Compound Light Microscope
- Place specimen slide on microscope stage and secure with clamping arm. The slide is properly in position if turning each of the stage adjustment knobs moves the slide appropriately. Position the 4x or 10x objective into place. It will click when it is properly positioned directly over the slide. Make sure that there are several inches of clearance between the glass slide and the lens.
- Using the stage adjustment knobs, position the edge of the coverslip in the center of the illuminated area. Look into the microscope and adjust the eye pieces so that you can see one image when you use BOTH eyes for viewing. While looking through the oculars and 4x or 10x objective lens, rotate the course focus knob slowly so that the distance between the slide and the objective lens is reduced. When you see the black line that indicates the edge of the coverslip is coming into focus, switch from the course to the fine focus adjustment and bring that "black line" into sharp focus. Switch to the 10x objective and refocus. Use the stage adjustment knob to move away from the edge of the coverslip into the area where your specimen is located. To increase the magnification of the specimen, rotate the nosepiece to the 40X objective lens and focus using ONLY the fine adjustment knob. Never use the coarse focus knob when you have the 40x objective in place.
- Although you will not use the 100x objective to view your specimens today, be aware that immersion oil must be placed on the slide in order to use the 100X objective lens. Therefore, please be sure NOT to use the 100X objective.
E. Calculation of Total Magnification
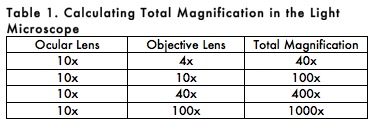
Total magnification of the specimen is determined by multiplying the magnifying power of the ocular and objective lenses. For example, a 10X ocular and a 40X objective together give a total magnification of 400X (Table 1). This means that the specimen appears 400 times larger when viewed with a microscope than its actual size.
F. Size Measurement of Cells and Cellular Structures
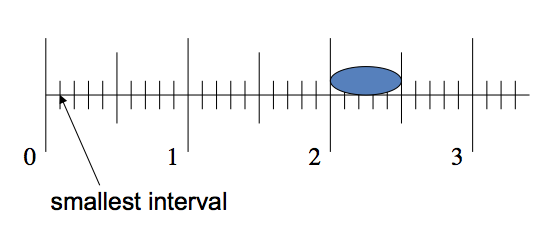
Cell size can be measured using an ocular micrometer. A micrometer has been installed in one of the ocular lenses of each microscope in the laboratory. As you can see below, it looks like a small ruler with both large and small units. The large units are numbered 1, 2, 3, etc. The small units are subdivisions of the large units and are not numbered. There are 10 small units per large unit.
The small units represent different lengths depending on the objective lens in use. You will measure cellular structures in small units only, and then convert to metric units (µm = micrometers) using the conversion values below.
Therefore, if you are observing a cell with the 40X objective, and this cell spans 2.5 small units on the ocular micrometer scale, then the size of the cell is calculated by multiplying 2.5 small units x 2.5µm/small unit = 6.25µm. You should always calculate size of any object that is the focus of a figure in a photomicrograph for a scientific paper. Because digital imaging allows manipulation of size post-viewing, giving the total magnification is sometimes misleading. You should calculate and give the size of any important object in the figure legend.
PART II: Examination of Tetrahymena pyriformis
To help you become familiar with the use of the compound microscope and to prepare for experiments with Tetrahymena pyriformis in Labs 3 and 4, today you will observe live Tetrahymena. The protozoan Tetrahymena is used as a model organism for the study of cellular processes such as phagocytosis. Tetrahymena are easy to maintain in culture and they can be observed using the compound microscope.
NOTE: You will not use the oil (100X) objective today to view your Tetrahymena.
- Obtain a microcentrifuge tube containing live Tetrahymena.
- Mix it gently by inverting a few times (no vortexing). It is best to obtain a sample from the TOP of the tube, since the cells will be more concentrated in that location.
- Add 20μL of the live Tetrahymena to the center of a clean glass slide, add a cover slip, and then view the cells using the microscope, starting with the lowest power and moving up to 400x total magnification.
- Carefully observe the behavior of the Tetrahymena and record your observations in your lab notebook.
- Using a digital camera, take photos of the Tetrahymena. Be sure to record the total magnification and include the ocular micrometer in your photographs. Please refer to the directions below, Use of the Cannon A620 and A630 Digital Cameras, or Appendix H for detailed camera instructions.
Use of the Canon A620 and A630 Digital Cameras
Focus your microscope slide image.
Record the total microscope magnification in your laboratory notebook.
We own several Canon digital cameras: A620 models with a resolution of 7MP (megapixels) and A630 models with a resolution of 8MP. The A620 and A630 models are essentially the same camera. Our strategy will be to capture images at the highest resolution (7 or 8 MP) of the camera, transfer them to the computer and use Photoshop to edit.
- Pull out the viewfinder and flip it so you can see the screen on the back of the camera.
- To take a photo, make sure the switch on the back of the camera is set to the red-camera-icon position (live image mode).
- Set the camera to auto on the wheel at the top of the camera near the on/off button.
- Turn off the flash by pushing the function wheel on the back of the camera under the lightning (flash) symbol. If the flash is off the flash symbol will have a line through it on the screen.
- Push the zoom all the way to the left so that you've zoomed out all the way.
- Place the camera lens against the microscope ocular lens containing the ocular micrometer.
- Move the camera lens around the microscope eyepiece to find the image. This takes a little practice and patience. The camera lens should not touch the microscope eyepiece. The image field is circular.
- Rest your left hand on the side of the microscope eyepiece and cup your fingers around the lens of the camera and the microscope. This will stabilize the camera and facilitate obtaining the best image. The camera lens should be about a quarter of an inch or so from the ocular lens.
- The camera will automatically focus the image. When you have obtained an evenly illuminated circular image field, gently press the exposure button at the top of the camera to take the picture.
- To transfer captured images to the computer, slide the switch on the back of the camera from the red-camera-icon position (live image mode) to the blue-arrowhead-icon position (captured-image review mode).
- Plug the USB cable into the computer keyboard port located on back of keyboard, then into camera port. The iPhoto window opens up. Check box to delete image from camera.
- Click Import to download your image into the iPhoto Library folder. Confirm that the “Delete originals” button is selected.
- In the File menu, select Export... The Export Photos window opens. Select “Full-size images” and “Original” format. Click Export button.
- A window shade drops down in the Export Photos window. Rename your file in the Save As text box and choose Desktop as your destination. Click OK. Close the iPhoto window.
- Launch Adobe Photoshop. In the File menu, select Open… The “Open” window appears. Find and select your image, then click Open.
- In the Embedded Profile Mismatch window, select “Use the embedded profile…” and click OK. Your image opens.
- Select the “Rectangular Marquee Tool” by typing the letter M on the keyboard. Drag cursor to select desired portion of your circular image, including a segment of the ocular micrometer. This yields a conventional rectangular image suitable for use in a paper.
- In the Image menu, select Crop. The selected portion of your picture appears on the desktop.
- In the Image menu, select Image Size... The “Image Size” window appears. Make sure the Constrain Proportions box is checked. In the Document Size portion of the window, decrease the larger of the two image dimensions to 4 inches. Click OK.
- In the File menu select Save As… and rename file. Use JPEG as the image Format. Click Save. JPEG Options window opens. Set Quality to Maximum (10). Click OK. This will create a small file of about 150–300KB in size. Delete the original large (3MB) image file.
- Email the images to yourself and to your partner(s). Check with your instructor to if she/he would like them uploaded to the lab Sakai site.
PART III: Determining the Toxicity of Cobalt Chloride or Cupric Chloride on Tetrahymena pyriformis
Each pair of students will obtain the cobalt chloride or copper chloride stock solution and dilutions they made last week to carry out a Tetrahymena toxicity study.
- Combine 20 μL of live Tetrahymena with 20 μL of 0.11 M copper chloride or 0.26 M cobalt chloride in a clean microfuge tube.
- What is the effective concentration of the heavy metal after it is mixed with Tetrahymena?
- Wait 1 minute, and then add 20 μL of those Tetrahymena (from the microfuge tube) to a glass slide, add a cover slip, and observe using the microscope.
- Record your observations and measurements about behavior and morphology changes in Tetrahymena after exposure to the heavy metal.
- Take pictures with the digital camera.
- As part of your lab notebook answer the following questions: Is copper chloride or cobalt chloride toxic to Tetrahymena at the concentration used? How do you define toxicity? How can you quantify the effects of toxicity in Tetrahymena? How do you know what is normal behavior and morphology?
- If you decide to use lack of movement as your criterion for toxicity, how will you determine what is self-propelled movement vs. water flowing on your slide? Should you include a control? YES! What would the appropriate control(s) be? Test the remainder of the dilutions of cobalt or copper chloride solution and determine if concentration is an important factor in the toxicity of your heavy metal. Make a table in your lab notebook to record your data. Don't forget to calculate final concentration (in moles) of the heavy metal every time you use a different dilution and record that information in your lab notebook.
- Before leaving lab today, please generate a graph of your your results using Excel. When labeling your X axis, be sure to use final (effective) concentration, not dilution factor. Show this graph to your instructor before putting it in your lab notebook.
Laboratory Cleanup
- Clean the objective lens of your microscope using only lens tissue (NOT Kimwipes®) starting with the lowest power (4x) and working up to the highest. Make sure that there is NO liquid on any lens.
- Rotate the 4x objective lens into the viewing position.
- The binocular head must be rotated into the storage position to protect the ocular lenses from damage. Loosen the setscrew on the right, rotate the head 180°, then tighten the screw. Turn off the microscope light.
- Have your instructor check your microscope before returning it to the cabinet.
- Place the stock solutions of cobalt chloride or cupric chloride in the tray next to the sink near the instructor’s table.
- Put all used microscope slides and cover slips in the glass disposal box.
- Put microcentrifuge tubes containing small amounts of heavy metal solution in the orange biohazard bags
- Return your heavy metal stock solutions to the instructor bench.
Assignments
- Before you come to lab next time, read all the material in Lab 3 and outline the day's work in your lab notebook.
- After reading the material in the Lab 3 wiki, please take the online quiz through Sakai.
- Please answer the Lab 2 questions through Sakai. To complete this homework please read pages 522-528 in your Essential Cell Biology (3rd edition) textbook. Answers to all questions must be in your own words. We recommend that you type your answers first in a word document and then paste the answers into Sakai. Assignments will ONLY be accepted through Sakai. This assignment must be done individually.


