20.109(F11): Mod 1 Day 4 DNA ligations and bacterial transformations
DNA ligations and bacterial transformations
Introduction
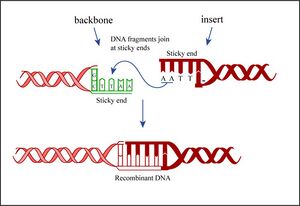
Today you will ligate your linearized plasmid backbone with your PCR product by mixing the two in the presence of ATP and an enzyme, T4 DNA ligase. During the ligation reactions, hydrogen bonds will form between the overhangs on the fragments, and then the ligase will repair the phosphate backbone, creating a stable circular plasmid (as shown in the figure below).


If all goes well, your ligation reactions will generate your desired construct: the pCX-NXX backbone carrying the EGFP gene lacking the first 32 amino acids. You will transform this product into bacteria. During “transformation,” a single plasmid from the ligation mixture enters a single bacterium and, once inside, replicates and expresses the genes it encodes. One of the genes on the pCX-NNX plasmid leads to ampicillin-resistance. Thus, a transformed bacterium will grow on agar medium containing ampicillin. Untransformed cells will die before they can form a colony on the agar surface.
Most bacteria do not usually exist in a “transformation ready” state, but the bacteria can be made permeable to the plasmid DNA, and cells that are capable of transformation are referred to as “competent.” Competent cells are extremely fragile and should be handled gently, specifically kept cold and not vortexed. The transformation procedure is efficient enough for most lab purposes, with efficiencies as high as 109 transformed cells per microgram of DNA, but it is important to realize that even with high efficiency cells only 1 DNA molecule in about 10,000 is successfully transformed.
Protocol
Part 1: Ligation Reactions
For your ligation, you should use 50 to 100 ng of the prepared backbone. The volume needed for this amount can be estimated by comparing the intensity of the purified backbone to the 3 Kb marker, which will have 125 ng of DNA. Once you’ve decided on the volume of backbone to use, choose a volume of prepared PCR product that will give a 1:4 ratio of backbone to insert. You should also set-up two control ligations. The “bkb+insert, no ligase” reaction controls for any errant uncut plasmid that might have wandered into your solutions. The “bkb only, plus ligase” reaction controls for religation of the backbone, from any singly cut plasmids for example.
The contents of each ligation will be
| bkb + insert, no ligase |
bkb only, plus ligase |
bkb + insert, plus ligase | |
| pCX-NNX bkb | ? μl | ? μl | ? μl |
| PCR insert | ? μl | xxx | ? μl |
| 10X Ligation Buffer^ | 1.5 μl | 1.5 μl | 1.5 μl |
| T4 DNA Ligase | xxx | 0.5 μl | 0.5 μl |
| Water | To 15 μl not including volume of enzyme | ||
^New England Biolabs sells 10X Ligation buffer to use with their ligase. It contains ATP so must be kept on ice.
- Assemble the reactions in eppendorf tubes but *NOT* in the order listed. Please ask one of the teaching faculty if you are unsure what order to assemble the components.
- When the ligation mixes are complete, flick the tubes to mix the contents, quick spin them in the microfuge to bring down any droplets, then incubate the reactions at room temperature for at least 10 minutes.
Part 2: Precipitation of DNA
In this step, salts and buffers are removed from the reactions. DNA is precipitated with salt and ethanol. Yeast tRNA is added to the precipitation as “carrier,” allowing you to better visualize the DNA pellets. The salts are washed from the pellets with 70% ethanol. The tRNA is not removed. Rather, it enters the bacteria with the ligation DNA, but is then rapidly degraded.
- Add 20 μl 3M sodium acetate to each tube.
- Add 5 μl tRNA to each tube.
- Add 200 μl 100% ethanol to each tube and vortex.
- Spin in a room temperature microfuge 15 minutes. Be sure to orient your tubes in the microfuge so you know where your pellets should be and balance your tubes with those of another group or with a water-filled eppendorf tube.
- When the spin is done, locate the pellets in each of the eppendorf tubes. They may appear as solid white dots at the bottom corner of the tube or they may appear to be a diffuse white smear along the wall of the tube. Both are OK. Carefully remove the ethanol from the pellets with your P1000, taking care not to disturb the pellet. You do not have to remove every last drop.
- Wash the pellets with 500 μl 70% ethanol. This is done by dribbling the 70% ethanol along the wall of the eppendorf tube that is opposite your pellet and then removing the 70% ethanol with the same pipet tip. Again you should not disturb the pellet and you do not have to remove every drop of liquid in the tube. If the pellet seems to float away from the wall of the tube, you can re-spin the tubes for 2 minutes with the liquid to adhere the pellets to the wall again.
- Once you have washed all your pellets, give the tubes a quick spin in the microfuge to bring down any droplets of ethanol that cling to the sides of the tube then remove any remaining liquid from the tubes using your P200. Allow your tubes to dry in the hood. All the ethanol must be removed or evaporated.
Part 3: Introduction to the Tissue Culture Facility
While your samples are drying, you can start reading the guidelines for working in the tissue culture facility, where you will work next time. We will also have a visitor from the environmental health and safety office (EHS) come to discuss tissue culture work with you.
Part 4: Bacterial Transformations
You will perform 4 bacterial transformations, one for each of the ligation mixtures as well as one transformation with 5 ng of plasmid DNA to assess transformation frequency.
| Tube | Transformation | Add |
|---|---|---|
| 1 | positive control plasmid | 1 μl (5 ng) of pCX-EGFP |
| 2 | bkb + insert, no ligase | 5 μl |
| 3 | bkb only, plus ligase | 5 μl |
| 4 | bkb+insert, plus ligase | 5 μl |
- Resuspend the pellets in 15 μl sterile water. This is done by adding water to the tubes and mixing. If the DNA does not readily go into solution, it helps to heat the DNA in the 42°C heat block, then vortex and pipet up and down several times. Bring any droplets down to the bottom of the tubes with a quick spin in the microfuge.
- Prewarm and dry five LB+AMP plates by placing them in the 37°C incubator, media side up with the lids ajar.
- Get an aliquot of competent cells from one of the teaching faculty. Keep these cells on ice at all times. There should be at least 200 μl of cells in each tube. Aliquot 50 μl of cells into 4 clean eppendorf tubes.
- Add DNA to each tube of cells as shown in the table below.
- Flick to mix the contents and leave the tubes on ice for at least 2 minutes.
- Heat shock the cells at 42°C for 90 seconds exactly and put on ice for two minutes. Use your timer.
- Move the samples to a rack on your bench then use your P1000 to add 0.5 ml of LB media to each eppendorf tube. Invert each tube to mix.
- Plate 200 μl of each transformation mix on LB+AMP plates, plating the bkb+insert+ligase transformation twice. Note: After dipping the glass spreader in the ethanol jar, then pass it through the flame of the alcohol burner just long enough to ignite the ethanol. After letting the ethanol burn off, the spreader may still be very hot, and it is advisable to tap it gently on a portion of the agar plate without cells in order to equilibrate it with the agar (if it sizzles, it's way too hot). Once the plates are done, wrap them with colored tape and incubate them in the 37°C incubator overnight. One of the teaching faculty will remove them from the incubator and set up liquid cultures for you to use next time.
DONE!
For next time
1. Tranformation Cheatsheet: In your own words, write a paragraph, draw a figure, or make a list of rules to guide a classmate on how to perform a transformation. You are limited to a single 4x6 inch index card, though you may use both sides of the card if you wish. Your card will be all the information about this procedure that you can use for the lab practical.
2. Read the guidelines for mammalian cell culture. Next time, you will begin your work in the tissue culture facility.
3. Next time you will prepare DNA from four transformants and begin to characterize the plasmids in these bacteria. Using the plasmid map you drew after Module 1 Day 2, plan a diagnostic restriction digest that will confirm the presence of the PCR insert.
When choosing enzymes for diagnostic digests, it is good practice to choose enzymes that
- cut both the plasmid backbone and the insert
- verify restriction sites on both sides of the insert
- release a fragment that can be visualized on a gel. Fragments smaller than 100 basepairs or larger than 2 kilobases are difficult to judge accurately on agarose gels.
- release differently sized fragments depending on the orientation of the insert.
- work best in the same buffer and at the same temperature.
Be sure to predict the size of the fragments you expect when the plasmid does and doesn’t have the PCR insert. Also include reaction conditions such as buffer and temperature. Use the NEB website for details on various enzymes and reaction conditions.
| Diagnostic digest 1 | plasmid with insert | plasmid no insert |
|---|---|---|
| Enzyme(s) used | ||
| Buffer used | ||
| Temperature | ||
| Predicted fragments |
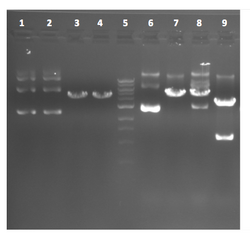
4. Here is some real data for you to consider.

| Lane | Plasmid | sample |
|---|---|---|
| 1 | cand 1 | uncut |
| 2 | cut with enzyme 1 | |
| 3 | cut with enzyme 2 | |
| 4 | cut with enzymes 1 and 2 | |
| 5 | 1 kb marker | |
| 6 | candidate 2 | uncut |
| 7 | cut with enzyme 1 | |
| 8 | cut with enzyme 2 | |
| 9 | cut with enzymes 1 and 2 |
This photo was taken of 2 candidates digested with two enzymes. Both enzymes cut once in the plasmid backbone (~5 kb with no insert), but close enough to eachother so as not to drop out any visible fragment. If the plasmid backbone has one PCR insert, then the double digest is expected to release a fragments of 1.2 kb and 4.2 kb. So...what's going on:
- what do you take away from the observation that lanes 1 and 2 look the same?
- what could explain the intensity differences in lanes 1 and 6?
- how do you explain the observation that lanes 3 and 4 look the same?
- how do you explain the observation that lanes 7 and 8 DON'T look the same?
- would you proceed with candidate 1 or candidate 2 or both or neither? why?
Reagents list
50 ng pCX-EGFP
T4 DNA Ligase Buffer (1X)
- 50 mM Tris-HCl
- 10 mM MgCl2
- 10 mM DTT
- 1 mM ATP
- 25 μg/ml BSA
tRNA
LB
- 1% Tryptone
- 0.5% Yeast Extract
- 1% NaCl
LB+AMP plates
- LB with 2% agar and 100 μg/ml Ampicillin
