20.109(F08): Mod 3 Day 1 Growth of phage materials
Introduction
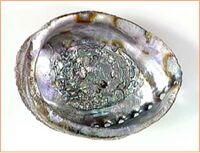
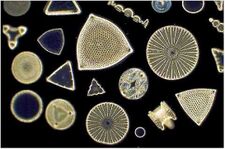
The accomplishments of the natural world can inspire us to great engineering feats. Biomineralization is one particularly impressive trick nature pulls off. Vertebrates, invertebrates and plants all have ways to precisely position inorganic substrates into crystalline order. For example, calcium carbonate will form unstructured dust in the absence of genetically-programmed organizers, but the same material can be made into the hard and luminous shells of sea creatures. Similarly, diatoms organize silicon dioxide into intricate patterns that manufacturers of electronic components can’t begin to approach. In one more instance, bacteria align iron inside their cytoplasm to form magnetic rods on the submicron scale. These feats are accomplished without harsh chemicals, without extreme temperatures, and without noxious wastes that poison the nests of the organisms themselves. Humans have a lot to learn from nature’s successes. In the upcoming weeks we’ll use a virus that infects bacteria, namely the bacteriophage M13, and we'll rely on the self-assembling coat of this virus to template a crystal of iridium oxide. The interaction of iridium with a protein on the phage coat yields nanoscale-particles with useful optic properties, as we’ll see (literally).
About M13
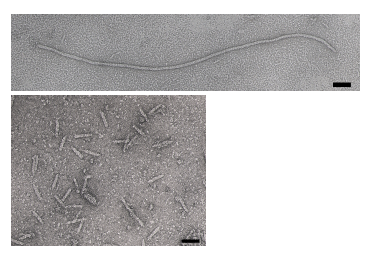
The bacteriophage M13 is a member of the filamentous phage family. It has a long (~900 nm), narrow (~20 nm) protein coat that encases a small (~6.4 kb) single stranded DNA genome. The genome encodes 11 proteins, five of which are exposed on the phage’s protein coat and six of which are involved in phage maturation inside its E. coli host. The phage coat is primarily assembled from a 50 amino acid protein called pVIII (or p8), which is sensibly enough encoded by gene VIII (or g8) in the phage genome. For a wild type M13 particle, it takes about ~2700 copies of p8 to make the ~900 nm long coat. The coat's dimensions are flexible though and the number of p8 copies adjusts to accommodate the size of the single stranded genome it packages. For example, when the phage genome was mutated to reduce its number of DNA bases (from 6.4 kb to 221 bp) [2], then the p8 coat “shrink wraps" around the reduced genome, decreasing the number of p8 copies to less than 100. Electron micrographs of the resulting “microphage” and its wild type parent are shown below (image courtesy of Esther Bullitt, Boston University School of Medicine), where the black bar in each image is 50 nm long. And what about the upper limit to the length of the phage particle? Anecdotally, viable phage seems to top out at approximately twice the natural DNA content. However, deletion of a phage protein (p3) prevents full escape from the host E. coli, and phages that are 10-20X the normal length with several copies of the phage genome can be seen shedding from the E. coli host.
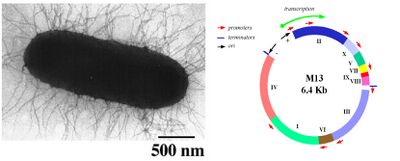
Phage life-cycle
The general stages to a viral life cycle are: infection, replication of the viral genome, assembly of new viral particles and then release of the progeny particles from the host. Filamentous phages use a protein at their tip, namely p3, to contact a bacterial structure known as the F pilus to infect E. coli. The phage genome is then transferred through the pilus to the cytoplasm of the bacterial cell where resident proteins convert the single stranded DNA genome to a double stranded replicative form (“RF”). This DNA then serves as a template for expression of the phage genes and produces new phage particles that shed off the surface of the infected cell. Other phage are known to lyse their host cells but in the case of M13 and E. coli, they co-exist in a balanced way, allowing the growth of both host and virus, though the infection does slow down the doubling time of the E. coli (as we'll see later today).
Phage display
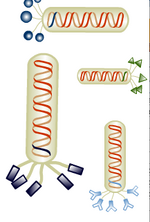
Phage display has been used for decades as a tool for discovery. This technique exploits natural selection and identifies functional peptide sequences that can be fused to the phage coat. Most often it’s the p3 protein at the phage tip that’s used for phage display because, despite the limited number of displayed peptides per phage (on the order of 5), there is enough flexibility to accommodate peptides of 20 to 30 amino acids. The other protein used for phage display, p8, is presented at much higher copy number per phage (on the order of 2700) but it has limited flexibilty. The semi-crystalline packing of p8 on the phage coat restricts fusions to only 4 to 6 neutral or negatively charged amino acids. For scientists who can tolerate a mix of p8 proteins on the phage coat for their work, there are phage-display variations that mix and match fusion and wild-type proteins on a phage coat, but for those who want phage of a particular form, the options are limited.
Nonetheless, peptides with remarkably diverse functions have been isolated with phage display. Once the fusion site is chosen, a library of sequences encoding random peptides can be synthesized and cloned. In this way a pool of phage, each with different fusions, can be made. Finally, the phage pool can be screened for interesting behaviors or properties. Peptide-fusion proteins to p8 or p3 that include stop codons or intolerable sequences are largely lost from the population after the first round of “panning.” Other phage that can bind to a substance of interest or show enzyme activity or glow green…, these remain and can be directly isolated from the pool or further enriched by a second, third, fourth round of panning. Ultimately anywhere from 10 to 1000 candidate sequences may remain from a starting pool of 1 billion [3].
Despite phage display techniques being available for more than a generation, this tool has been applied only recently to the search for novel materials. Largely it’s been Angela Belcher and her lab who highlighted and then demonstrated the usefulness of this search tool for finding peptides that interact with materials to meet human needs. That M13 could interact with inorganic materials could not have been predicted from the original genetic studies on the phage, but there was also no one who had tried it. Phage that can bind to cobalt oxide, gold, iridium and indium tin oxide are all in-hand thanks to their work (e.g see reference [4]). Today you will harvest and titer a phage that can bind to iridium since these can be used to build nanowires next time.
Protocols
In advance of this lab, a bacterial host ( XL1-blue) was infected with the modified M13 phage called "3-12." Though the precise details of the 3-12 modification are still unpublished, it was isolated from a screen for changes in the M13 p8 that enable the phage to bind a metal (iridium). Today you will harvest the phage from the supernatant of the infected bacterial culture and then titer it. You will begin the lab by preparing iridium oxide colloidal particles from a reaction of sodium hexachloroiridate (IV) hexahydrate (Na2IrCl6*6H2O) with sodium citrate. An example of such colloidal particles, further stabilized to enable water cleavage into H2 and O2 is here
Part 1: Synthesis of Iridium Oxide
You'll be preparing colloidal particles of Iridium Oxide that will bind to the M13 phage you concentrate. You should wear your lab coat, your safety glasses and gloves throughout this chemical synthesis.
- Put on your lab coat, your safety glasses and gloves.
- Clean an amber 120 ml bottle and its lid with ethanol and distilled water. Place your team color on the bottle.
- Add 71 mg of sodium citrate dihydrate to 35 ml of commercially deionized water that's been equilibrated to 80° and a stir bar.
- Place the solution in an oil bath in the hood that's been equilibrated to 90°C.
- Add 43 mg of sodium hexachloroiridate (IV) hexahydrate (Na2IrCl6*6H2O) to your stirring solution.
- Magnetically stir the solution at 400 rpm at 90° for 4 hours. Don't close the bottle lid. Instead, keep it open and just cover the opening with aluminum foil.
- One of the teaching faculty will take your reactions out of the hot baths and store them at room temperature until next time when we will complete the synthesis reactions.
Part 2: Phage purification
- Spin 2 eppendorf tubes with infected cells in a room temperature microfuge, 1 minute at full speed.
- Remove the supernatant to clean fresh eppendorf tubes.
- Use your P1000 to measure the volume, then add a 1/6th volume of 20% PEG-8000/2.5M NaCl solution.
- Invert to mix then incubate on ice 60 minutes.
- Spin in a room temperature microfuge, 15 minutes at full speed. A very tiny white pellet may be visible...these are your precipitated phage. If you can't see a pellet keep going, but be aware of where the pellet you can't see is in the tube and don't scrape a tip against it or you will accidentally remove it.
- Remove the supernatant by aspiration (carefully so as not to disturb the pellet) or using your P1000.
- Spin the tubes 1 minute more to pellet any droplets stuck to the walls of the tube and use your P200 to remove the last drops of liquid from the pellet.
- Resuspend the pellet in 100 ul sterile H2O, pool the volumes of both eppendorf tubes into one and add a 1/6th volume of 20% PEG-8000/2.5M NaCl solution.
- Invert to mix. Then incubate on ice for 15 minutes.
- Balance your sample against that of another group, or against an eppendorf with water. Spin in a room temperature microfuge, 10 minutes at full speed.
- Aspirate the supernatant and resuspend the pellet (if you can see it) in 100 ul sterile H2O.
- If the solution looks at all cloudy, spin in a room temperature microfuge for 1 minute more and move supernatant with the phage to a new eppendorf tube.
Part 3: Titering phage
The idea of this technique is simple. Since phage infection slows down the growth of bacteria, any phage-infected cell will grow less quickly than an uninfected one, giving rise to a zone that is more clear on a lawn of fully grown cells. This zone is called a plaque and by counting the number of plaques formed, it is possible to measure the number of infective phage in the sample you are testing. The number of infected phages is measured as PFUs, which is "plaque forming units per ml."
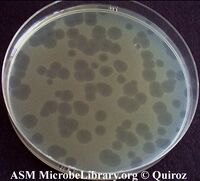
- Start by placing 4 LB plates in the 37° incubator to prewarm them. If there is any condensation on the surface of the plates, then you can leave the lids slightly ajar to dry the plate surface.
- Aliquot 200 ul of bacteria into 4 small, sterile test tubes. The bacteria you are using are the strain ER2267 since this strain has a selectible F'. Label the tops of each tube with a colored sticker and one of the following: none, 10^6, 10^8, and 10^10th.
- Serially dilute the phage stock you made in Part 1 of today's protocol, making stepwise 1/100 dilutions in eppendorf tubes. For example, add 10 ul of a phage stock to 990 ul sterile water for a 10^-2 dilution, then repeat, using 10 ul of the 10^-2 dilution into 990 ul sterile water to make a 10^-4 dilution. Vortex the dilutions before removing any liquid and change pipet tips to prepare each new dilution. Continue serially diluting the phage to final concentrations that are 10^-6th, 10^-8th and 10^-10th as concentrated as the starting stock.
- Mix 10 ul of the 10^-6 dilution into a tube with bacteria.
- Mix 10 ul of the 10^-8 dilution into another tube with bacteria.
- Mix 10 ul of the 10^-10 dilution into another tube with bacteria.
- One of the teaching faculty will show you how to mix 3 ml of top agar into the uninfected sample you have prepared and how to pour the molten mix onto the surface of a prewarmed LB plate.
- You and your partner should add top agar to the other samples and plate the cells as you were shown.
- Allow the top agar to solidify by leaving the plates on the bench at least 5 minutes then stack them and wrap them with your colored tape and finally move them to the 37° incubator to grow overnight. One of the teaching faculty will remove them from the incubator tomorrow and store them for you until next time.
- Give your undiluted phage stock to one of the teaching faculty who will store it for you at 4°C until it is time to react it with the IrOx.
DONE!
For next time

1. The primary assignment for this experimental module will be for you and your partner to develop either a scientific research proposal or a collaborative science and art project with the League of Imaginary Scientists, a "non-exclusive society for creative scientists, and mechanically-inclined artists." At the end of this module you will have the opportunity to present your idea to the class. For next time, please
- consider which option is of interest to you and why.
- if you are inclined to pursue the scientific research proposal, please describe five recent findings that might define an interesting research question. You should hand in a 3-5 sentence description of each topic and list the reference that led you to each item. The topics you pick can be related to any aspect of the class, i.e. DNA, protein, or bio-material engineering. During lab next time, you and your partner will review the topics and narrow your choices, identifying one or perhaps two topics for further research.
- if you are inclined to pursue the collaborative science and art project for display, please begin by researching other genetically programmed works that the public has seen. Ideally these would be interactive exhibits with biology or biotechnology. As a starting point, consider artists like Kac and the League of Imaginary Scientists who have done some great work in this area. You should hand in an image and some descriptive text for 3-5 exhibits that either piqued your interest or that didn't work for you at all. Come to lab prepared to describe them for and discuss them with your partner. The artists will be in the lab to work with us on Nov 13th from noon to 1PM and the conversation will be part of an exhibit in Dublin. The outline for that conversation is here
2. Ultimately you'll be using phage nanowires to make an electrochromic device. The application for these devices is in displays of all sorts. For next time you should describe one of the following types of displays: LCD, plasma screen, rear projection, or DLP. Include a description of how they work (in two or three sentences) and draw a figure to illustrate the workings of the display in question. A hand-drawn figure is fine, or a computer-drawn version, but not something that's just cut and paste from a webpage. Include the references you used to learn about the display.
Reagents list
Silicone oil for water bath (VWR A12728)
Sodium citrate dihydrate (MK075412)
VWR deionized water
Sodium Hexachloroiridate hexahydrate (Alfa Aesar 11890)
Top Agar
- 10 g Tryptone
- 5 g Yeast Extract
- 10 g NaCl
- 1 g MgCl2*6H20
- 7 g Agar per liter
- Autoclaved then 100 ml aliquoted to 250 ml bottles. Stored at RT. Melted in microwave 2’ then keep molten in 55° water bath.
LB
- 10 g Tryptone
- 5 g Yeast Extract
- 10 g NaCl per liter
- 20g of Agar for plates.
- Autoclaved 30 minutes with stirbar. Poured when ~55°. Plates dried ON on bench and store in sleeves in 4°.
