Year 3 BME Group Project 22-23: Automation of Laboratory Protocols
Summary and Updates
Group Structure
- Project Supervisors: Professor Richard Kitney, Dr Matthieu Bultelle, Alexis Casas
- Group members : Jay Fung, Aatish Dhawan, Sonya Kalsi, Jey Tse Loh, Sakshi Singh
Update Log
- 14/11-20/11: Finalising mindmap concepts and associated references, preparing to submit individual literature reviews.
- 07/11-13/11: Visited the London Biofoundry, revised editions of mindmap.
- 31/10-06/11: Set up the OWW reference webpage.
- 24/10-30/10: Generated OWW webpage, mindmap conception, and further literature reading explored.
- 17/10-23/10: Initial mindmap branching, review of provided literature, reference library established.
- 07/11-21/11: Literature Mindmap and Individual Literature Highlight Report completed.
- 23/11-12/12: Meeting research groups for the Human Practice Study.
- 06/01-18/01: Setting up a GitHub, assigning subtasks to members of the group and finalising the protocol(s) to automate.
- 20/01-03/03: Developing and simulating the code, working on the Project Pitch.
- 07/03-29/03: Developing and testing the protocols on the OT-2 robot in the London Biofoundry, working on the Final Report.
- 30/03-13/04: Finalising the Final Report.
Deliverables
Literature Mind Map
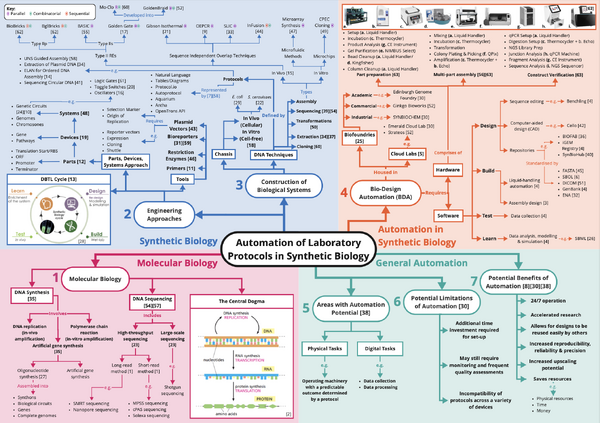
Labs and people contacted for human practice study
Professor Tom Ellis & Fankang Meng (Ellis Lab)
Dr Rodrigo Ledesma Amaro (Ledesma Lab)
Emily Bennett (Isalan Lab)
Dr Francesca Ceroni (Ceroni Lab)
Dr Matthew Haines, Dr Marko Storch, Keltoum Boukra, Beccy Weir (London Biofoundry)
Literature
Below is a complete list of the literature we have referenced in this project. Y3 BME Automation Group Project : References
Project Pitch
Below is a complete list of the literature we have referenced in the project pitch presentation: Y3 BME Automation Group Project : Project Pitch References
Project Methods
Design
Overview
This sub-section presents the Gibson and Golden Gate assembly protocols, followed by the justification for our hardware and software choices.
Gibson Assembly
Gibson Assembly[11-12] is an isothermal, robust method for joining DNA fragments. Adjacent DNA fragments are designed to include overlapping regions at the 5' and 3' ends. During incubation, a 5' exonuclease generates long complementary overhangs at the ends of each fragment, allowing them to anneal. A polymerase fills in the gaps of these annealed regions and a DNA ligase seals the nicks of annealed and filled-in gaps. This results in a continuous strand of DNA. These steps are shown in Figure 2 below:
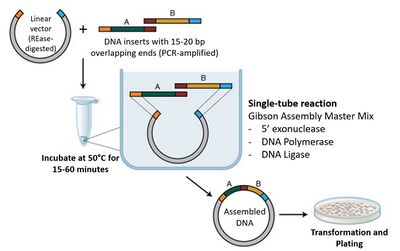
The protocol used as a reference was the NEB Gibson Assembly® Protocol (E5510)[13]. The relevant assembly steps are defined as follows: 1. Set up the following reaction on ice:
| Reagent | Assembly Reaction |
|---|---|
| Total amount of Fragments | 0.02-0.5 pmols + Xμl |
| Gibson Assembly Master Mix (2X) | 10μl |
| Deionised H2O | 10–Xμl |
| Total Volume | 20μl |
2. Incubate samples in a thermocycler at 50°C for 15 minutes(for 2-3 fragments )
Golden Gate Assembly
Unlike Gibson, Golden Gate Assembly[14-15] involves Type IIS restriction enzymes, such as Bsal, which cut outside of their recognition sequence. DNA fragments with specific overhang sequences at their ends are mixed with the Golden Gate master mix, which contains the restriction enzyme. During incubation, the restriction enzyme recognises and cuts the DNA fragments, resulting in the required complementary overhangs. T4 DNA ligase then binds the pieces together, resulting in a single continuous piece of DNA.
These steps are shown below in Figure 3:
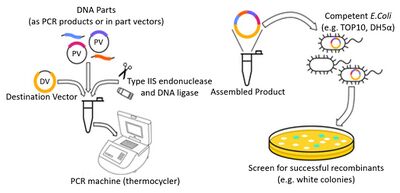
The protocol used as reference was the Golden Gate Assembly Protocol for Using NEBridge® Golden Gate Assembly Kit (BsaI-HF®v2) (E1601)[17]. The relevant assembly steps are defined below:
1. Set up 20μl assembly reactions as follows:
| Reagent | Assembly Reaction |
|---|---|
| pGGAselect Destination Plasmid | 1μl |
| Amplicon Inserts | 3 nM each DNA fragment (final concentration) |
| T4 DNA Ligase Buffer (10X) | 2μl |
| NEBridge® Golden Gate Enzyme Kit (BsaI-HFv2) | 2μl |
| Nuclease-free H2O | to 20μl |
2. Incubate using the following profile: 37°C, 1 h → 60°C, 5 min.
Hardware Choice
The Opentrons OT-2 Liquid Handling Robot was the obvious choice to automate our chosen protocols for the following reasons:
- It has the thermocycling and liquid-handling capabilities required for each protocol.
- We were granted access to one, which allowed for real time testing and iteration.
- It’s a popular platform, which makes our results more widely applicable.
What makes it popular is that it’s cost-effective. The OT-2’s optional add-ons for heater-shaker and magnetic modules, among others, remove the need for costly standalone hardware for each function. This versatility is a significant advantage as multiple protocols can be run on the OT-2.
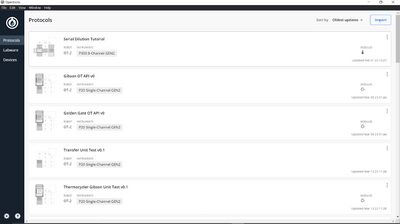
The OT-2 robot is accompanied by the Opentrons Application[18] (see Figure 4), which facilitates simple connection and control of the hardware. This helps circumvent the need for specialist technicians to operate the robot. The app allows custom protocols and labware measurements to be uploaded. Both functions increase the accessibility of the OT-2 system, which from our Human Practice Study we know is an important factor to encourage labs with a less technical coding background to consider automation.
Software Choices
We chose two frameworks to convert the manual protocols from written representations (e.g., handwritten/PDF/online) to automated commands. These commands needed to be compatible with our hardware choice (OT-2 robot).
We chose a platform-dependent framework, Opentrons OT-2 API[18] for Python. This functioned as our base for comparison with our chosen platform-agnostic framework, the Laboratory Open Protocol Language Python API[19-20] (LabOP API, formerly known as PAML). LabOP API converts protocols to the OT-2 API format as shown in Figure 5. It was chosen over other platform-agnostic frameworks such as PyLabRobot[21] as it converts protocols into a wider range of formats.
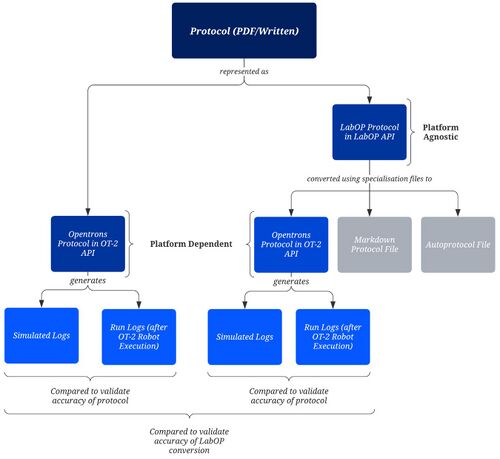
A summary of the key differences between the frameworks is shown below.
| Opentrons OT-2 API [18](Platform Dependent) | LabOP API [19-20](Platform Agnostic) |
|---|---|
| Directly compatible with OT-2 Robot. | Provides specialisation files to convert into multiple representations (currently Opentrons API, Markdown and Autoprotocol). |
| Has a simulation command line tool which generates simulated run logs, which can be used to verify that the manual protocol has been represented accurately. | Once converted to the OT-2 API representation, can also be simulated using the same command line tool, so outputs of each framework can be compared. |
| Protocols written using relatively low-level commands. | Protocols are written using more abstract commands. |
| Beginner/Intermediate Python understanding, all documentation[22] is open source, increasing accessibility. | Also requires a basic understanding of the Unified Modeling Language (UML) [23], the Resource Description Framework (RDF) [24], and the Synthetic Biology Open Language (SBOL)[25]. |
Automation
Overview
This section describes steps (see Figure 6) taken to translate the chosen protocols into automated code and describe the coding methods.

Process Mapping
From the protocols defined previously, we made a Process Mapping Document to transfer these into executable steps for the OT-2 robot. This design document covered the following choices:
- Labware, pipettes, and pipette tips.
- Position of labware and the thermocycler module on the OT-2 deck.
- Starting volumes of reagents.
- Order of transfers.
- Volumes of reagents transferred.
From our meeting with the team at the London Biofoundry as part of the Human Practice Study, we paid special consideration to the following factors:
- Order of transfers, to ensure the enzyme mix is added after the other reagents to minimise enzyme denaturisation.
- Type of labware used, to minimise dead volume and save costs.
- Use of negative controls.
Protocol Designer
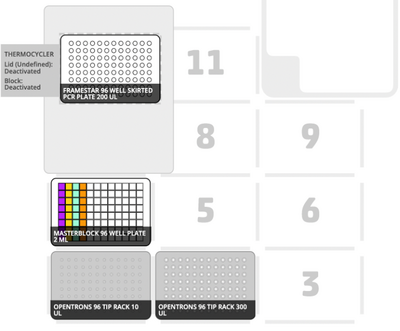
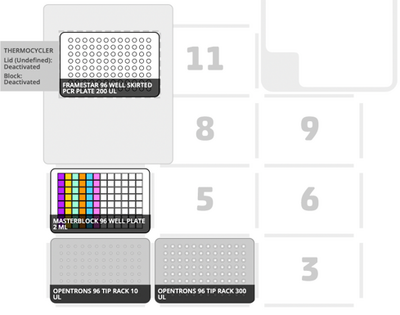
The Opentrons Protocol Designer [26] was used to visualise the layout of the robot deck (see Figures 7 and 8) and transfers for each protocol. The software also provides error messages as appropriate, which verified that our protocol steps were compatible with the robot functions.
Coding
We then coded the protocols using the OT-2 API and the LabOP API. The process for each framework can be found in Appendices C and D respectively. Alongside the protocols, we wrote unit tests to validate the accuracy of each step used in the protocols. The functions included in the unit tests were:
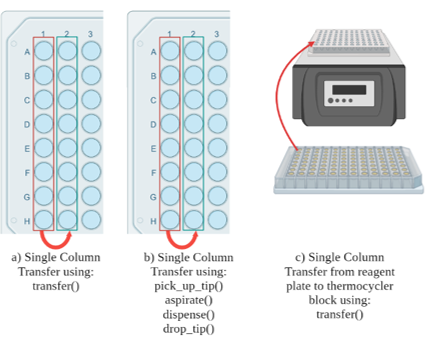
- The higher-level transfer command – used to move liquid from one well to another within the same labware. (Figure 9a)
- The transfer command broken down into its individual commands for picking up tips, dropping off tips, aspirating, and dispensing to move liquid from one well to another within the same labware. (Figure 9b)
- Transfer to the thermocycler – used the transfer command to move liquid from labware on the deck to labware in the thermocycler. (Figure 9c)
We also met with Bryan Bartley from the Bioprotocols Working Group[27] that developed the LabOP API for additional insight into the API structure and feedback. Specifically, we discussed labware and pipettes definitions, alongside defining more complex commands like mixing and incubating. We then implemented the solutions discussed in subsequent code iterations. Appendix E contains more detail on these issues.
Testing
Overview
Here we describe the validation methods used, starting with simulations and dry runs, leading to final testing with coloured water reagents. The main validation metric used on the OT-2 robot was the comparison of the executed to the simulated run logs. The order of these steps is summarised in Figure 10

Simulation
We simulated both the unit tests and protocols using the OT-2 API simulator with the command line tool ‘opentrons_simulate’. For the protocols and tests written using the LabOP API, we ran the same simulation function on the output OT-2 API file after conversion.
To validate the automated representation, we compared these simulated logs to the manual commands from the Process Mapping Document (see Appendix B). We identified some discrepancies, mainly that the higher-level commands such as transfer and mix didn’t automatically include a command to pick up a new tip. These issues and solutions are presented further in Appendix F. We implemented these solutions for the next iterations before testing on the robot.
Dry Runs
Next, we executed the unit tests and protocols as dry runs on the OT-2. This consisted of running the robot commands with the intended labware but without any liquid reagents. Through visual inspection, we could identify missing steps, incorrect calibrations, or incorrect labware definitions before introducing liquids. The dry runs also produced a measurement of protocol duration.
Additionally, executed run logs from the Opentrons App were parsed into a .txt file to match the format of the text outputs of the Opentrons simulator command line tool. We then applied a Python ‘difflib’ function to compare and return the differences between the logs. This verified that the executed steps matched the steps simulated.
During our first dry run, we encountered issues with thermocycler functions and labware calibration. To resolve the latter, we defined our custom labware (i.e., labware not present in the OT-2 Default Labware Library[28]) using the Opentrons Custom Labware Creator[29]. This definition was then uploaded to the app for use in the subsequent protocols.p/>
A comprehensive list of the issues faced and their solutions, which we implemented before testing with liquids, can be found in Appendix G.
Testing with Liquids
We optimised the code after our dry runs to shorten the duration of the protocols by reducing the number of pipette movements required. Details on the optimisations made are listed in Appendix H.
To test our second success criteria as mentioned in section 1.2 Aims, both protocols were executed on the OT-2 using coloured water reagents, as shown in Figure 11. We used water to avoid wasting expensive actual reagents while conducting multiple iterations of these tests. Of course, water has different properties (e.g., viscosity) to actual reagents and wouldn’t allow us to verify that the intended assembly reaction has taken place. Therefore, these tests served to verify that the transfers were aspirating and dispensing the correct volumes. This was important because incorrect volumes could lead to errors during DNA assembly when using actual reagents. The verification was done by measuring the final volumes of the reaction mixtures manually using pipettes and comparing this to the expected volume.
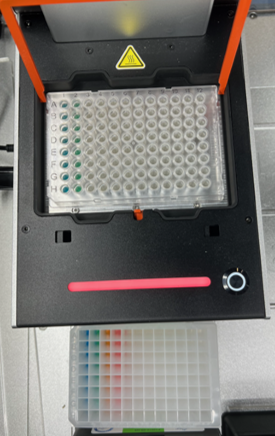
We parsed the run logs in the same way as described in section 3.3.3 Dry Runs and compared:
- The simulation logs to these parsed run logs to verify correct automation (our first aim).
- The OT-2 and LabOP logs to each other to verify that both frameworks can achieve the same steps (our second aim).
Project Results
Comparison of Logs
Manual against Simulated
Our final protocols' simulated logs matched the manual protocols' intended steps in the Process Mapping Document (Appendix B), validating their accurate representation using the OT-2 API and the LabOP API frameworks.
Simulated against Executed
We used the 'difflib' Python function to compare simulated and executed steps for each unit test and protocol. The number of differences represents any unique steps and serves as our accuracy metric. We also identify where these discrepancies occurred.
| Test | No. of Unique Steps | Explanation |
|---|---|---|
| Asp disp | 0 | N/A |
| Transfer | 0 | N/A |
| Tc transfer | 2 | 2 extra steps in the run logs for calibration |
| LabOP transfer | 2 | 2 extra steps in the run logs for calibration |
| GG v0 OT2 | 0 | N/A |
| Gib v0 OT2 | 0 | N/A |
| GG v1 OT2 | 0 | N/A |
| Gib v1 OT2 | 2 | - |
| GG v3 LabOP | 27 | Discrepancies for aspirate and dispense commands, due to the liquid flow rate being different between the simulation and the actual execution.
2 extra steps in the run logs for calibration. |
| Gib v3 LabOP | 29 | Discrepancy due to different flow rates during aspirate/dispense commands.
2 extra steps in the run logs for calibration. |
LabOP API against OT-2 API
The results from comparing the executed run logs of the LabOP API and OT-2 API versions of each protocol are shown below.
| Protocol | No. of Unique Steps | Explanation |
|---|---|---|
| Golden Gate | 2 | 2 extra steps in LabOP for calibration. |
| Gibson | 0 | N/A |
Testing with Liquids
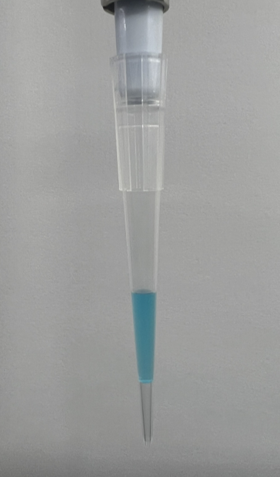
From visual inspection of the coloured liquid runs, we observed liquid remaining in the pipette tips after each dispense step. TThis led to liquid loss in our final reaction mixture, meaning the transfer command didn’t dispense the required volume.
To quantify this loss, we manually pipetted our expected volume from the final reaction wells as shown in Figure 12 and 13 below. Furthermore, the percentage error was plotted for each well across both protocols as shown in Figure 14 and 15.

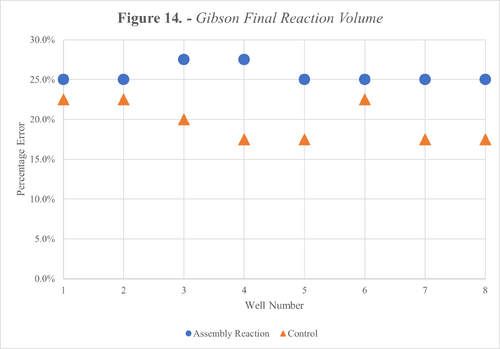
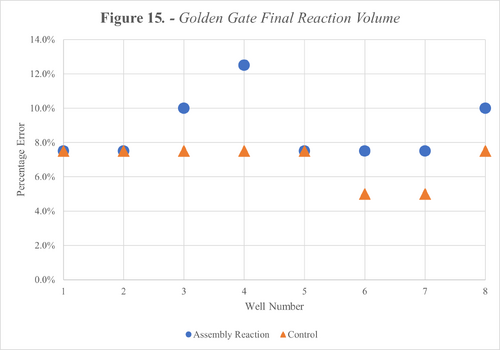
We also calculated the average error across all wells for each reaction type and divided this by the number of transfers per reaction to estimate the error per transfer. The results from this are shown in the Table below.
| Reaction Type | Average Error | Average Error per Transfer |
|---|---|---|
| Golden Gate Asssembly Reaction | 8.75 % | 1.25 % |
| Golden Gate Control | 6.88 % | 1.15 % |
| Gibson
Assembly Reaction |
25.63 % | 5.13 % |
| Gibson
Control |
19.69 % | 4.92 % |
Project Discussion
Automation of Protocols
Overview
The success criteria for the first aim to automate Golden Gate and Gibson Assembly protocols using the OT-2 API and the LabOP API were defined as follows:
- The order of the steps in the automated protocols should match those of the manual protocols.
- The liquids should all be handled correctly, yielding an accurate assembly when tested on actual reagents.
Criteria One - Order of Steps
The steps executed by both protocols on the Opentrons robot mostly match those of the manual protocols (see Table in Section 7.1.2). The only differences were from two extra calibration steps needed with the actual robot and different liquid flow rates. Therefore, our first success criteria was met.
Criteria Two - Correct Liquid Handling
The results from our tests with liquids revealed inaccuracies during transfers, as shown in Figures 14 and 15. These errors equate to an average error per transfer of up to 5.13% and 1.25% for Gibson and Golden Gate respectively as shown in Table 9. These high error margins meant our second success criteria wasn’t met.
The results from our tests with liquids revealed inaccuracies during transfers, as shown in Figures 14 and 15. These errors equate to an average error per transfer of up to 5.13% and 1.25% for Gibson and Golden Gate respectively as shown in Table 9. These high error margins meant our second success criteria wasn’t met.
- Aspirate an excess volume to account for the remaining liquid in the tip after dispensing.
- Use the ‘blow_out' command to push additional air to expel all droplets.
- Use the ‘touch_tip’ command to remove any droplets left on the pipette tip against the edges of the well.
Testing with Actual Reagents
Once the aforementioned solutions are implemented to reduce the errors with liquid transfers, our protocol should be tested with actual reagents to fulfil our second success criteria. The actual reagents consist of buffers, enzyme mixes, water, and the DNA construct to be assembled. The details for the construct we designed can be found in Appendix I.
We plan to assemble the construct using both the manual and automated protocols, verify it through sequencing on agarose gel and transformations, and compare the outputs. We also aim to quantify the cost and time taken to execute each of these protocols. This enables use of the Q-metrics described in the Human Practice Study to measure the gain, if any, from automating these protocols.
Comparison of the OT-2 and LabOP Frameworks
Overview
Our second aim was to compare and evaluate the OT-2 and LabOP frameworks used to automate the Gibson and Golden Gate protocols. Following discussions from our Human Practice Study, we focused on how easily/quickly the framework could be learned and their accuracy and flexibility. While both frameworks yielded similar results, as shown in Table 8, we found that the OT-2 API was the better framework with easier implementation and more comprehensive functionality. As the OT-2 API is platform-dependent and designed specifically for the OT-2 Robot, this was to be expected. The core shortcomings of the LabOP API are listed below.
- A much steeper learning curve, requiring background knowledge of other existing standards.
- A lack of documentation.
- A more complex coding process than the OT-2 API (see Appendix C and D).
- Difficulty in converting between representations (see Appendix E for specific errors).
Being relatively new, the current LabOP Specification Document[30] available doesn’t have sufficient details of how to implement protocols. There are also few implementations in real-world projects, with our project being the first to attempt automating these protocols with the OT-2 robot. As such, we had to reach out to Bryan Bartley from the Bioprotocols Working Group[27] for help with the LabOP API, which other researchers using this framework may not have time for in their project.
Currently, the LabOP API’s range of labware and helper functions is limited to those required for simple demonstrations. To account for this incomplete functionality, we made several modifications to the specialisation files to ensure correct conversion to the OT-2 API format. These solutions have the potential to facilitate the extension of functionalities in the LabOP API for any future work.
While the goal of platform-agnostic frameworks is to circumvent the issues with reproducibility by allowing control of machines from different manufacturers, the LabOP API isn’t quite ready for the above reasons. To warrant the investment of time and effort into implementing it, we recommend the following improvements be made:
- Allow users to implement custom labware in their protocols without having to manually add them into the Container Ontology and modify the specialisation files.
- Provide further documentation on the OT-2 conversion process, specifically regarding functions and their parameters.
- Implement an algorithm within the OT-2 conversion process to automatically select the appropriate pipette based on the transferred volume.
Further Testing of Platform-Agnostic Frameworks
Moving forwards, we could use another platform-agnostic framework, like PyLabRobot[21], to automate same protocols on the OT-2 robot. We could also evaluate PyLabRobot[21], which is compatible with Hamilton robots[31], in a similar fashion against Hamilton’s proprietary control software. The purpose of either of these tests would be to see if our findings are applicable to other hardware and frameworks. This would also determine if either of these platform-agnostic frameworks are suitable to become the industry standard for protocol representations within SynBio.
Conclusion
Our aims were to automate the Gibson and Golden Gate protocols with two frameworks and to compare and evaluate their efficacy. Executing the automated protocols with both frameworks showed that the order of the steps in the original protocols were correctly implemented. However, due to time limitations, we need to conduct further investigation with actual reagents to confirm the full functionality of our automated protocols. Nevertheless, valuable insights were gained in comparing the frameworks chosen. While both showed viability, the OT-2 API was more intuitive and had superior functionality over the LabOP API. However, the OT-2 API, being platform-dependent, is hindered by its lack of portability, which makes platform-agnostic solutions like the LabOP API more viable in the long term.
The limitations encountered and the experience gained from automating previously untried tasks with the LabOP API can provide valuable insights for future endeavours to streamline the automation process and enhance the usability of automation frameworks. This should lead to more efficient, reproducible, and accessible automated protocols in the future, which from our Human Practice Study was found to be what research groups are looking for. Furthermore, by making our code and work publicly accessible online (see Appendices J and K), we hope to contribute to the ongoing efforts to develop and enhance automation frameworks for the wider scientific community.
Please see Appendix L for our Project Management Assessment where we discuss key deviations from our initial plan and lessons learned.
Appendicies
Appendix A : List of Groups Contacted
Below can be seen the list of all the researchers we contacted as part of our Human Practice Study.
- Dr Francesca Ceroni (Ceroni Lab)
- Professor Geoff Baldwin (Baldwin Lab)
- Professor Guy-Bart Stan (Stan Group)
- Dr Eszter Csibra (Stan Group)
- Professor Mark Isalan (Isalan Lab)
- Emily Bennett (Isalan Lab)
- Dr Nikolai Windbichler (Windbichler Lab)
- Professor Tom Ellis (Ellis Lab)
- Fankang Meng (Ellis Lab)
- Dr Rodrigo Ledesma Amaro (Ledesma Lab)
- Professor Karen Polizzi (Polizzi Lab)
- Professor Paul Freemont (London Biofoundry)
- Dr Marko Storch (London Biofoundry)
- Dr Matthew Haines (London Biofoundry)
- Keltoum Boukra (London Biofoundry)
- Beccy Weir (London Biofoundry)
- Dr Poh Chueh Loo (Poh Lab)
Appendix B: Process Mapping Document
Appendix C: OT-2 API Coding Process
The steps below were taken to code the Gibson and Golden Gate protocols as specified in the Process Mapping Document (Appendix B) using the OT-2 API in Python.
- Import the Opentrons modules.
- Define the metadata dictionary with information about the protocol as follows. Note that only the API level is compulsory to include while the rest are optional.
- API level
- Protocol name
- Description
- Author
- Define the labware and hardware in the starting deck state. This includes specifying the labware name and the position where it will be placed on the OT-2’s deck.
- Labware – reagent reservoirs, well plates, and tip racks.
- Hardware – thermocycler module, left and right pipette mounts.
- Define the steps of the protocol using the building block commands available in the OT-2 API.
- Run the ‘opentrons_simulate’ command line tool to verify that the code has no errors.
Appendix D: LabOP API Coding Process
The steps below were taken to code the Gibson and Golden Gate protocols as specified in the Process Mapping Document (Appendix B) using the LabOP API in Python.
- Import the required additional Python modules and LabOP Primitive Libraries. The LabOP primitive libraries contain protocol primitives that are designed to capture the control and data flow of laboratory protocols.
- Set up a SBOL Document object and the namespace that governs new objects to be added to the Document.
- Define the Container Ontology and the Ontology of Units of Measure (OM). An ontology is a formal way of representing knowledge about a particular domain – in this case, it is used to specify required containers for use in laboratory protocols and describe parameters with physical units.
- Define the reagents and set them up in the reagent reservoir. This includes specifying them as a SBOL Component and their respective Plate Coordinates in the reagent reservoir.
- Define the labware and hardware in the starting deck state. This includes mapping the labware name to the respective definition in the Container Ontology and specifying their respective positions on the OT-2’s deck.
- Set up the target samples on the well plate. This is to specify which Plate Coordinates on the well plate correspond to the Assembly Reaction and Negative Control.
- Define the steps of the protocol using helper functions defined in the OT-2 conversion file (opentrons_specialization.py).
- Define the protocol execution using the Execution Engine class which translates the LabOP protocol into an OT-2 protocol.
- Run the protocol execution to verify that the translated OT-2 code has no errors.
Appendix E: Issues Encountered While Using the LabOP API
The issues encountered during the development of the Gibson and Golden Gate protocols using the LabOP API are listed in Table 10 below. Following the discussion with Bryan Bartley from the Bioprotocols Working Group[27], we implemented the following workarounds to circumvent these issues.
| Issue | Workaround |
|---|---|
The reagent reservoir and PCR plate used in the lab were not defined in the Container Ontology of the LabOP API
|
|
The following OT-2 commands did not have a helper function defined for them in the OT-2 specialisation file.
|
Defined new helper functions in the OT-2 conversion file mapping the existing primitives available in the LabOP Primitive Libraries to the respective OT-2 commands.
|
| The choice of pipette to be used in the ‘transfer’ and ‘mix’ commands was hard coded to point to the left pipette into the OT-2 specialisation file |
|
Appendix F: Issues Encountered While Simulating the Code
The issues encountered while simulating the code for both the unit tests and the protocols using the OT-2 API simulator are shown in Table 11.
| Issue | Solution | Framework Affected |
|---|---|---|
| A new pipette tip was not picked up automatically before a ‘mix’ command. |
Added the ‘pick_up_tip’ command before and the ‘drop_tip’ command after each ‘mix’ command. |
Both |
| A single ‘transfer’ command defined for transfers to multiple wells did not include the changing of pipette tips between each individual transfer. |
Added the ‘new_tips = ‘always’’ argument to each ‘transfer’ command |
OT-2 API |
| The recommended volume of 20 µL aspirated and dispensed during the ‘mix’ commands was too large for the P10 pipette used on the left mount. |
|
Both |
| The ‘aspirate’ and
‘dispense’ commands were not available in the OT-2 specialisation file |
Note: the solution for this issue was not implemented as the ‘transfer’ function worked without these lower-level commands. Our proposed solution would be to:
|
LabOP API |
Appendix G: Issues Encountered During the Dry Run
The issues identified during the first dry run and the respective solutions applied to the code for the Gibson and Golden Gate protocols using both the OT-2 and LabOP API are detailed in Table 12 below. These solutions were implemented for both the OT-2 and LabOP frameworks respectively.
| Issue | Solution |
|---|---|
| The opening and closing of the thermocycler lid between the ‘transfer’ and ‘incubate’ steps required human intervention. |
|
| The pipette tips were obstructed by the walls of the labware during the ‘transfer’ steps as the labware used in the lab was notdefined in the OT-2 Default Labware Library[28]. |
|
Appendix H: Optimisations Made After the Dry Runs
The code for the Gibson and Golden Gate protocols using both the OT-2 and LabOP API were optimised by implementing the following changes shown in Table 13 to reduce the duration of the protocols.
| Optimisation | Purpose | |
|---|---|---|
| Replaced the single channel pipette with an 8-channel one. |
To reduce the number of pipette movements required as one transfer with the 8-channel pipette is equivalent to eight transfers with the single channel pipette. | |
| Attached a P300 pipette on the right mount in addition to the P10 pipette originally on the left mount. |
To eliminate repeated transfer steps where the volume transferred was larger than 10 µL as the P300 pipette can accommodate larger volumes between 20 – 300 µL. | |
| Combined separate transfer steps of water for the Negative Control into a single step. |
To eliminate redundant transfer steps as steps with a common reagent can be transferred together using the P300 pipette. |
Appendix I: Construct Design
Here we present the design process for a DNA construct to be assembled using each protocol. The design requirements for a functioning construct are:
- A Transcription Unit (TU) which consists of a promoter, a Ribosome Binding Site (RBS), the structural gene and a terminator.
- A plasmid backbone for the TU to be inserted into.
From here, we chose individual parts corresponding to our requirements as shown in Table 14.
| Part | Name | Source |
|---|---|---|
| Promoter | BBa_J23101 | 2022 iGEM Kit Plate 1[32][3] |
| RBS | BBa_B0034 | 2022 iGEM Kit Plate 1[32] |
| GFP | BBa_E0040 | 2022 iGEM Kit Plate 1[32] |
| Terminator | BBa_B0015 | 2022 iGEM Kit Plate 1[32] |
| Plasmid (Golden Gate) | pGGAselect | NEB Golden Gate Assembly Kit [33] |
| Plasmid (Gibson Assembly) | psB1K3 | 2022 iGEM Kit Plate 1[32] |
Parts listed in the International Genetically Engineered Machine (iGEM) Part Registry[34] and the NEB Assembly Kit were chosen as they were standardised and readily available. To source these parts, we could either:
- Synthesise the whole TU commercially, and then assemble this TU into our backbones.
- Select individual TU parts from iGEM Distribution Kits, and then assemble them into our backbones.
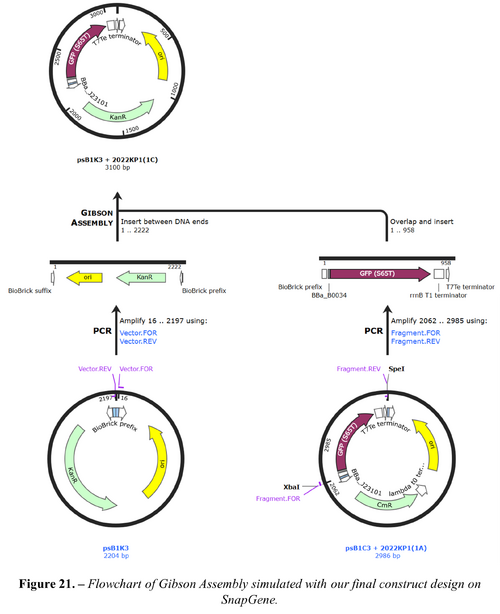
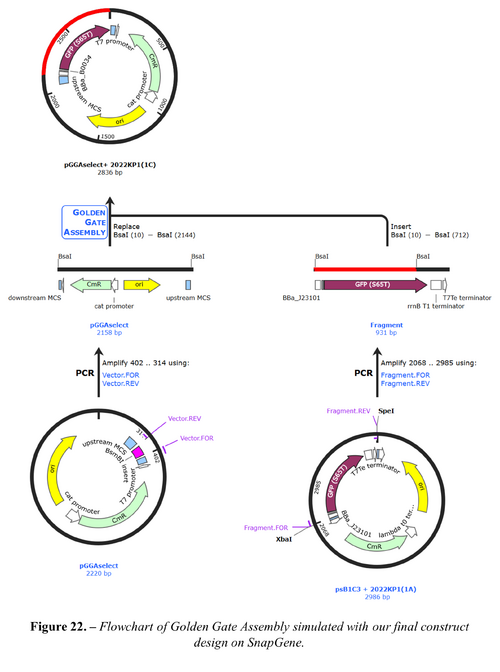
We would choose the second option as commercial synthesis is not cost-effective for our use. We also modelled and simulated each assembly using SnapGene[35], which verified the correct assembly. The full constructs designed are shown in Figures 21 and 22 below.
Appendix J: GitHub Repository
The complete source code of the Gibson and Golden Gate protocols written using the OT-2 and LabOP API can be found in the GitHub repository linked below.
https://github.com/jeytseloh/BMEY3_LabAutomationGroupProject
Appendix L: Project Management Assessment
Departures from Project Plan
With regards to our project schedule, as outlined in our pitch, we adhered to the allocated timeslots for each task. However, we were unable to test our protocols on actual reagents as was initially planned. This would have involved preparations done in the wet lab before running the actual protocols. After, we would have to verify the final assemblies by performing sequencing on agarose gel and transformations. This whole process was estimated by our supervisor to take at least two weeks. However, even if we ordered the required reagents as soon as the constructs were designed, they would only have arrived in the final week before the project was due. Therefore, we used remaining time to instead optimise our code by completing more runs with the alternate reagents (coloured water).
Key Project Management Lessons Learned
Firstly, we learned the necessity of planning ahead and having proper contingencies. This was especially important given how our project was reliant on many external factors such as delivery time for reagents, robot availability, and lab induction timings. For example, the actual reagents we needed would’ve taken too long to be delivered. Therefore, we planned to instead use the lab time to iterate versions of our automated script to make it more efficient. Additionally, as we only had access to the robot three days a week, we used those days away from the lab to focus on developing the code and strategizing our lab plan. That way, we were able to make the most of our limited time in the labs.
Secondly, we learned the importance of having a clear team structure in any group project. Individual roles and responsibilities were outlined within the first few weeks of our project. Having this clear team structure proved especially critical in the latter stages of our project when the tasks became more varied. For example, we had some people working on the LabOP API, others on the OT-2 API, and others working on designing the construct. By clearly outlining roles, we were able to efficiently make progress on all the different aspects of our project. It was also useful having a Project Manager to keep oversight of all the different tasks being done to make sure nothing was being missed out.
The third key lesson we learned was the critical role of efficient communication with our supervisors. Regular meetings allowed us to receive feedback on our progress and ensured we stayed on the right track towards our goal. This was especially important in the early stages of our project when we were still conducting our Human Practice Study and trying to narrow down the scope of our project. This was specifically with regards to design choices where at times, we would occasionally fixate on certain ideas that wouldn’t be feasible for our project. However, through clear and consistent communication, we were able to identify and address these issues, making full use of our supervisors’ experience. We were also able to make use of our supervisors’ contacts when reaching out to groups for our Human Practice Study and to gain access to the OT-2 robot we used.