User:James Chappell/ protocol
- Fluorometer
- Plate x1
- Plate Centrifuge
- 6x1.5ml tubes
- Gilson Pipettes
- Use of Cold room
- 1xWater Bath - to be placed in the cold room and have temperature set to 15°C
- 27°C incubator
- 37°C incubator
- 50°C incubator
Reagents and Chemicals
- Remove pure sample of recombinant GFP protein of .....M from storage
- Remove .... of our cell extract solution from storage solution and place in a 1.5ml tube and put to the side.
- Now we need to prepare 100μl of the commercial E.coli and T7 cell extract solution. First we need to prepare complete amino acid mixture for both extract solutions: Add the 30μl volume of two amino acid minus mixtures for both kits to give a final volume of 60μl
Now prepare the commercial cell extract: - Take 3x1.5ml tube and add 5µl of the E.coli complete amino acid mixture
- Take 3x1.5ml tube and add 5µl of the T7 complete amino acid mixture
- To each 1.5ml tube add 20µl of S30 Premix Without Amino Acid
- Add 15µl of S30 Extract Circular
- Add 55µl of nuclease-Free Water to make volume upto 100μl
Prepare GFP serial Dilations
- Prepare a solution of GFP to give a final concentration if ...M
Loading Plate
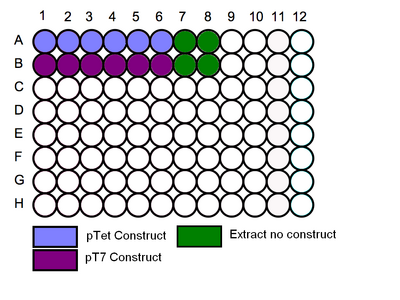
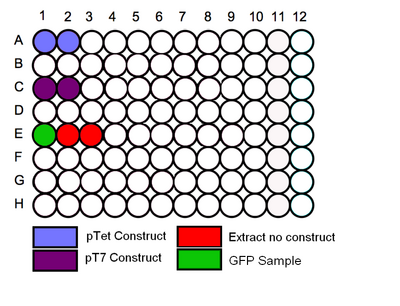
- Follow the schematic for loading the plate, begin by adding the relevant cell extracts to the correct wells.
- Then add the correct dilution of GFP to the corrrect well.
- Place place in the fluorometer and measure the intial fluorescence, try to minimise the time between addition of the GFP and reading the plate.
Schematic
Protocols
- Fluorometer
- Plate x1
- Plate Centrifuge
- 6x1.5ml tubes
- Gilson Pipettes
- Use of Cold room
- 1xWater Bath - to be placed in the cold room and have temperature set to 15°C
- 27°C incubator
- 37°C incubator
- 50°C incubator
Reagents and Chemicals
- Remove pure sample of recombinant GFP protein of .....M from storage
- Remove .... of our cell extract solution from storage solution and place in a 1.5ml tube and put to the side.
- Now we need to prepare 100μl of the commercial E.coli and T7 cell extract solution. First we need to prepare complete amino acid mixture for both extract solutions: Add the 30μl volume of two amino acid minus mixtures for both kits to give a final volume of 60μl
Now prepare the commercial cell extract: - Take 3x1.5ml tube and add 5µl of the E.coli complete amino acid mixture
- Take 3x1.5ml tube and add 5µl of the T7 complete amino acid mixture
- To each 1.5ml tube add 20µl of S30 Premix Without Amino Acid
- Add 15µl of S30 Extract Circular
- Add 55µl of nuclease-Free Water to make volume upto 100μl
Prepare GFP serial Dilations
- Prepare a solution of GFP to give a final concentration if ...M
Loading Plate
- Follow the schematic for loading the plate, begin by adding the relevant cell extracts to the correct wells.
- Then add the correct dilution of GFP to the corrrect well.
- Place place in the fluorometer and measure the intial fluorescence, try to minimise the time between addition of the GFP and reading the plate.
Schematic
Friday
1) Calibration Curve for GFP
Test to determine the relationship between fluorescence and in vitro concentration of GFP. To test this purified samples of known [GFP] are added to in vitro chassis and the fluorescence measured. From this a calibration curve of [GFP] vs Fluorescence can be made. This can be used for data analysis to convert fluorescence into a [GFP].
Aims:
- To determine [GFP] vs Fluorescence
Conditions:
- 50μl in vitro chassis
- DNA added
- Do we need DNA, as it may absorb some of the fluorescence
- 25oC
Variables:
- [GFP] added
- Fluorescence
Sampling:
- Measure after addition of GFP to minimize degradation of GFP
Repetition:
- 3 repeats
Controls:
- Negative Control: In vitro system only
- No GFP is added to an in vitro chassis
2) Degradation Time of GFP
Test the half life of GFP protein in an in vitro chassis. To test this a purified sample of known [GFP] are added to an in vitro chassis, then fluorescence will be measured at regular time intervals. The fluorescence will be converted into GFP molecules using the calibration curve. This will give; degradation of GFP as a function of time, from this the half life of GFP can be obtained. In addition, temperature may affect the half life of GFP and so the half life will be measured for an appropriate temperature range.
Aims:
- To determine the half life of GFP for a range of temperatures
Conditions:
- 50μl in vitro chassis
- [GFP] added
Variables:
- Temperature range: 4oC, 15oC, 25oC, 30oC, 37oC, 50oC
- Range may change based upon the initial testing; will only test ranges that in vitro is stable at.
- Degradation of GFP
Sampling:
- Every 15 minutes.
Repetition:
- 3 repeats
Controls:
- Negative Control: In vitro system only
- Positive Control: In vitro chassis with high concentration of purified GFP added at high temperature
Equipment
- Incubator 30oC
- Fluorometer
- Spectrometer
- Plate x1
- Plate Centrifuge
- 6x1.5ml tubes
- Gilson Pipettes
- Stop watch
DNA Concentration
- We need to be able to quantify the DNA from the mini preps and midi preps. To do this we measure the A260nm where one unit corresponds to 50ug/ml of double stranded DNA.
- First remove 5ul of the DNA sample and add to 1ml of MiiA/Nuclease Free water to a quatz curvette.
- Place an empty curvette and zero the machine.
- Place the curvette containing the DNA in the spectrometer and measure the A260nm.
- To calculate the A260nm,
DNA ug/ml = 50 x A260nm - In addition we can measure A280nm and calculate the purity of the DNA sample. To do this measure, A280nm and calculate A260nm/A280nm
- A value between 1.8 - 2.0 indicates pure DNA
Preparations of Chemicals and Reagents
After preparing all solutions preheat to 30oC
- Remove .... of our cell extract solution from storage solution
- Now we need to prepare 100μl of the commercial E.coli and T7 cell extract solution. First we need to prepare complete amino acid mixture for both extract solutions: Add the 7.5μl volume of two amino acid minus mixtures for both kits
- Take 3x1.5ml tube and add 5µl of the E.coli complete amino acid mixture
- Take 3x1.5ml tube and add 5µl of the T7 complete amino acid mixture
- To each 1.5ml tube add 20µl of S30 Premix Without Amino Acid
- Add 15µl of S30 Extract Circular
- Add nuclease-Free Water to make volume upto 100μl
Loading Plate
- Follow the schematic for the plate adding everything but the DNA sample.
- Place the top on the plate and place in the incubator. Leave for a few minutes to heat to 30oC
- Remove from incubator and centrifuge for 1 minute
- Remove lid and Measure in the flourometer.
- Then to begin the reaction add .... purified DNA sample.
- Place lid back on and place back in the incubator at 30oC
Collecting Data
- After 5 minutes of incubation measure the fluorescence by repeating procedure 3-4 above.
- Repeat measurements after every 5 minutes until the Fluorescence is constant
- Before every measurement in the fluorometer spin the plates in a plate centrifuge
Schematic
|
Our Cell Extract
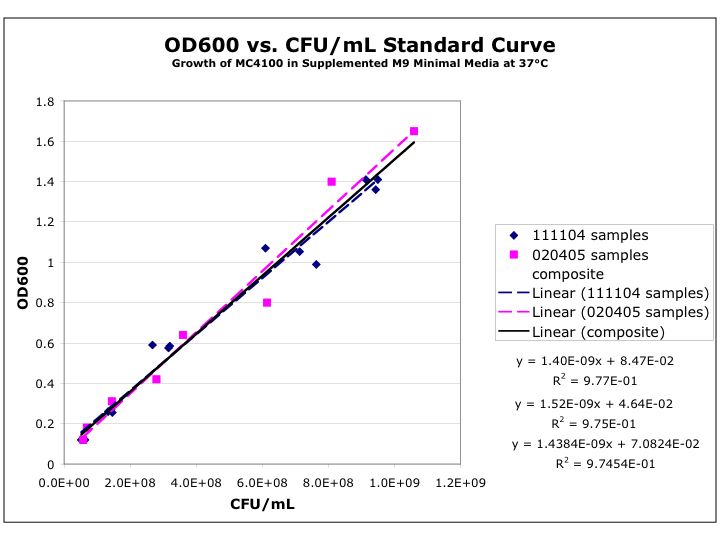
- A cell density of O.D.600=0.6 is grown, using the following calibration curve, this corresponds to an approximate cell density of 3.6x10⁸
- A cell density of O.D.600=4.5 is grown, using the following calibration curve, this corresponds to an approximate cell density of 3.15x10⁹
- The average number of cells in the bought extract in 50ul of in vitro chassis is:
- 2.1x10⁹
- For our cell extract a 3000ml culture will be grown until the A600nm is 4.5 per ml. This is an approximate cell densirty of 9.45 x 10 12 for the total culture.
- At the end of the experiment this will be made into a 10ml solution. Assuming that we have 100% effeiciency, we then would have 4.725x10¹⁶ per 50ul.
- However we are very unlikely to get 100% effeicency.
GFP Calibration curve
- Remove pure sample of recombinant GFP protein of .....M from storage
- Remove .... of our cell extract solution from storage solution and place in a 1.5ml tube and put to the side.
- Now we need to prepare 100μl of the commercial E.coli and T7 cell extract solution. First we need to prepare complete amino acid mixture for both extract solutions: Add the 7.5μl volume of two amino acid minus mixtures for both kits
Now prepare the commercial cell extract: - Take 3x1.5ml tube and add 5µl of the E.coli complete amino acid mixture
- Take 3x1.5ml tube and add 5µl of the T7 complete amino acid mixture
- To each 1.5ml tube add 20µl of S30 Premix Without Amino Acid
- Add 15µl of S30 Extract Circular
- Add 55µl of nuclease-Free Water to make volume upto 100μl
Prepare GFP serial Dilations
- The commercial S30 extracts are claimed to produce around 150-200ng of protein. We need to cover this range within our calibraation curve.
- Prepare suitable dilutions given a suitable range:
- Remember need to consider the concentration of GFP in total volume of cell extract
Loading Plate
- Follow the schematic for loading the plate, begin by adding the relevant cell extracts to the correct wells.
- Then add the correct dilution of GFP to the corrrect well.
- Place place in the fluorometer and measure the intial fluorescence, try to minimise the time between addition of the GFP and reading the plate.
Schematic
Experiment 2:
- To create a calibration curve to determine: [GFP] in in vitro chassis vs Fluorescence
- This is essential for our data analysis to convert the fluorescence into GFP molecules
- Need to finalise which in vitro chassis we will be using for our experiments, will be determined in initial in vitro testing of phase 1
Protocol 2
Aims:
- To test pTet in vitro'
Equipment
- Fluorometer + Connected PC Turn on before beginning
- 37oC
- 96 well plate x1 + Plate lid + Autoclave tape
- 1.5ml eppendorf tube x7
- eppendorf rack
- Gilson p20,p200,p1000
- Stop watch
Reagents
- Commercial S30 E.coli extract. Level 5 Biochem freezer
- 175µl Amino Acid Mixture Minus Methionine, 1mM
- 175µl Amino Acid Mixture Minus Leucine, 1mM
- 1 x 45µl tubes of S30 Extract, Circular
- 1 x 60µl S30 Premix Without Amino Acids
- Commercial S30 T7 extract. Including: Level 5 Biochem freezer
- 175µl Amino Acid Mixture Minus Cysteine, 1mM
- 175µl Amino Acid Mixture Minus Methionine, 1mM
- 175µl Amino Acid Mixture Minus Leucine, 1mM
- 1 x 45µl T7 S30 Extract, Circular (3 × 150µl)
- 1 x 60µl S30 Premix Without Amino Acids
- GFP solution (For this initial experiment does not need to be purified GFP, we just want to know we have the right filter and that our settings are adjusted to measuring GFP) In the teaching labs fridge
- pTET midi DNA id 02 In the teaching labs fridge
- pT7 midi DNA id 11 In the teaching labs fridge
Protocols
- First collect all equipment and reagents and ensure the fluorometer and that the PC connected has a data collection protocol installed.
- All the cell extracts are kept level 5 in the biochemistry labs in the bottom draw of the -80oC freezer. The S30 extract and premix have been divided into 10 tubes, 1 tube being enough for 3 reactions. The amino acid mixtures have not been divided and should be removed from the freezer.
- Commercial E.coli Cell Extract: First prepare a complete amino acid mixture for both extract solutions: Add 7.5μl volume of two amino acid minus mixtures into an labeled eppendorf to give a volume of 15μl. Each amino acid minus mixture is missing one type of amino acid, and so by combining two solutions we are complementing each solution for the missing amino acid. Place eppendorf in a rack on bench.
- Commercial T7 Cell Extract:Carry out procedure above for the T7 amino acid minus mixtures, to give a final volume of 15ul.
- Commercial E.coli Cell Extact:Take an eppendorf tube and add 5µl of the E.coli complete amino acid mixture. Then add add 20µl of S30 Premix Without Amino Acid. Then add 15µl of S30 Extract Circular. The volume should be 40ul in the eppendorf tube.
- Carry out step above twice more so that we end up with three eppendorf tubes of prepared commercial E.coli extract, however for one of the tubes mark as control and add 20ul of nuclease free water to the eppendorf.
- Commercial T7 Cell Extract:Take an eppendorf tube and add 5µl of the T7 complete amino acid mixture. Then add 20µl of T7 S30 Premix Without Amino Acid. Then add 15µl of S30 T7 Extract Circular. The volume should be 40ul in the eppendorf tube..
- Carry out step above twice more so that we end up with three eppendorf tubes of prepared commercial T7 extract, however for one of the tubes mark as control and add 20ul of nuclease free water to the eppendorf
- Vortex the tubes to mix thoroughly and place the 5x eppendorf tubes in the incubator at 37oC
Loading Plate
- Follow the schematic for the plate and begin by loading the in vitro expression system into the correct wells. Before loading in the samples vortex the tubes for a few seconds to mix the solution.
- Place the lid on the 96well plate and tape up the edges of the lid. This should be put into the incubator at 37oC for 10 minutes to allow temperature to equilibrate
- Remove from 37oC incubator and spin-down in centrifuge in plate centrifuge at 2000rpm for a few seconds. Spin down is the process of bringing down any solution on lid or side of well into the base of the well. Alternatively can tap the top of the lid to bring down any solution to bottom of the well.
- CAREFULLY remove lid off the 96well plate and place in the fluorometer. Create a file name protocol 2-1 under: D:\IGEM\INSERT DATE\CBD\ protocol 2-1. Export the data here. If repeated measurements change the second number to suit repeat number, e.g. 2nd repeat protocol 2-2, 5th repeat protocol 2-5. Once the data collection is set up then initiate the measurements.
- This measurement will give a back ground fluorescence measurement and can be used as our time zero data.
- Then to begin the reaction add 20ul volume of purified DNA sample to give 2µg to the wells indicated on the schematic. Be careful not to add to wells that DO NOT NEED DNA or to mix up which DNA we are adding.
- Place lid back on and tape again and place back in the incubator at 37oC
- After 30 minutes of incubation measure the fluorescence by repeating procedure 3-4 above. This initial measurement of 30 minutes is to find out how fast GFP is being produced. After this initial measurement, the intervals should be reassessed and adjusted accordingly
- Before each measurement be careful to remember to either spin down or tap down the solution and to remove the lid before placing in the fluorometer
Schematic
|


