Physics307L:People/Gooden/Notebook/070917
From OpenWetWare
Jump to navigationJump to search
e/m Ratio Experiment

SJK 00:22, 18 October 2007 (CDT)

Very nice description!
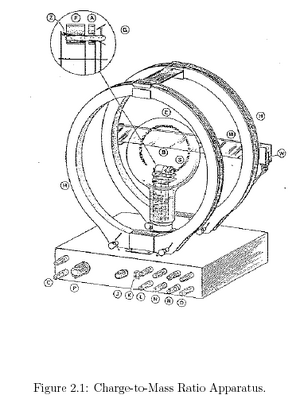
- This experiment is using the Helmholtz coils and a helium filled tube with an electron gun to measure the e/m ratio. That is the electron charge-to-mass ratio. A heating element inside the tube is heated to the point where electrons in the metal are 'boiled' off and with the help of a voltage applied between two plates the electrons are accelerated. The helmholtz coils are supplied with a current to generate a magnetic field that according to the Lorentz force law will cause the electrons path to be bent into a circular trajectory inside of the tube. As the electrons move through the tube they collide with helium atoms that become excited by the collision and then radiate, allowing us the see the path that the electrons are taking. Measuring the radius of the electrons circular path allows for the calculation of the Charge-to-Mass ratio.
Procedure
Materials
   This experiment requires 2 DC power supplies, 2 digital volt meters, 1 helmholtz coil,
   1 vacuum tube/electron gun assymbly, and 1 high voltage supply.
Set Up
   step 1 - Connect one of the DC power supplies in series with a DVM, that will measure
            current, to the Helmholtz coil jacks on the bottom left side of the apparatus.
   step 2 - Connect the other DC power supply to the electron gun heater jack on the front
            right of the apparatus.
   step 3 - Connect the high voltage power supply to the electron gun electrode jacks that are
            next to the heater jacks.
   step 4 - Finally connect the second DVM to the voltmeter jacks on the apparatus to measure
            accelerating voltage.
- Complete Set Up
   Step 1 - Once all of the equipment is connected, turn on the power supply to the heater
            jacks and allow the electron gun to heat up for several minuets.Keep the voltage
            under 6.3 volts.
   Step 2 - Once the electron gun has heated for several minuets go ahead and turn on the high
            voltage supply to around 250 volts(for best results) and begin to increase the
            current through the coils using the current knob on the apparatus. Also, turn on
            both DVM's to being measuring voltage and current through the coils.
DATA
SJK 00:25, 18 October 2007 (CDT)

Nice recording of the data. It would also be good to record your measurement uncertainties for the various measurements. For example, "all radius measurements +/- 0.1 cm"
- DATA SET 1 at constant voltage - V=270 V
   Measurment 1                      Measurment 6
   I=1.04                            I=.99
   r1=5.4cm,r2=4.1cm                 r1=5.5cm,r2=4.1cm
     * r=4.5cm                         *r=4.55cm
   Measurment 2                      Measurment 7
   I=1.01                            I=1.22
   r1=5.5cm,r2=4.1cm                 r1=4.9cm,r2=3.9cm
      *r=4.5cm                          *r=4.35cm
   Measurment 3                     Measurment 8
   I=.95                             I=1.13
   r1=5.6cm,r2=4cm                   r1=5.2cm,r2=4cm
      *r=4.6cm                          *r=4.2cm
   Measurment 4                     Measurment 9
   I=1.18                            I=1.08
   r1=5cm,r2=4cm                     r1=5.3cm,r2=4.1cm
      *r=4.25cm                         *r=4.3cm
   Measurment 5                     Measurment 10
   I=1.24                            I=1.30
   r1=4.8cm,r2=3.9cm                 r1=4.6cm,r2=3.9cm
      *r=4cm                            *r=3.65cm
- DATA SET 2 at constant current - I=1.35 A
   Measurment 1                     Measurment 6
   V=270                             V=320
   r1=4.4cm,r2=4cm                   r1=4.8cm,r2=3.9cm
     * r=3.7cm                         *r=4.15cm
   Measurment 2                     Measurment 7
   V=289                             V=330
   r1=4.6cm,r2=4cm                   r1=4.9cm,r2=4.1cm
      *r=3.9cm                          *r=4.25cm
   Measurment 3                     Measurment 8
   V=298                             V=348
   r1=4.6cm,r2=4cm                   r1=5cm,r2=4.2cm
      *r=3.95cm                          *r=4.35cm
   Measurment 4                     Measurment 9
   V=307                             V=360
   r1=4.6cm,r2=4cm                   r1=5cm,r2=4.2cm
      *r=4cm                             *r=4.45cm
   Measurment 5                     Measurment 10
   V=313                             V=388
   r1=4.7cm,r2=4cm                 r1=5.1cm,r2=4.3cm
      *r=4.1cm                            *r=4.55cm
- DATA SET 3 for random values of current and voltage
   Measurment 1                     Measurment 6
   V=180,I=1.21                      V=220,I=1.30
   r1=3.9cm,r2=3.5cm                 r1=4.1cm,r2=3.6cm
     * r=3.7cm                         *r=3.85cm
   Measurment 2                     Measurment 7
   V=189,I=1.02                      V=230,I=1.33
   r1=4.7cm,r2=3.6cm                 r1=4.2cm,r2=3.7cm
      *r=4.15cm                          *r=3.85cm
   Measurment 3                     Measurment 8
   V=198,I=1.09                      V=248,I=1.14
   r1=4.6cm,r2=3.7cm                 r1=5cm,r2=4cm
      *r=4.15cm                          *r=4.5cm
   Measurment 4                     Measurment 9
   V=207,I=1.18                      V=260,I=1.01
   r1=4.4cm,r2=3.8cm                 r1=5.5cm,r2=4.1cm
      *r=4.1cm                             *r=4.8cm
   Measurment 5                     Measurment 10
   V=212,I=1.25                      V=288,I=4.33
   r1=4.2cm,r2=3.7cm                 r1=4.6cm,r2=4cm
      *r=3.95cm                            *r=4.3cm
ANALYSIS
- With the three data sets, we used the formula on the e/m apparatus to calculate e/m for each
measurment and then found the mean for the set and the standard deviation.
SJK 00:26, 18 October 2007 (CDT)

I don't think this formula is correct
[math]\displaystyle{ e/m=\frac{2V}{(B*I)^2R^2} }[/math]
- Value of e/m for data set 1
       e/m = 6.28343E+11 +/- .725E+11
        (Koch says (6.3 +/- 0.7)*10^11)
- Value of e/m for data set 2
       e/m = 3.39E+11 +/- .0272E+11
        (3.39 +/- .03)*10^11
- Value of e/m for data set 3
       e/m = 3.07111E+11 +/- .00840E+11
        (3.07 +/- .01)*10^11
Data Analysis of set 1 and random set
SJK 00:28, 18 October 2007 (CDT)

This is a good start to a discussion of the errors...but I don't think you fully explained everything that we had talked about. Also, it would be good to include graphs as images to show how the e/m "constant" varies with current, like we saw.
- These values are all very far off from the accepted value of the charge-to-mass ratio of
e/m = 1.76e+11 coulomb/kg. Our result from our first data set is grossly inaccurate and the
other two results while not as bad are still not very good. We believe that we are experiencing
systematic errors in the experiment, that are most likely not human caused since the another
group who performed this experiment obtained results very near ours.
- Errors that could be apart of the experiment include:faulty DVM's, or faulty e/m tube. Other
pausible sources of error could be that the equation used to calculate the ratio is incorrect
and also that the constant B (magnetic flux density) for the helmholtz coils is inaccurate.