Lidstrom:Sorvall Centrifuge
From OpenWetWare
Jump to navigationJump to search
Back to Protocols
Background

We have a Sorvoll RC-5B centrifuge that is useful for spinning large volumes in 0.5L bottles or medium-sized (a few mL) volumes very quickly
Rotors
SS-34
- Holds 8*50 mL, spins at 20,000 RPM/36,900 RCF
- BUT Katya (circa 2010) recommends using it at <= 18,000 RPM
- Tubes:
SS-34 tubes - Can't be autoclaved.
- Actually, Amanda might have autoclaved them before.
- Can't write on body; can only write on cap. Sandy says stickers don't stick.
- Can't be autoclaved.


GS-3
- GS-3.
- BUT Katya (circa 2010) recommends using it at <= 7,500
- For bigger bottles. (0.5L)
- Holds eppendorf (1.5mL) tubes
- Spins at 9,000 RPM/13,700 RCF
- Requires 3 pieces for installation:
- (1) the base that you put the filled bottles in
- (2) a matching black metal lid
- (3) a metal rod with threads at one end and a knob on the other.
- Place the based down, screw the lid on counter clockwise and then use the pin to secure it. Try lifting to ensure you secured it correctly.
- To remove, you must use the handle with a screw. After the rotor spins, it is screwed onto the base. You can hurt your back trying to lift the rotor if you haven't unscrewed it with the handle first.

Explanation of RCF

- For reference, the benchtop 50mL centrifuges (e.g. ST-15R with a TX-400 swinging bucket rotor) we have spin at 4696 RCF.
- There are stickers with maximum speeds. These were set by Katya, a Lidstrom Lab manager, circa 2011. It is unknown what the motivation was for keeping the rotors below maximum speed.

Instructions
- pre-chill the rotor you plan to use (overnight in fridge)
- turn on centrifuge and set it to the desired temperature range
- The dial on the left (under the temperature gauge) is really two knobs; one turns the lower bound blue stick and the other turns the upper bound red stick.
- The centrifuge will start cooling as soon as you turn it on.
- Install the rotor of your choice
- The small SS-34 rotor requires a T-shaped piece of metal with a screw end on it to install. Turn counter clockwise to screw it on. Use the same piece to unscrew it upon completion.
- The large GS-3 rotor has 3 pieces: the base that you put the filled bottles in, a lid, and a metal rod with threads at one end and a knob on the other. Place the based down, screw the lid on counter clockwise and then use the pin to secure it. Try lifting to ensure you secured it correctly.
- Fill bottles with the cells you want to centrifuge:
- To turn on, you have to have the black line in the temperature gauge panel between the blue and red lines. Then the start button glows and you can begin spinning.
- Note: the centrifuge is slow to speed up and slow to lose speed as well.
- Remove centrifuged cultures
- The machine slows down slowly.
- Leave the lid of the centrifuge open for a few hours until it warms up to room temperature and any condensation has evaporated. This will reduce odors.
Sample protocols
Example protocol for SIP3-4:
Janet's SIP3-4 centrifugation:
- Chill to 4oC with SS-34 rotor inside
- Fill correct tubes
- Spin for ___ min at ___ RCF at ___oC
Example protocol for AM1:
Ask Nate/Ceci
Centrifugation Math & Basics
- Sigma summary:
- sedimentation rate is proportional to RFC, and proportional to the square of the particle diameter (cell diameter).

Stoke's equation 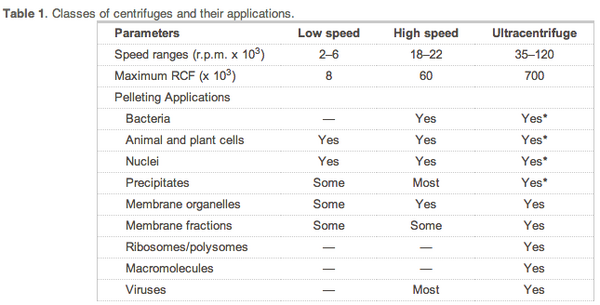
centrifugation speeds for applications


