Beauchamp:AayushiPreprocessingNotes
Beauchamp Lab wiki
|
To search for things on the wiki, use Google's site search feature. For instance, to find an Experiment Sheet, type
site:openwetware.org/wiki/Beauchamp ExperimentSheet
Imaging Pipeline
1. Connect to the SECTRA PACS. You must be use a PC (not a Mac) connected to the PennMedicine WiFi (or to a UPHS ethernet port). The Dell workstation has a bookmark for the URL (see the PACS_Notes.txt file on the desktop for additional help). Click the "Start" button, then enter your UPHS username and password. Use the default workspace and domain.
http://sectrapacs.uphs.upenn.edu/ids7/
2. Enter the patient name or MRN. If the MRN is not found, you may need to prepend an "8". Select the appropriate series and download them all (pre-op MRI, post-op CT, post-op MRI). 3. Connect to the MacPro server. A simple way is to right click on "This PC", select more options, select network drive, followed by \\computername\BeauchampServe. Note that you cannot connect to the server from the PennMedicine WiFi (used in the previous step), only from AirPennNet. 4. Copy the downloaded images to the appropriate directory on the server:
BeauchampServe\rave_data\raw\PAVxxxx
5. Use the to3d command to create .nii volumes out of the imaging series. Go to each directory with images and run the command line. Give the file a useful name, such as the kind of image (preMR, CT, postMR) and the last four digits of the directory number.
 set sess = /Volumes/BeauchampServe/rave_data/raw/PAV001/Imaging/
 dimon -infile_pattern '*' -dicom_org  -gert_create_dataset -gert_to3d_prefix anatomy.nii -use_obl_origin
 mv anatomy.nii {$sess}/CT_xxxx.nii
6. Run FreeSurfer on the pre-anatomy.
recon-all -all -parallel -subject fs -i ./preMR_9593.nii
7. (in parallel) Align CT to post-anatomy.
set t1 = postMR_D1B6.nii
set ct = CT_E983.nii
@Align_Centers -base $t1  -dset $ct
3dresample -input CT_E983_shft.nii -prefix CT_highresRAI_res_shft.nii  -master $t1  -dxyz 1 1 1 -rmode NN
align_epi_anat.py -dset1 $t1 -dset2  CT_highresRAI_res_shft.nii -dset1_strip None -dset2_strip None -dset2to1 -suffix _al  -feature_size 1  -overwrite -cost nmi -giant_move -rigid_body > status.txt
3dcopy  CT_highresRAI_res_shft_al+orig CT_highresRAI_res_al.nii
3dcopy $t1 ./temp_ANAT.nii
afni -com "SWITCH_UNDERLAY temp_ANAT.nii" -com "SWITCH_OVERLAY CT_highresRAI_res_al.nii"
Creating an Epoch.CSV file from BlackRock
see also RAVE Epoching instructions
Information about event timing can be gathered from at least three sources:
- stimulus presentation program, such as Psychtoolbox
- the photodiode channel
- the neural recording system
The Blackrock creates a separate .NEV file that stores comments and information about trial timing, for subject PAV004 and experimental block 2, this file could be called
PAV004_datafile_002.nev
The first step is to convert this file to Matlab using the Blackrock library in Matlab, e.g.
NEV = openNEV('PAV004_datafile_002.nev');
Repeat this for every block of the task. Copy all of the resulting .mat files into the subject's raw dir in the RAVE directory structure, e.g.
cp PAV_004_datafile_???.mat /Volumes/BeauchampServe/rave_data/raw/PAV004/
The comments describing each trial are in
NEV.Data.Comments.Text
Write them out to a CSV file with
writematrix(NEV.Data.Comments.Text,'comments.csv');
The starting time of each trial are in
NEV.Data.Comments.TimeStampSec
Write them out to a CSV file with
writematrix(NEV.Data.Comments.TimeStampSec,'timing.csv');
In Excel or RStudio, convert these to an epochs.csv file. See the R program
/Volumes/BeauchampServe/rave_data/create_epoch_helper.R
After preprocessing, move this epochs.csv file into the correct directory, e.g.
rave_data/ent_data/EMU_NoisyWords/PAV004/rave/meta/
Note that the filename must begin with epoch_
Pre-processing Pipeline at UPenn
a. Connect to the Beauchamplab Serve
b. Open the RAVE Pre-proc icon on your desktop (RAVE_PreProcMacPro.command) OR launch the RAVE pre-processing module from RStudio with the following command:
>rave::rave_preprocess()
c. The pre-processing module will launch in a new browser window or a new tab (if the browser is already opened). The initial page, it opens to, will be the "Overview" page. You can also click on the Overview module on the left panel.
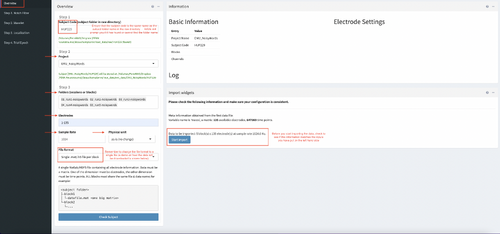
Step 1: Importing the data (refer to the screenshot to see how the inputs should look like)
- Subject Code: Manually enter the subject code (this will be the name of the subject folder in the raw directory; you need to ensure that the names match) [e.g: HUP229]
- Project:Select, from the dropdown list, the project that you are importing the data for [e.g: EMU_NoisyWords]
- Click on "Create Subject"
- A step 3 dialogue box will be added
- Folders: Select the data folders for that task (there will be a dropdown list with the annotated folders) [e.g:run1-noisywords, run2-noisywords...run5-noisywords]
- Electrodes: Manually enter the total number of electrodes implanted [e.g:1-135]
- Sample Rate: Set the sample rate to 1024
- Physical Unit: If you know the unit of the data, select one from the dropdown options. Otherwise, if you do not know the sample rate, choose the option "as-is(no change)"
- File Format: Remember to change the file format option to "Single.mat/.h5 file per block"
- Click on "Check Subject"
- If everything is correct and your configuration is consistent, a "Start Import" box will show which you can click.
- Start Import
- Once you click on start import, a pop-up will show "Confirm importing data". Click on "let's Go".
- A small pop
- Importing the data takes time. Be patient.
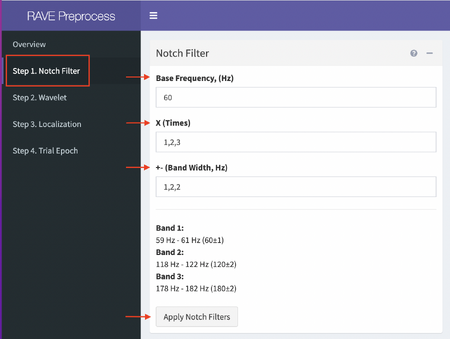
Step 2: Notch Filter (see the screenshot below)
- Click on the Step 1.Notch Filter tab on the left panel
- Set the Base Frequency (Hz) to (or leave as is) 60 Hz
- Set the X times value as 1,2,3
- Set the +- (Band Width,Hz) to 1,2,2
- Select the Apply Notch Filters box (This step may take a few minutes)
- Once the notch filtering process is completed for each electrode, the Inspection tab on the will load the Block and the Electrodes for analysis
(You can also download the Notch Filtered Signal graphs as a zip file on your local desktop for analysis- whichever you are more comfortable with)
- These signals will be used to reference the "good", "bad", and "not sure" electrodes.
Follow this template for electrode referencing:
https://docs.google.com/spreadsheets/d/19EB3T6Qdt5G-nF4foKrYbvVqFl-nI6gX22W8OFVhnXw/edit?usp=sharing
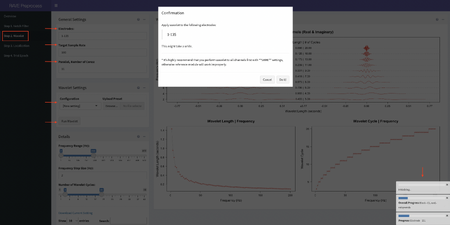
Step 3: Wavelets (refer to the screenshot to see how the inputs should look like)
- Click on the Step 2.Wavelet tab on the left panel
- Set the Electrodes to (or leave as is) 1-135
- Set the Target Sample Rate value as 100
- Set the Parallel, Number of Cores input to 31
- Leave the Wavelet Configuration as [New Setting]
- Select the Run Wavelet box (This step may take an hour or so)
- A confirmation pop-up screen will show, check if the number of electrodes are correct, and select Do it!
- If everything runs correctly, you will see a progress report on the bottom right corner
- To double check if you ran your wavelet step correctly, go to the server-->rave_data-->ent_data-->EMU_NoisyWords-->HUP229 AND check the raw folder and see if all the HUP229 files are inputted correctly
Step 3: Trial Epoch (refer to the screenshot to see how the inputs should look like)
- Go to the rave_data folder and to the patient subject folder and change the photodiode.pd files photodiode.mat for each run of the task
- Set the Epoch name to new epoch
- Set the


