BME100 f2018:Group5 T0800 L6
| Home People Lab Write-Up 1 | Lab Write-Up 2 | Lab Write-Up 3 Lab Write-Up 4 | Lab Write-Up 5 | Lab Write-Up 6 Course Logistics For Instructors Photos Wiki Editing Help | ||||||
OUR COMPANY
Fluorigo LAB 6 WRITE-UPBayesian StatisticsOverview of the Original Diagnosis System To test for the disease-associated SNP in the patients, our BME100 Lab was split into 17 teams of 6 students. In total we diagnosed 34 patients. Each team was given 3 samples of DNA per patient and each team was given two patients to test. To prevent error, we did 3 replicates per patient and the controls on the openPCR machine were standardized according to the lab workbook, across the class. These controls were a heated lid of 100˚, 95˚C for 2 minutes for initial setup, then 25 cycles in total comprising of Denaturing at a temperature of 95˚C for 30 seconds, Anneal at 57˚C for 30 seconds, and Extend at 72˚C for 30 seconds. Then the final step was set at 72˚C for 2 minutes, and the final hold at 4˚C. For the ImageJ software, the calibration controls were also standardized across as we used what was already set in ImageJ when the program was opened. Three pictures were taken for each drop to decrease error and the same phone with the same settings and approximately the same position was used to take each picture. The settings for the phone were that the ISO was set to 800, the flash was turned off, white balance was set to auto, exposure was set to the highest setting, saturation was set to the highest setting, and contrast was set to the lowest setting. One challenge that we faced were getting the shadow box onto the phone without shaking the phone and causing it to go out of focus. Another challenge was that the oval tool in ImageJ did not fit perfectly with the drops and so we were forced to do the best we could with setting the oval around the drop without including the background which would affect the results.
Calculations 1 and 2 imply that the PCR replicates have a high reliability, due to their high Bayes values. Both calculation 1 and 2 had Bayes' values close to 1.00, showing a high level of reliability in determining whether someone has the disease SNP. Calculations 3 and 4 differed in their ability for the PCR replicates to predict the development of the disease. The Bayes value for calculation 3 was quite small, which implies that the reliability to predict the disease is low. The Bayes value for calculation 4 was near 1.00, implying a reliable prediction of the disease. In the PCR, there are many ways in which error can arise, either human or machine. If some of the PCR reactions were skewed due to a faulty machine, this would affect the Bayes value negatively. In addition, if a lab group were to use incorrect micro-pipetting technique, there would be issues with the detection. This is because there may not be enough sample in the test tube. Finally, when using the fluorimeter, there is potential for light to get into the box, which would skew the pictures. This error could be prevented by ensuring that the box is positioned correctly as well as the camera focusing properly on the droplet. Intro to Computer-Aided Design3D Modeling
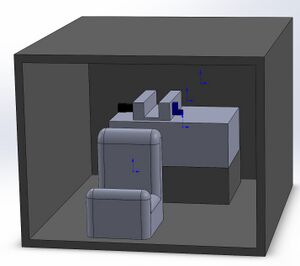
We chose this design for the reason that when we were using the current setup for the fluorimeter, it was too clunky and had too many parts that needed to be accounted for, and the setup was also easily disturbed or messed up throughout the process. Because of this, we determined that we wanted to make a design that would have less moving parts that could be messed with during the experiment, and would be easier to manage in order to create accurate and repeatable results.
Feature 1: ConsumablesOur product will use the same PCR consumables used in the lab. These include the PCR mix, Primer mix, SYBR green solution, and empty plastic PCR tubes. Our kit will include the essentials for the lab: PCR mix and empty PCR tubes. These consumables are essential to conducting PCR so we included it in our kit. We assume the lab conducting PCR has standard equipment of a micropipette and glass slides. Feature 2: Hardware - PCR Machine & FluorimeterOur design will use the same openPCR machine we used in the lab. As for the fluorimeter, all of the same parts are present but we chose to attach the phone holder to the box itself to aid in removing error such as when closing the lid and accidentally moving the phone holder which causes the phone to change positions and affect the results. This occurred multiple times during our experiment.
| ||||||


