BME100 f2018:Group1 T1030 L5
OUR TEAM
 Role(s) |
 Role(s) |
 Role(s) |
 Role(s) |
 Role(s) |
LAB 5 WRITE-UP
PCR Reaction Report
During the last section of the lab, 50 microliters of PCR reaction and 50 microliters of DNA primer were added to PCR tubes using proper micropipetting techniques. The group members with the most experience in micropipetting performed the majority of the pipetting. Each tube was also labeled with its corresponding patient ID. Once the tubes were done being prepared, they were placed in the thermal cycler to go through denaturation, annealing, elongation. This process causes the DNA prepared to become amplified. The tubes were then placed in a freezer until the next lab. The pre-lab information was extremely useful for learning the micropipetting techniques and keeping the experimental error minimal. The step-by-step instruction videos were also important for helping to understand the technique and making sure there is no contamination of the samples.
Procedure
Camera Set-Up:
Phone used: iPhone X
Adjust the camera settings to:
- flash off
- 7-second timer
- set ISO to 2500
Placement of the phone:
- Place phone at a right angle in the stand and move phone towards drop until it is in focus
- Start timer and close box to eliminate outside light
Fluorimeter Procedure:
Procedure of Placing drops on fluorimeter:
First, since the drops needed to be 160 microliters and contained two different substances, the micropipette was set to 80 microliters. Second, 80 microliters of SYBR GREEN was obtained and in the micropipette. Third, the drop of SYBR GREEN was placed by very slowly releasing the micropipette into the first hole on the glass slide and as the drop became larger, dragging the drop to the second hole. The drop was spanning the two holes. Fourth, 80 microliters were obtained of the substance being tested with a new, clean micropipette tip. Fifth, the tip of the micropipette was slightly stuck into the drop and the plunger was slowly released to add the substance to the drop. The fluorimeter was then ready for pictures. Once the pictures were taken, the liquid was sucked up by the micropipette and disposed of in the waste container. The next two holes on the glass slide were used for the next drop.
- 1. Set micropipette to 80 microliters.
- 2. Obtain 80 microliters of SYBER GREEN using the micropipette and a clean tip.
- 3. Place the drop of SYBER GREEN onto the glass slide by very slowly pressing the plunger and placing the liquid into the first hole on the glass slide and dragging it into the second hole as you press.
- 4. Dispose of the micropipette tip.
- 5. Obtain 80 microliters of the substance being tested using the micropipette and a clean tip.
- 6. Stick the tip of the micropipette slightly into the placed drop and slowly press the plunger until all the liquid is transferred into the drop.
- 7. Dispose of the micropipette tip.
Data Collection & Analysis
Calibration
Calibrator Mean Values:
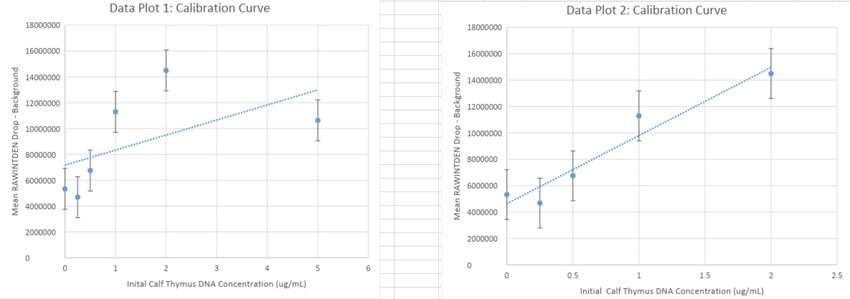
Calibration Curves:
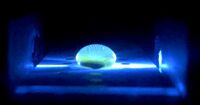
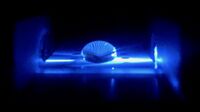
Images of High, Low and Zero Calf Thymus DNA:
- Picture of 5 μg/mL sample
- Picture of 0.5 μg/mL sample
- Picture of 0 μg/mL sample
PCR results
PCR Concentrations Solved:
Images of PCR Positive and Negative Controls:
- Positive Control 64002
- Negative Control 85406
PCR Results: Summary
- The positive control PCR result was 15.16 μg/mL
- The negative control PCR result was 4.55 μg/mL
Observations & Conclusion:
Patient 64002 had evidence of florescence where as, patient 85406 showed no evidence of florescence. In conclusion, using data from the table above, patient one had closer values to the positive control and patient two had closer values to the negative control.


