BME100 f2015:Group9 8amL6
| Home People Lab Write-Up 1 | Lab Write-Up 2 | Lab Write-Up 3 Lab Write-Up 4 | Lab Write-Up 5 | Lab Write-Up 6 Course Logistics For Instructors Photos Wiki Editing Help | |||||||||||||||||||||||||||||||||||||||||||||||||||||||||||||||||||||||
|
OUR COMPANY
LAB 6 WRITE-UPBayesian StatisticsOverview of the Original Diagnosis System Using traditional PCR and fluorimeter machinery 34 patients were tested for disease associated SNP. To divide the work evenly, each of the 17 groups were given two patients to test. In the PCR portion of this lab all members worked together in preparing each sample to be put in the PCR machine. After the PCR samples were received the group then divided into two sub groups, where one sub group was responsible for handling the fluorimeter machine while the other sub group analyzed the data received from the fluorimeter photos. To prevent error all members were very careful to avoid any cross contamination between patient samples and primers. Any previously used material was disposed of and three separate DNA samples were made for each patient, giving the results a higher chance of accuracy. Each sample from the fluorimeter was photographed and three times using ImageJ to further increase the probability of an accurate result. Control groups were used for known positive and negative result comparison with unknown samples. Not many issues occurred during the PCR portion of this lab, only one sample had the slightest amount less than the others so it could have impacted the results. However, the fluorimeter gave way for more possible errors. The timer on the camera taking pictures of the drop was not working properly so nearly all photos taken had a small amount of external light. On a couple of occasions the drop on the slide would spill over and would be wiped away, but this could have allowed for cross contamination in another sample even when a different, unused portion of the slide was used. Calculation 1:
Calculation 2:
Calculation 3:
Calculation 4:
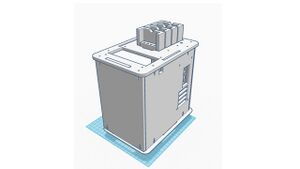
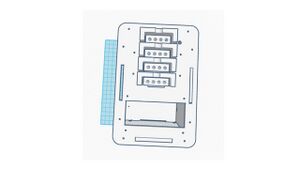
The individual PCR replicates were reliable in concluding whether a person has the disease SNP or not because the numbers from calculations 1 and 2 were close to 1.00. The results from calculations 3 and 4 imply that the PCR is more reliable in determining whether a patient will not develop the disease because the probability a patient will not develop the disease given a negative final test conclusion is above .50 and the probability a patient will develop the disease given a positive final test conclusion is a lot less than .50. One possible source of error could be from the measurements taken from ImageJ. These measurements could have been interpreted wrong, or not taken correctly. Another source of error could be from the pictures taken by everyone's smart phones. Some people's smart phones might not have set up at the right angle, or not taken clear enough pictures. One more source of error could be from people making mistakes in the steps of the lab prior to this one. A mistake in those labs would have affected the Bayes value in a negative way. Intro to Computer-Aided DesignTinkerCAD During lab, the TinkerCAD tool was used to create the design for our improved OpenPCR product. Overall, the TinkerCAD tool was very user-friendly and easy to use. Completing some of the tutorial steps prior to assembling the OpenPCR, made the design step a lot easier. During the Computer-Aided Design lab, I imported the parts of the OpenPCR machine that Professor Haynes had put up into TinkerCAD, and then used those to design our new product. The only things that I had to change to the original parts were the area to insert the test tubes, and the handle that covers that area. Compared to other design software, such as Solid Works, TinkerCAD is a lot simpler and requires a lot less practice to master. One difference that I found a lot easier was that in TinkerCAD there are already pre-made shapes that you can edit, while in Solid Works you have to create a shape on a face then extrude it out. Our Design Our design is similar to the original OpenPCR design, but instead of one area to place 16 test tubes there are four different areas to place 4 test tubes in each. With these four new areas, our OpenPCR machine can do four different tests at the same time, instead of just one at a time on the original OpenPCR design.
Feature 1: ConsumablesThe following consumables will be packaged in this kit:
Feature 2: Hardware - PCR Machine & FluorimeterThe PCR machine and fluorimeter will remain two separate devices, however they have been redesigned for efficiency and ease of use. The PCR machine was redesinged to include four separate compartments, each holding 4 test tubes. Each compartment runs on its own timer so that the cylcle is not interrupted when tubes are added or taken from a different compartment. Having separate compartments with fewer test vials allows the user to test many patients faster, as they do not need to wait for all 16 test tube slots to be filled to start the machine. Along with this more samples can be moved on to the fluorimeter before the others are done in the PCR, allowing the user to get more done in a shorter amount of time. The fluorimeter was also redesigned to exclude the need for a program such as ImageJ and glass slides. After the PCR machine has done its job, the tubes are removed and the buffer and SYBR green solution are added directly to the tube. The tubes are then placed into the enhanced fluorimeter that will pass light waves through the tube and display the percentage of light passed through. A lower percentage means that the SYBR green solution was activated and the patient may have the disease, while a higher percentage means that the SYBR green solution was not activated and the patient is not likely to have the disease.
| |||||||||||||||||||||||||||||||||||||||||||||||||||||||||||||||||||||||


