BME100 f2015:Group11 8amL6
| Home People Lab Write-Up 1 | Lab Write-Up 2 | Lab Write-Up 3 Lab Write-Up 4 | Lab Write-Up 5 | Lab Write-Up 6 Course Logistics For Instructors Photos Wiki Editing Help | |||||||
|
Tedward and CO.
LAB 6 WRITE-UPBayesian StatisticsOverview of the Original Diagnosis System BME 100 had 17 groups of 6 students to diagnose 34 patients. Different groups were given different samples to test for a positive PCR reaction. In order to keep the results accurate, there had be standard controls for PCR and ImageJ. These include the calibration, number of images used, the settings on the camera, and more. In order to get consistent results in diagnosing patients, it is crucial to have all the groups use the same procedure. The Bayesian statistics determined that the results were fairly accurate. The calculations showed very high accuracy in determining that a positive PCR reaction would result in a positive final test conclusion. There was also a high probability of a negative final test conclusion given a negative diagnostic signal. Although these results were accurate, the ones predicting whether or not the patient would actually develop the disease based off of the test conclusion were not as accurate.
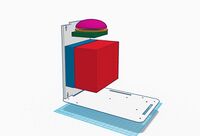
Intro to Computer-Aided DesignTinkerCAD The TinkerCAD tool is very user friendly and easy to use once the controls are learned. My only criticism of the tool is that it is almost to simplistic. With Solid Works, the user can design and create almost anything with the right knowledge. However, in Tinker Cad, there are definitely some limitations with the detail and overall design of any project. Our Design We have a very basic design for our PCR machine, however, we did make several changes to the original PCR machine. The most notable change is the increase in the size of the heating block (red) and the cooling fan (blue). These two pieces of equipment were increased in order to run more PCR tests at once. The second change that we made is the size of the tray that the reaction tubes are placed into (green). The increase in size allows more tubes to be placed into the machine than before, allowing scientists and average consumers alike to run more PCR tests at once. The final change that we made to the overall machine was to the lid (purple and orange). The lid on the original PCR machine was clunky and hard to open/close. We scrapped that lid in favor of a half sphere design. This design allows the used to easily twist the top of the machine off. The lid is coated in a material that is easy to grip and twist off. All of these design changes lead to a better, more user freindly PCR experience.
Feature 1: ConsumablesConsumables included in our kit: Micropipetter, tips, tubes, PCR mix, and primers. Our PCR kit is overall going to be easier to use by simply having color identifications on the consumables. Having primers and PCR mixes that arent color-coded makes for much confusion regarding which samples have already been worked with or not. Having color-codes on our consumables will avoid this confusion and make the process overall much simpler. Ensuring that there will be no errors with the PCR mix and primers will lead to more accurate results with no invalid data.
Feature 2: Hardware - PCR Machine & FluorimeterPCR Machine The PCR machine is very good at replicating a very small amount of DNA and can be done with a high level of accuracy. Some of the main benefits of the machine is that it can be done within a very short time, usually in a matter of hours. In addition its very useful for detecting DNA sequences that appear in very small sample. Although the machine useful functions very well, like everything some times there can be mistakes, and one of the problems with the PCR is because of its replication process even a small amount of error would exponentially ruin the results.
| |||||||


