BIOL398-04/S15:Help
From OpenWetWare
Jump to navigationJump to search
Some pages designed to help students become familiar with OpenWetWare.
- Introductory tutorial to OpenWetWare
- An introduction to the basics of using OpenWetWare
- Using OpenWetWare
- Why and how to use OpenWetWare in this course
- Guidelines for editing OpenWetWare
- Some basic guidelines for editing OpenWetWare
- General OpenWetware introductory tutorial
- OpenWetWare help pages
- Dahlquist Lab Wiki Checklist
Tips & Tricks
Please feel free to add any tips and tricks you have learned so the whole class can benefit from your knowledge.
Windows
Screenshots
- To take a screen shot, press
AltandPrint Scrntogether. The contents of the active window will be saved on your clipboard. You may then paste into a graphics program (like Adobe Photoshop or Microsoft PowerPoint) and save the file.- Note that pressing the
Alttakes screenshot of the active window (the one on top) only. If you just pressPrint Scrn, it will take a screenshot of the entire Desktop.
- Note that pressing the
Viewing File Extensions
- The Windows 7 operating systems defaults to hiding file extensions. To turn them back on, do the following:
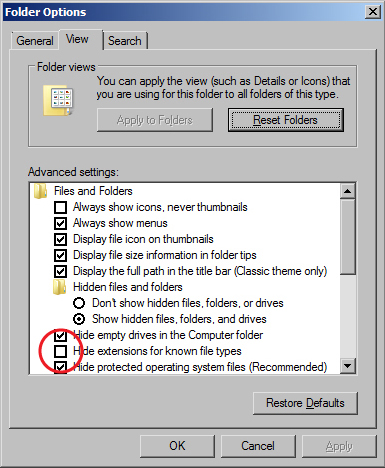
Folder Options window - Go to the Start menu and select "Control Panel".
- In the window that appears, search for "Folder Options" in the search field in the upper right hand corner.
- Click on "Folder Options" in the main window.
- When the Folder Options window appears, click on the View tab.
- Uncheck the box for "Hide extensions for known file types".
- Click the OK button.
- The computers in Seaver 120 are are set to erase all custom user settings and restore the defaults once they have been restarted, so you will probably have to do this many times throughout the semester when using these computers.

Compressing Files with 7-Zip
- The 7-Zip file compression software has been installed on the computers in Seaver 120. To compress a single file or a group of files, do the following:
- Select all of the files you want to zip together by clicking and dragging or control-clicking on the filenames.
- Right-click on your selection. In the context menu that appears, select the menu option: 7-Zip > Add to archive
- Make sure there is a meaningful filename in the field under the word "Archive:". If not, change it to something that is. Typically you will want to include your name or initials, a short descriptor of what the file contains, and the date in year-month-day format (yyyy-mm-dd).
- Select "zip" as the Archive format.
- You do not need to change any of the other defaults. Click OK. The zip file will appear in the same folder as the files you compressed.
Macs
Other Useful Links
- LMU Library Guide for Biology 478 (but also useful for this class)
