BIOL368/S20:Help
From OpenWetWare
Jump to navigationJump to search
Instructions for Online Class Sessions
- Class will meet at our regular time, Thursday, 1:00 - 5:00 PM, PDT, using the online web conferencing software, Zoom.
- Attendance will be taken for these sessions, you must login to Zoom from MyLMU to have your attendance recorded properly (see instructions below).
- In addition a meeting password will be emailed to you to secure the session from "Zoombombing".
Accessing Class Materials
- All PowerPoint slides used by the instructor will be posted to this wiki or Brightspace before class so that you can download them and follow along.
- All assignments and coursework will be carried out on this wiki as usual.
- In-class Zoom sessions will be recorded on video and posted to Brightspace after the class period is over.
Using Zoom

- To login to Zoom, first login to MyLMU.
- Click on the "Accounts & Tech" tab. If you do not see the tab, click the hamburger icon (three-line icon).
- On the right, the last choice under "Software & Tools" will be "Zoom (web conferencing)". Click on the link to Zoom and it should take you to your LMU user profile page on Zoom.
- If you don't have an account, an LMU Zoom account will be automatically created for you.
- If you already have an account, you will see your Zoom home page.
- Click on the link sent to you via e-mail to join the meeting.
- If this is your first time using Zoom, the Zoom software will automatically be downloaded to your computer.
- Follow this link to test zoom on your device.
- To learn more about Zoom:
- If you are having issues using Zoom in the middle of class, you can always use your phone to call in to the meeting. The phone number will be on the meeting invitation e-mailed to you. If you do this, you will only be able to hear audio and talk through your phone, but you will be able to download and view the slides onto your computer. After the class is over, the video recording of the class will be posted on Brightspace.
- If you want to host your own Zoom meeting, please see these instructions written by Dr. Fujishige.
Web Conferencing Best Practices
Guidelines adapted from UW-Madison Webconferencing Best Practices.
- System Check: Complete a system and web browser check at least 24-48 hours prior to the web conference. This allows time to make any necessary changes (with the help of ITS Service Desk or Zoom Support, if necessary).
- To do the System Check, you would follow the steps above to login to Zoom.
- Follow this link to join a test meeting.
- Internet Connection: Participate from a location with a strong and stable internet connection.
- Close Other Applications on Your Computer: Particularly when presenting, any dropped connections from the web conferencing system can be very disruptive to a meeting. Close all other applications on the computer that are not necessary. This will help the software operate more efficiently, and will help to conserve the individual network bandwidth.
- Quiet Location: Participate from a quiet location. To avoid disruption, post a note on your door, notify roommate and/or family that you're in a web conference.
- Be On-Time: It can take a while to get logged in and set up for a web conference, so plan to arrive a little early (~5 minutes prior to the conference start time).
- Audio Quality: If you have one available, use a headset with a microphone. It provides better sound quality and helps reduce background noise.
- Mute: Mute your phone/microphone when not speaking. Every noise that is made, including paper shuffling, pencil tapping, typing, coughing, and chatting with others, will be heard by everyone else in the conference.
- Stay Engaged: Follow the expectations and etiquette established by the instructor. For example, the instructor may ask to be interrupted with questions or comments on audio at any time, raise hands, or post in the Chat.
- Identity Yourself: Identify yourself by name when verbally asking a question or making a comment.
Accessing Zoom Support
There are three options to reach Zoom Support.
The Zoom support hours are 24 x 7, including public holidays, where agents or technical engineers are available for email or live chat.
Live chat or a phone call is the best option if you are in a meeting or trying to get something done.
- Live chat
- Make sure you are logged in to your LMU Zoom account first (through MyLMU).
- Select the "Help" blue bubble on the lower right-hand corner.
- Phone Call
- US: 1-888-799-9666 ext 2
- You might be asked to enter your ID number. Within Zoom, click the left navigation pane, select Profile and locate the Personal Meeting ID (xxx-xxx-xxxx).
- Online Submission (Ticket)
- A ticket is mainly for non-emergency/non-immediate requests when you can wait a few hours or even a day or so for a response.
- Online submission - click the "Submit a request" link. Make sure you are logged into LMU Zoom.
Open WetWare Help
Some pages designed to help students become familiar with OpenWetWare.
- Introductory tutorial to OpenWetWare
- An introduction to the basics of using OpenWetWare
- Using OpenWetWare
- Why and how to use OpenWetWare in this course
- Guidelines for editing OpenWetWare
- Some basic guidelines for editing OpenWetWare
- General OpenWetware introductory tutorial
- OpenWetWare help pages
Tips & Tricks
Please feel free to add any tips and tricks you have learned so the whole class can benefit from your knowledge.
Screenshots
- Making a screenshot smaller: This may not be the most technical way, but it gets the job done. After the image you insert into the Edit page, add "thumb|upright=3.0". This command makes the image at thumbnail, then adjusts the thumbnail to a different size. For images you want to be wider, use a number greater than 1, for more vertical images, use a number less than 1. You can also center the image by using the "|center" command (Example: [[Image:This is an example.jpg|thumb|center|upright=2.5]]
Windows
- To take a screen shot, press
CtrlandPrint Scrntogether. The contents of the active window will be saved on your clipboard. You may then paste into a graphics program (like Adobe Photoshop or Microsoft PowerPoint) and save the file. - An alternate method is to use the Snipping Tool.
- Go to the Search field in Task bar and search for "Snipping Tool". Launch the tool.
- Click on the "New" icon and then click and drag to select the area that you want to screenshot.
- Go to the menu File > Save As and save your file.
Macs
Turning on File Extensions in Windows 10
- The Windows 10 operating systems defaults to hiding file extensions. To turn them back on, do the following:
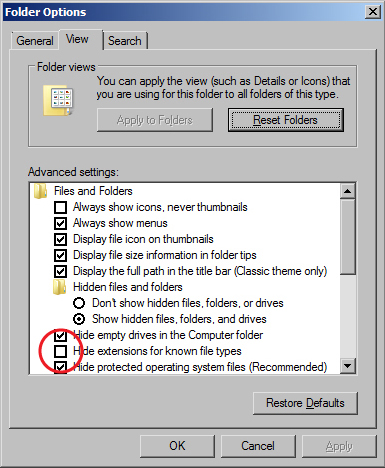
Folder Options window - Go to the Search menu (circle icon) "File Explorer Options" in the search field. Select the result.
- When the File Explorer Options window appears, click on the View tab.
- Uncheck the box for "Hide extensions for known file types".
- Click the OK button.
- The computers in Seaver 120 are are set to erase all custom user settings and restore the defaults once they have been restarted, so if you have done this previously, you might have to do it again.

Setting the Download Options for FireFox and Chrome
- For Mozilla FireFox (40.0.2 or higher)
- Options set to default downloads to Desktop and to ask each time a file is downloaded
- Go to the Options menu, General options
- First, under the "Downloads" section, next to "Save files to" click the "Browse" button, select the Desktop, and click the OK button.
- Second, click the radio button next to "Always ask me where to save files"
- Options set to default downloads to Desktop and to ask each time a file is downloaded

- For Google Chrome (Version 44.0.2403.157 m or higher)
- Options set to default downloads to Desktop and to ask each time a file is downloaded
- Go to Settings page, click on link to "Show advanced settings"
- First, under the "Downloads" section, click the "Change..." button, select the Desktop, and click the OK button.
- Second, check the box next to "Ask where to save each file before downloading"
- Options set to default downloads to Desktop and to ask each time a file is downloaded

Compressing Files with 7-Zip
- The 7-Zip file compression software has been installed on the computers in Seaver 120. (If you want to install this software on your own computer, go to the 7-zip Download page.) To compress a single file or a group of files, do the following:
- Select all of the files you want to zip together by clicking and dragging or control-clicking on the filenames.
- Right-click on your selection. In the context menu that appears, select the menu option: 7-Zip > Add to archive
- Make sure there is a meaningful filename in the field under the word "Archive:". If not, change it to something that is. Typically you will want to include your name or initials, a short descriptor of what the file contains, and the date in year-month-day format (yyyy-mm-dd).
- Select "zip" as the Archive format.
- You do not need to change any of the other defaults. Click OK. The zip file will appear in the same folder as the files you compressed.
What to do if there is a OpenWetWare outage
- We recommend that when doing your journal assignments, "save early, save often". That is, work in short increments, saving your work in small pieces. This will help you avoid losing your work if there is an issue with the internet.
- We also recommend that you begin your assignments well ahead of the deadline so that you have enough time to complete them on the wiki.
- While we do not anticipate any problems, in the event of an OpenWetWare outage near a deadline, please do the following:
- send an e-mail to the instructor notifying her of the outage, attaching a screenshot documenting the problem;
- complete the unfinished portion of the assignment as a Word document and e-mail it to the instructor. Even though you are saving it as a Word document, write it in wiki syntax so that it can be saved back to the wiki when it becomes available again.
Other Useful Links
- LMU Library Guide for Biology 368 (but also useful for this class)
