Arking:JCAOligoTutoria24
DeepView Basics
This tutorial was adapted from the "Basic Tutorial For DeepView" available at http://spdbv.vital-it.ch/TheMolecularLevel/SPVTut/. I've simplified it somewhat to illustrate the basic operation of the program. For the full glory of DeepView, I recommend following the complete tutorial available at the above URL.
Download DeepView
Go to http://spdbv.vital-it.ch/disclaim.html, accept the disclaimer, and then download the file. On a Windows PC, it will come down as a zip file. You should unzip the file, and then double click on spdbv.exe to launch the program. (There is no "installer" for DeepView, and you can launch it from anywhere).
DeepView is often referred to by different names including spdbv, Swiss view, and Swiss-PdbViewer...it's all the same program, just different names.
Download a File
There are several ways to get structure files (.pdb files) for viewing in DeepView. DeepView can access pdb files from the Protein Data Bank directly, but I'll show you how to get to things via pubmed. For this tutorial, we want to work with Hen Egg-White Lysozyme in complex with the trisaccharide inhibitor tri-(N-acetylglucosamine). The ID code for the file we want is 1HEW.
Go to https://www.rcsb.org/, type "Hen Egg-White Lysozyme" into the search box, and click the search button. This will pull up a lot of hits of different structures of Lysozyme. Each entry is a distinct crystal structure. Often the different hits are mutants of the original, different inhibitors bound to the protein, or maybe just another author's structure of the same protein. Unless you know specifically what ID file you want, you usually use keyword searches and browsing through the list to find what you are looking for. For this example, we know exactly what we want: 1HEW.pdb. So, type "1HEW" in the search box. You should get this:
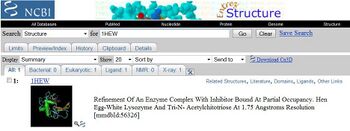
Click on the image, and that should take you to a screen that looks like this:
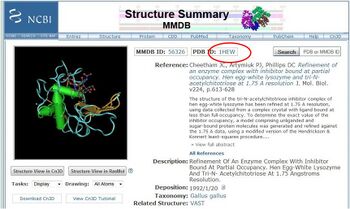
I've circled the link you should now follow to get to the Protein Data Bank where you can download the file. Click it.
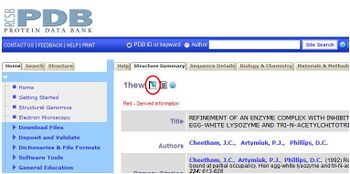
I've circled the link to click to download the pdb file. Click it and save the file to your desktop. Now you can open it into DeepView. Double-clicking the desktop icon might do the job. If not, do "File > Open PDB File..." within DeepView to open the file. There might be some error messages that pop up. If you really want it not to give you these error messages, you can turn them off in the DeepView preferences. Just say ok to get rid of them for now. You should have something that looks like this:
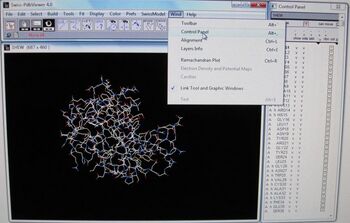
If you don't have that rightmost window, the "Control Panel", you should open it up from the Window menu. Alright, now let's play with it!
Selecting and Displaying
You use the Control Panel to select, display, or hide parts of the model. Different parts of the model such as amino-acid residues or hetero groups like the three NAG residues in the lysozyme inhibitor are all called "groups" in DeepView. Selecting groups does not change the display. But most actions that you take on the model affect only the currently selected groups. The Control Panel lists all the groups in the model and allows you to select, hide, and display them. You may find this Panel imposing at first, but when you get the hang of it, you will be able to control the display and determine the targets of commands very quickly and precisely.
Click anywhere on the Control Panel window to make it active. First, simply scroll down to the bottom of the list to see how many amino-acid residues the protein contains, and to see how the hetero groups are named at the bottom of the list (hetero groups are always listed last). The tri-NAG inhibitor is listed as three residues of NAG, numbered 201 to 203.
Now click and drag, starting on the word GLY4 at the top of the window, dragging down to GLY16 and releasing the mouse button. All group names from GLY4 through GLY16 should turn red. Groups printed in red are now selected. The simplest way to select a small number of residues is to click their names and drag to select a range of them.
Now hit <Enter>. This will hide all groups except those selected. You are looking at residues 4 through 16 of the protein. Notice that a checkmark (on Windows, a checkmark looks like the letter v) has appeared in the "show" column next to the selected residues in the control panel, indicating that they are on display. There are checks also in the "side" column, which means that side chains are shown. A side chain is shown only if the rest of the residue is shown, so you only see the side chains of displayed residues in the graphics window.
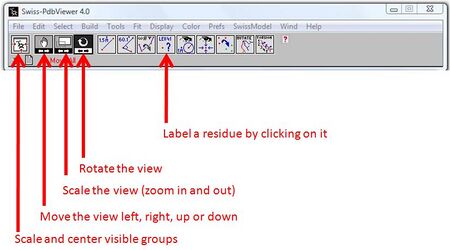
Now, let's center the view and play with it. There are different mouse modes that controls what happens to the display when you click or drag in the graphics window:
Click the button for "Scale and center visible groups". For now on, I'll just refer to this as "centering the view". Notice that after centering, the model rotates about the center of the groups on display. Centering the view with this button just does the action--it doesn't change the mouse mode. The next three buttons are different. Go ahead and click on one of them and then click and drag on the screen. This is how you manually zoom in and out, spin the image around, and shift it left and right. Play with that a bit and then re-center the view.
Now let's play with the Control Panel some more. Click the check in the side column next to MET12, to hide the side chain. Click the same space again to replace the check and display the MET12 sidechain. Try the same thing in the show, label (text labels), and surface (dotted van der Waals surface) columns, and look at the effects. Now remove the checks from the label and surface columns.
Again select and display residues 4-16 with side chains.
You can also turn on a whole column-worth of settings at once. To do this for just the selected groups, you click the header word at the top of a column in the Control Panel. Let's do this for "ribn". With residues 4-16 still selected, click on the word "ribn". You should get a little alpha helix showing up. Try spinning the image around, re-centering it to get it all on the screen, and playing with the other mouse controls. Since the view is in 3D, but you are viewing it in 2D, it will often help to wiggle the view around with your mouse to help orient you to what is above and behind your view.
You can also turn on or off an entire column-worth of settings for the entire model with shift-clicks. To remove the labels, surface, and ribbon, hold down the shift key and click any checkmark in the label column (not the word label). Repeat for the surface and ribn columns. When you click on a checkmark while holding down shift, your action removes all checkmarks, and DeepView makes the corresponding changes in the display. You can also turn the whole column on by shift-clicking on an unchecked position in the column. So, you can toggle the view to be all-on or all-off by using shift-click for a particular column of settings.
Next, select and show residues 4-16 with their side chains, and add residues 17 through 22 as follows: click in the show column next to LEU17, drag down the column to GLY22, and release the mouse button. Arrows should appear in the show column next to residues 17 through 22, but these residue names should not turn red. If you drag too far, release the mouse button and then remove unwanted checkmarks by clicking them one at a time. Add checkmarks in the side column for residues 17-22 in the same way. Now residues 4 through 16 are selected and shown, while residues 17 through 22 are shown, but not selected.
Again, display residues 4-22 (all with check in the show column, but with only residues 4-16 selected (red). Notice the + and - symbols above the Control Panel column headings. These act as buttons to turn the column function (show, side, label, and so forth) on or off, but only for the selected groups. Click on them and see for yourself.
For easily selecting a range of residues, click on a name to select the first residue, then hold down shift while clicking the last residue in the desired range. DeepView selects your first and last residue, and all those in between. Try it.
You can also select groups of residues that are not consecutive. With residues 4-16 selected and shown, hold down the control key (ctrl) and click TYR20 and LEU25. This adds residues 20 and 25 to the selection (shown in red). Press enter to add them to the display. These residues are disconnected from the others. If you do not see them, Zoom/Center to center the displayed groups. Click the word side at the top of the Control Panel. This adds side chains to the newly selected groups. Note again that clicking headings in the Control Panel affects the selected residues only.
There are also two narrow columns to the left of the group column. The first column is blank when the current model contains only one protein chain. Usually, you'll get some letters. For 1HEW.pdb, you should see "A"s by each group. These refer to the biopolymer chain. If there were multiple subunits in the file, or perhaps a DNA in there, there will be multiple chain labels for each biopolymer present. If you click on one of these chain labels, you select the entire chain.
The second column contains groups of the letters h or s. Groups labeled h comprise alpha helices, while groups labeled s comprise strands of beta sheet. Click on any h. You have selected the entire helix containing the residue you chose. Center the view to zoom in on the helix. Now find a different helix in the Control Panel list. Hold down ctrl and click any h in your chosen helix. You have added the second helix to the display (without selecting it). Center the view again to see what you did.
Select Menu Basics
The DeepView Select menu provides other commands for selecting.
"Select > All" selects all groups in the model
"Select > Secondary Structure > Helices" selects all the alpha-helical regions of the model
"Select > Seconday Structure > Strands" selects all the strands of beta sheets.
Another useful one is "select > visible groups". This one will select all the groups that are currently visible on the screen.
You can also select everything other than those currently selected with the "Select > Inverse Selection" choice.
There are lots of other selection methods available from this menu, and we'll visit some of them later. You can do things such as selecting all the tryptophan residues, or all the hydrophobic residues.
Coloring
Colors can reveal structural, chemical, and comparative features vividly, and can help you to keep your bearings during complex operations.
Select, display, and center the complete model, without side chains. Checkmarks should only appear in the "show" column.
You can color groups manually using the Control Panel, or using various options within the "Color >" menu. Let's start with the color menu. When opening up a file for the first time, it is very useful to color the chains to get a feeling for what different biopolymer chains are present in the model and how they are oriented. You'd do this by "Select > all" (or hitting <ctrl-A>) and then selecting "Color > Chain". For lysozyme this isn't very interesting since there is only one chain, but for multiple chains they'd all turn different colors.
You can also color things by various biochemical properties from the color menu:
"Color > Secondary Structure" colors helical residues red, beta sheet residues (strands) yellow, and all others gray.
"Color > Secondary Structure Succession" colors helices and strands, but with this command, color reflects the order of each structural element in the overall sequence of residues. DeepView colors the first element of secondary structure violet, the last one red, and the ones in between with colors of the visible spectrum that lie between violet (400 nm) and red (700 nm). The result is that it is easy to follow the chain through the protein -- elements of secondary structure are colored from the N-terminal to the C-terminal end in the order violet, blue, green, yellow, orange, red.
You can also color things manually from the Control Panel.
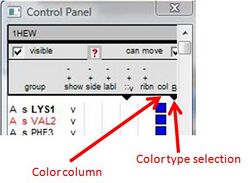
In Deepview, you can indivually color the backbone, sidechain, surface, label, or ribbon of the groups. The color for the group is indicated by the colored box within the "col" column. To the right of the "col" column is a little triangular button. You use this button to toggle between what aspect of the group the color refers to. To change which aspect you are currently coloring, click on the little triangle and choose which one you want to color. Just like with the "show", "side", and so forth columns, the "col" column operates on the currently-selected residues when you click on the word "col". You can also individually control the color a particular group by clicking on the color box itself within the "col" column.
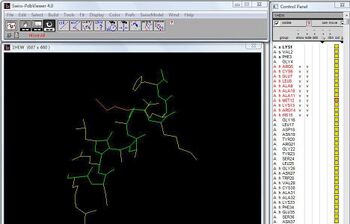
Let's give it a try by coloring just the backbone. Select all and choose "Color > Chain". Use you mouse to select residues 5-16, hit enter, and center the view. Click on "side" so that the sidechains are also visible. Now, click on the color type selection triangle and select "backbone." Now click on the word "col" to bring up the color menu. Click on one of the green squares, then click OK.
Now let's color one of the sidechains. Click on the color type selection triangle and choose sidechain. Click on the colored square next to MET12 and then click on an orange square and select OK. You should now have something like this:
As a last step, let's make a nice visually-clear view of the whole of the protein that let's us see the fold and lights up the bound inhibitor. Then we'll pretty it up with a a higher-resolution rendering, then save a PNG file of the current view.
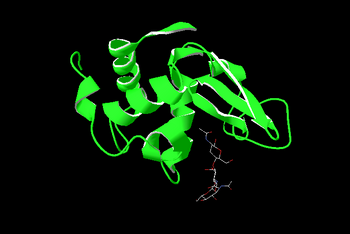
First of all, let's show just the ribbon and make it green. Select All, then highlight just the "ribn" column--all others should be unchecked. Center the view. Click the color type selection triangle and select "ribbon". Click "col", a green box, then OK. You should have a nice green ribbon of the entire protein now.
Page down in Control Panel and select the 3 NAG groups. Click "show" and "side" to light them up. Right now, they are appearing as yellow residues on my screen, but I'd like to have them with CPK coloring (oxygens in red, nitrogen in blue, etc.) To do this, slick on the color type selection triangle and choose "backbone + side." click "col". Now, DON'T click on a color, just click on OK. This will set it to CPK coloring.
Now use the mouse mode button for rotating and your mouse to spin the model into an orientation that puts the ligand in a visually-appealing position.
Finally, let's improve the resolution. From the "Display >" menu, select "Render in 3D". If you want to get fancy, you can pretty it up even more with the preferences and lighting options. Let's just leave it as is for now and save a png. Go under "File > Save > Image...". Give it a filename and click save. Here's what I got:
What's left?
There are many other things you can do to view PDB files with DeepView. I've only shown you the basics here. We'll cover a few more things that we'll get into in the next tutorial at various spots. DeepView also has all sorts of tools for modeling (changing the sequence of the model) and comparing two models. I won't get into that stuff at all. If you want to learn the full scope of the program, I recommend you follow the complete tutorial at http://spdbv.vital-it.ch/TheMolecularLevel/SPVTut/.
Quiz
Download the PDB file 2PIA.pdb, open it up into DeepView. Select and display a single slpha helix. Display the ribbon for this alpha helix and color it green. Display the sidechains and color them yellow. Center the view, render it in 3D, output a png file, and submit your file for grading.
