Applications - Other
Tissue Engineering
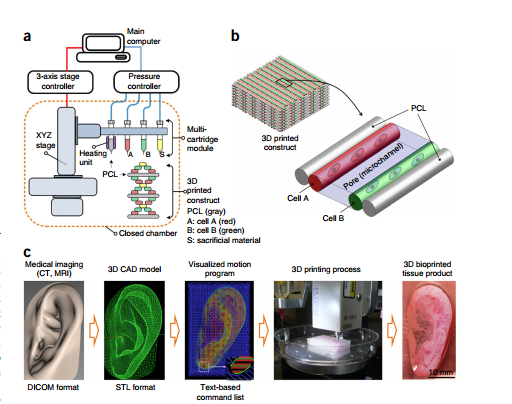
Let's say Mike Tyson bit off more then just a chunk of your ear. 3D bioprinting has the potential to customize a new ear for you.
Soft Robotics
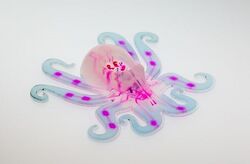
Soft robotics is a relatively new development in the field of robotics in which robots are developed with soft, flexible materials in contrast to the rigid materials used in conventional robots. Many robot structures, whether rigid or soft, are inspired by nature, mimicking humans, spiders, and several other animals. Robots with rigid bodies are typically designed to perform a single task efficiently, but it is difficult for rigid robots to adapt to changes in their environment. In addition, the hard surfaces and rigid joints of rigid robots render them unsafe for human interaction [2]. In contrast, soft robots are able to adapt to their environment and pose much less of a physical threat to humans. In this field, 3D printed microfluidic robots are a recent advancement that combines microfluidic technology and soft robots to create fully soft, autonomous robots[3].
Robots made using soft mateirals are resilient and are able to adapt to different environments. However, many robots encased in soft materials still rely on control systems composed of hard materials. Creating fully autonomous robots with flexible analogues of these rigid control systems has posed a great challenge. One such example of an untethered robot composed of only soft materials is the octobot, developed at Harvard University.[3].
Octobot
The Octobot is a 3-D printed, fully autonomous microfluidic robot. The robot is made completely out of soft materials such as polydimethylsiloxane (PDMS) and Pluronic F127, SE 1700, and Sylgard 184, which are soft, silicone-based materials. In place of a rigid control center, the octobot is powered by a microfluidic logic circuit alongside a decomposition reaction that generates gas [3]
Several different fabrication techniques are used to produce the Octobot[3]:
Soft controller fabrication
The soft controllers are fabricated from PDMS using traditional soft lithography molding and bonding techniques. Upper and lower molds for the controller are first fabricated using SU-8 3050 negative photoresist. PDMS is then poured into the molds and cured. After punching inlet and outlet holes, the upper and lower PDMS layers are then exposed to oxygen plasma so that they can be bonded to an intermediate thin film.
Mould fabrication
Negative moulds (molds for US English speakers) for the octobot are designed in SolidWorks (a CAD software), then fabricated from acetal blocks using CNC milling. Holes are then drilled for 1mm dowel pins to use for controller placement in the mould.
Soft robot assembly
A multi-material, embedded 3D printing (EMB3D) technique is used to pattern the pneumatic actuator networks, on-board fuel reservoirs, and catalytic reaction chambers the octobot uses to power movement. Before EMB3D printing, Ecoflex 30 is poured into what will become the arms of the octobot, degassed, and cured. After excess material is removed, the soft controller is loaded onto the pins that have been placed in the mold. The fuel matrix material is then loaded, degassed, and cured. Following this, the body matrix material is loaded and degassed. Once this is done, the fugitive and catalytic inks are deposited using EMB3D printing. Finally, the entire assembly is cured two times to crosslink the inks and the matrix materials, and the octobot is release-cut using a CO2 laser.
Actuation
In microfluidic devices, pressure generation can be used to create a pneumatic battery to replace the use of electrical energy and the constraints that come with it as an actuator. One approach to creating a pressure-based actuator is to use chemical reactions to generate gas in a system. This gas can build up to increase pressure and power the microfluidic device [2].
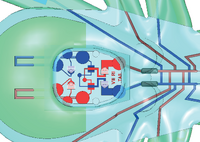
The octobot is controlled fully through such a microfluidic system, without the need of any rigid control systems. A soft, microfluidic controller sits at the center of the Octobot. The controller regulates fluid flow and the catalytic decomposition of the monopropellant fuel inside the robot.
The controller system is divided into four sections: upstream for liquid fuel storage, oscillator for liquid fuel regulation, reaction chamber for the decomposition into pressurized gas, and downstream for gas distribution for actuation and venting. In the upstream section, the fuel reservoirs are filled using a syringe pump. Backflow into the fuel inlets is prevented using check valves. The networks downstream from the reaction are inflated from the gas produced from the fuel decomposition. The inflation causes parts of the Octobot to move.
The decomposition of aqueous hydrogen peroxide powers the robot:
[math]\displaystyle{ 2H_2O_2 (l) \to 2H_2O (l,g) + O_2 (g) }[/math]
This reaction results in a 240-fold volumetric expansion. The controller is designed to operate at fuel flow rates of 40 μl min-1, with a fuel capacity of 1 mL, resulting in a theoretical run time of 12.5 minutes[3]
Food Science
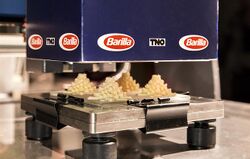
As the global population size increases, providing nutrition that is both sustainable and appealing has become an ongoing problem[5]. As 3D printing techniques can be used to fabricate a variety of 3-dimensional objects using a diverse array of materials, 3D printing can potentially become a new method of cooking to support the global population[5]. Insects, for example, are rich in proteins and healthy fats, but they are unappealing as a food source to mouch of the general public, especially in western audiences. With 3D printing, however, the appearance and texture of a food product such as one made with insects can be improved upon so that more people can accept unappealing but otherwise healthy foods. Foods can also be personalized by increasing or reducing the amounts of certain ingredients in the food "ink" to suit different dietrary restrictions[5].
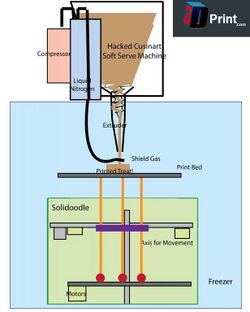
In the food industry, the most commonly used 3D printing method used in food production is Fused Deposition Modeling (FDM)[5]. The fundamental structure of this type of 3D printer usually includes an extruder connected to an electric engine. Ingredients are mixed and stored in reservoirs and sent through the extruder onto a platform. This platform can be heated to cook the food as it is being deposited. Materials that can be heated to a liquid state such as sugar, chocolate, or gelatin are all printable using this method. Additionally, foods in the form of purees, gels, or doughs can be directly deposited without a structuring agent to support it[5].
A common use for 3D printing in the food industry is for sweets. Many dessert companies and bakers need to create pleasing designs on their products, and 3D printing gives them a highly controllable tool with which to decorate[5]. In order to 3D print candy or decorations, for example, powered sugar crystals are used in the platform of a binder jetting type of printer. Food coloring, water, and flavoring are then deposited onto the sugar, which wets the sugar to create a solid layer. This process is repeated in layers until the desired product is created [5].
References
- ↑ https://www.nature.com/articles/nbt.3413
- ↑ 2.0 2.1 2.2 https://www.nature.com/articles/nature14543
- ↑ 3.0 3.1 3.2 3.3 3.4 3.5 3.6 3.7 3.8 https://www.nature.com/articles/nature19100
- ↑ https://3dprint.com/151348/barilla-pasta-3d-printer
- ↑ 5.0 5.1 5.2 5.3 5.4 5.5 5.6 https://www.tandfonline.com/doi/full/10.1080/10408398.2015.1094732
- ↑ https://3dprint.com/9148/3d-printed-ice-cream/

![The 3-D printing process of the Octobot a-b The arms of the mold are filled with PDMS. c-f The soft controller is pre-made and placed into the mold, which is filled with matrix material. g-h The chambers and actuators are printed using EMB3-D. i-k The Octobot is then removed from the mold.[3].](https://oww-files-thumb.sfo3.cdn.digitaloceanspaces.com/8/8c/Octabot-3dprinting.png/502px-Octabot-3dprinting.png)
![EMB3D printing shown with fluorescent dye markers[3].](https://oww-files-thumb.sfo3.cdn.digitaloceanspaces.com/6/6d/3d-printing-fluorescent.png/601px-3d-printing-fluorescent.png)