20.309:LabManualElectronicsIntroduction
Objectives and Learning Goals
- Familiarize yourself with standard lab electronics and some common circuit elements: linear and nonlinear, passive and active
- Understand fundamental electronics concepts, including:
- current/voltage dividers
- impedance & load
- frequency response & transfer functions
- Analyze and build several circuits, which will be of use later
This module is an extended lab orientation of sorts. Take this time to explore electronic circuits and really get to know all the features of our lab's instrumentation. It will pay off later. What you learn and do this week will underpin many of the experiments during the rest of the semester
Since you are mainly concerned with understanding your toolset and learning its uses and limitations, no formal write-up is necessary. However, many parts of this module work hand-in- hand with questions on Problem Set 1, so you will still want to record data for completing them
Roadmap and Milestones
- Practice making DC and AC signal measurements
- Measure circuit input and output impedances and observe loading effects
- Study the nonlinear characteristics of a diode, and learn how a photodiode responds to inci- dent light
- Test several unknown circuits to determine their transfer functions
3 Lab Procedures
3.1 DC measurements
The simplest type of circuit is the direct current (DC) situation. This means simply that the applied voltage does not vary in time. Alternating current (AC) is discussed in Sec. 3.Most often, we separate complex signals into their DC and AC components (e.g. a sine wave with a constant offset) to make analysis simpler
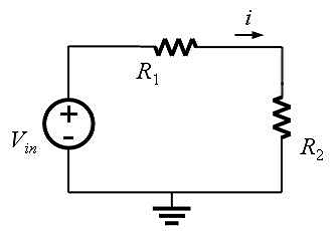
To get started, wire the circuit shown in Figure 1 on your breadboard, where R1=330 and R2=150. Using the power supply, set Vin to 5V. We'll make a few measurements of the behavior of R2 in the circuit. We want to know the voltage across it and the current through it

Figure 1: Resistive voltage divider circuit
Measuring Voltage with the DMM
First switch the DMM to voltage mode. Note: Make sure that the DMM test leads are plugged into the right connections. Remember, the correct con¯gurations for current and for voltage/resistance measurements are different. See Sec. B.1 Place the two leads across the terminals of R2 so that it is in parallel as shown in Figure 2
In voltage mode, the DMM has a very large equivalent resistance (ideally in¯nite) so that when placed in parallel with the circuit you are measuring, it will have minimum effect on the circuit under test
To prove this: (a) Assume ¯rst that the effective resistance of the DMM is small, such as 100. What is the combined resistance of the parallel combination of R2 and the DMM? (b) Now assume the DMM's resistance is something very large, like 10M. Now what is the resistance of the parallel combination of R2 and the DMM? Figure 2: Measuring voltage across R2
Why would a DMM in voltage mode with low input resistance be poor for voltage measure- ments? Hint: think about how it affects the voltage divider circuit in this case
Measuring current with the DMM: Switch the DMM to current mode
Place the leads of the DMM in series with a device in the path that you want to measure, shown in Figure For this type of measurement you actually need to break the circuit and insert the DMM
