20.109(F13): Mod 3 Day 4 Solar cell assembly
Solar Cell Assembly
Today's goal
Use our characterized phage based nano-composites to build DSSCs.
Introduction
An animation video of how DSSC's are assembled. Remember, Dr. Belcher's procedure is a little different from what is described here, but it provides a good visual overview.
Solar cells in society
Solar cells have the ability to fill the world's need for renewable energy in order to create a more sustainable society. Currently, the majority of solar cells on the market are silicon based (90%). Unfortunately, in order to compete with fossil fuels in today’s market, production costs must be lowered and/or efficiencies must increase . New types of solar cells such as CdTe based solar cells are thin film based to allow for ease in manufacturing. Similarly, dye sensitized solar cells (DSSC) have the potential to lower production cost as compared to the traditional silicon based photovoltaics. In addition, DSSCs provide the opportunity of integration into buildings and consumer products as they are lightweight, flexible, and exhibit better performance in diffuse light than competitors.
DSSC
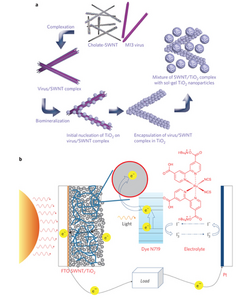
Dye sensitized solar cells (DSSCs) function based on the following steps. An image depicting this cycle can be seen on the right.
- Dye becomes excited by light.
- Dye injects an electron very rapidly to the TiO2 (the conduction band); dye is oxidized in the process.
- Electrons are transported through the semi-conducting TiO2, move through the load, and eventually reach the counter electrode.
- At counter electrode, normally platinum, the electrons reduce the redox mediator located in the electrolyte of the DSSC.
- Redox mediator diffuses to meet and regenerate oxidized dye molecules.
In order for the above process to be completed, five general components must be included in a DSSC. Below is a list of each of these general components, as well as the specific materials we will be using for each in our DSSC’s.
- Semi-conductor: TiO2 particles enhanced with either gold or SWNTs via phage bio-templated assembly.
- Sensitizer (dye): N719 dye
- Electrolyte and redox mediator pair: I3 - / I-
- Counter electrode: Pt
- Mechanical support: TCO (transparent conducting oxide) coated FTO (Fluorine doped tin oxide) glass. This material will be used as the base of the anode in your DSSC.
For more information on DSSCs you can look to these resources:
Nazeeruddin, Md K., Etienne Baranoff, and Michael Grätzel. "Dye-sensitized solar cells: A brief overview." Solar Energy 85.6 (2011): 1172-1178.
Hagfeldt, Anders, et al. "Dye-sensitized solar cells." Chemical Reviews 110.11 (2010): 6595-6663.
Our phage improvements
Light collection
In order to improve efficiency of DSSCs, we will be using our gold/titania phage nano-composites to expand the wavelengths of light that can excite the dye to eject an electron. This approach is also termed increasing “light harvesting.” Specifically, the mechanism involves the interaction of localized surface plasmons – elementary excitation states in the gold nanoparticles – with the dye. By increasing the range of excitation light wavelengths, we will generate more electrons and thus produce more energy.
For more information on this method of optimization, please see Dang, Xiangnan, et al. "Tunable Localized Surface Plasmon-Enabled Broadband Light-Harvesting Enhancement for High-Efficiency Panchromatic Dye-Sensitized Solar Cells." Nano letters 13.2 (2013): 637-642.
Electron collection
The hypothetical electron paths we discussed previously are idealized, and in reality not all of the electrons leaving the excited dye will enter the semi-conductor and reach the electron collector. Instead of entering the semi-conductor, the electron ejected from the dye can recombine with the redox mediator or another dye molecule. Additionally, electrons that have entered the semi-conductor can leave and recombine with the dye or redox mediator surrounding the semi-conductor.(*) In order to avoid these unfavorable events, we can decrease the time it takes for electrons to reach the electron collector. Single-walled nanotubes made from sp2 bonded carbon atoms can form more direct paths for the electrons, as the sp2 bonds endow carbon nanotubes with the property of high electron mobility. As a result, our M13 phage fabricated nano-composite of aligned single walled carbon nanotubes coated with TiO2 can improve the performance of a DSSC by providing a way for electrons to reach the electron collector faster, thereby reducing unfavorable recombination events.
For more details about how this concept was developed in the Belcher lab, please look to this paper: Dang, Xiangnan, et al. "Virus-templated self-assembled single-walled carbon nanotubes for highly efficient electron collection in photovoltaic devices." Nature nanotechnology 6.6 (2011): 377-384.
(*) Kinetics of electron movement are also the reason for selecting semiconductors to collect electrons from the excited dye. The TiO2 (or other semiconductor used in the DSSC) promotes directional flow of electrons in the solar cell. Once injected quickly to the TiO2(10^-12 seconds), electrons are not as easily recombined with the sensitizer or redox mediator (which occurs on a 10^-2, 10^-3second time frame). If instead, the electrons entered a metal, recombination events would be much more frequent.
Protocols
While You Were Out
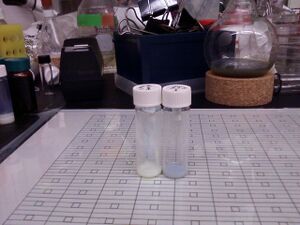
The TiO2 mineralized SWNT:phage or gold:phage complexes from M2D2 were dried in a vacuum oven at room temperature and ground to micron sized particles via mortar and pestle. After grinding, pure TiO2, ethyl cellulose (binder), and terpineol (an organic solvent with a high boiling point) were added to make a paste.
Additionally, FTO glass, which will be used as the base of your anode, was coated with a thin layer of TiO2. This coating was achieved by first cleaning the FTO glass, and then incubating the glass in a solution of TiCl4.
Part 0: Assembly demonstration
Watch the assembly demo, and then practice putting together your own fake solar cell using the materials at hand (glue, etc.) -- this practice round should make you more comfortable doing the real assembly over in Belcher lab.
Part 1: Prepare anode
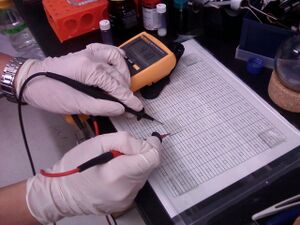

- Use a resistance meter to determine which side of a prepared glass anode base contains the layer of TiO2 coated FTO. The coated side of interest should have a measurable level of resistance while the pure glass side should not.
- With the coated side up, align your glass anode base onto a gridded template containing a 4mm x 4mm square so that the square appears in the center of the base.
- Using scotch tape, create a "well" the size of the 4mm X 4mm square by taping everywhere on the glass except the small square. (One piece on each side and one on the top and bottom should suffice.) Because the thickness of the tape is consistent (~50 micrometers), this method is a simple way to make uniformly sized solar cells.
- Using a bent pipette tip, paint a small amount of the Titania paste that contains SWNT:Titania powder, or Au:Titania powder, onto the top of the well. The amount you use should be roughly equivalent to the amount seen on the photo to the right.
- Spread the paste evenly throughout the well using the edge of a glass slide. This process is known as "doctor blading." Once spread, let the device sit for about 3 minutes; this step helps reduce the surface irregularity of the paste.
- Carefully remove the tape from around the well and heat in air at 120deg for 5 min.
- Repeat the doctor blading process, and heat again in air at 120deg for 5 min.
- Heat in air for 4 hours at 310deg. This step removes the virus and cellulose from the device.
(To be completed by TA)
- Heat in Argon for 30min at 500deg. This step calcinates the TiO2 nanoparticles, increasing crystalinity as well as connecting the particles to one another (which is important to electron transport in the device).
- After letting the device cool from the annealing stage, immerse it in Ru620 dye solution that contains 1:1 acetonitrile and tert-butyl alcohol. The solution will be left at room temperature until the next lab session, in which the counter electrode along with the completed device will be assembled and tested.
Part 2: Cross-group research proposal discussion
The groups not visiting the Belcher lab should use the extra time to work on their research proposals and get some peer feedback. Last time, you started brainstorming ideas with your partner. This time, you'll share these early stage ideas with someone else in the class, according to the pairings on today's Talk page. Your idea and approach might be quite uncertain for now, and that's okay!
Note that you and your partner should meet separately with people who are themselves not in the same group, so that you each get a chance to give your take on the project.
As you have started reading and thinking about potential research topics, you may feel
(a) like there's too much to read
(b) like you have too many ideas and no way to map or prioritize them
(c) like you don't understand what you're reading
(d) all of the above.
One of the best ways to help frame a problem for yourself is to discuss it with someone new. Take some time today to talk with someone from another lab group. That group will offer you a fresh ear to consider your proposal. Try to describe your research problem to them. Articulate why it's important. Tell them about some recent, relevant data. Describe what you're proposing to do and what the findings from your experiments might reveal. Throughout your discussion, keep careful track of the questions they ask since these will point you to the confusing concepts or fuzzy parts of your explanation or understanding.
Then be a good listener to hear the proposal that they've been working on. Ask lots of questions. No questions are dumb. You are there to offer a naive ear and seek complete explanations. Next time you meet with your partner you can share how your cross-group discussions went. Try to identify repeated questions or concerns since these are probably the holes in the project as it stands. You can rework your proposal based on the conversations you've had.
Materials
- Ethyl cellulose/terpineol/phage mixtures
- FTO coated glass
- Ohm meter
- Glass slides
For next time
Next time in lecture (Tuesday, 11/26), you will have the opportunity to get feedback about your research idea from Professor Belcher. Believe us that this plan is for your benefit – to help you develop a feasible and exciting research project. We will not sit there judging your articulation of your ideas or even the idea itself! Yet.
What will be evaluated for homework is due on our next lab day (T/W in early December):
1. Begin to define your research proposal by making a wiki page to collect your ideas and resources (you can do this on one page with your partner or split the effort and each turn in an individual page). Keep in mind that your presentation to the class will ultimately need:
- a brief project overview
- sufficient background information for everyone to understand your proposal
- a statement of the research problem and goals
- project details and methods
- predicted outcomes if everything goes according to plan and if nothing does
- needed resources to complete the work
You can organize your wiki page along these lines or however you feel is most helpful -- check out the “yeast rebuild” or the “T7.2” wiki pages on OpenWetWare for examples of research ideas in process. For now, focus on coming up with a research problem and giving a little background about it. Print your user page(s) for next time, making sure it defines your general topic (background and significance), your specific idea (research gap and general approach, but not precise experimental details), and two or more references you've collected and summarized. Keep in mind that you're not committed to this idea - if you come up with something that you like better later on, that's fine.
Please note: you may also utilize any 'cloud' software (Evernote, Google docs), but it must be something that is accessible to both of you.
Navigation Links
Next Day: Mod 3 Day 5: Solar Cell Testing Previous Day: Mod 3 Day 3: TEM
