20.109(F13): Mod 1 Day 1 DNA engineering using PCR
DNA engineering using PCR
Introduction

By performing this plasmid construction, you’ll be learning some fundamental tools and techniques of molecular biology. One major goal we have for this module is to establish good habits for documentation of your work. By documenting your work according to the exercises done today, you will
- Be better research students (in 20.109 as well as any research lab you may join)
- Be better writers since a clear record of what you’ve done will improve your data analysis
- Be better scientists, since you’ll eventually train others to document things this way too
PCR "primer"
To begin your recombination study you will be performing a protocol called the Polymerase Chain Reaction (PCR). The applications of PCR are widespread, from forensics to molecular biology to evolution, but the goal of any PCR is the same: to generate many copies of DNA from a few. In 1984, Kary Mullis described this technique for amplifying DNA of known or unknown sequence (called the “target” or “template”).
In addition to the target, PCR requires only three components: primers to bind sequences flanking the target, dNTPs to polymerize, and a heat stable polymerase to carry out the synthesis reaction over and over and over. PCR is a three-step process (denature, anneal, extend) and these steps are repeated 20 or more times. After 30 cycles of PCR, there could be as many as a billion copies of the original target sequence.

Based on the numerous applications of PCR, it may seem that the technique has been around forever. In fact it is fewer than 30 years old. In 1984, Kary Mullis described this technique for amplifying DNA of known or unknown sequence, realizing immediately the significance of his insight.

"Dear Thor!," I exclaimed. I had solved the most annoying problems in DNA chemistry in a single lightening bolt. Abundance and distinction. With two oligonucleotides, DNA polymerase, and the four nucleosidetriphosphates I could make as much of a DNA sequence as I wanted and I could make it on a fragment of a specific size that I could distinguish easily. Somehow, I thought, it had to be an illusion. Otherwise it would change DNA chemistry forever. Otherwise it would make me famous. It was too easy. Someone else would have done it and I would surely have heard of it. We would be doing it all the time. What was I failing to see? "Jennifer, wake up. I've thought of something incredible." --Kary Mullis from his Nobel lecture; December 8, 1983
Today’s lab has three parts. First, you'll go through a lab certification to show off the skills you learned at the lab orientation. Second, you will follow a four-part exercise to design a pair of PCR primers and to generate a primer record, and then third, you will use the primers you designed to set up a PCR. Next time you’ll start cloning the PCR product.
Protocols
Part 1: Lab Certification
Good luck!
Part 2: Primer design
Starting links for primer design
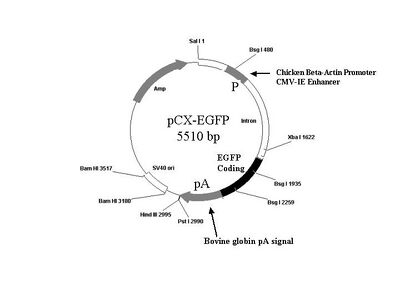
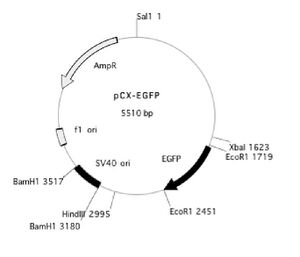
pCX-EGFP plasmid map: here and here
Engelward lab resources
ORF finder
NCBI
IDT Analyzer
New England Biolabs
The sequence of pCX-EGFP can be downloaded here
You may also find it useful to refer to the plasmid map below.

Design of the primers
Part 1: Finding the sequence to be amplified
The PCR product you are trying to generate will be used to introduce a 32 amino acid deletion at the N-terminus of enhanced green fluorescent protein (EGFP). To design primers for this amplification you need the EGFP gene sequence. Here’s how to get it.
- Begin by copying the sequence for pCX-EGFP (provided above) into a new MSWord document. The coding strand is listed and the complement is not shown. You will have to manually adjust the margins of your document so they are 0.6 inches (top, bottom, left and right) and you should change the text to 10 point Courier font. Courier font has a fixed letter width so all the lines of sequence should have the same number of bases, except the very last one on page 2, which will have fewer.
- Next, you’ll find the open reading frame (ORF) that encodes EGFP within the 5700 bases of plasmid sequence you just copied. One way to find the EGFP gene is to scan the sequence for ATG, the gene’s start codon. You could do this using the “Find…” feature of the MSWord program, but before you begin, think about how many ATGs you’re likely to find in 5700 bases. Do you think there will be 1? 10? 100? If there is more than one, how will you decide which ATG starts EGFP? There should be a better way to identify ORFs…and there is.
- Sequence data can be found in many places on the web. The 20.109 and OpenWetWare wikis are extraordinarily useful but they will not have every sequence you will ever need in your research career, so here’s how to find sequences in general. This is also the way you will identify the EGFP open reading frame (ORF) in the document you’ve started. The pCX-EGFP sequence you’ve copied is provided by Masaru Okabe, Professor at the Genome Information Research Center at Osaka University in Japan. Sequence information is also available at government websites, including NCBI. You can get the sequence of EGFP from either place…or both if you feel like it.
- Start by opening the Clontech homepage and search the top menu for Support → Product Documents. Proceed to search for EGFP-1 in the Discontinued Vector Archive. Open an EGFP vector such as EGFP-1 or EGFP-C1. You will see the plasmid map of the one you choose. The maps have tons of useful information but for today you should focus on the location of features section to determine the length of the EGFP gene. Do not choose a plasmid that is a fusion of EGFP to another protein.
- From the information at the Clontech site you will know the length of the EGFP gene but you will not have its sequence. To identify the EGFP ORF in pCX-EGFP you should paste the pCX-EGFP sequence from your MSWord document into “ORF Finder.” The sequence you have is already in the FASTA format. Once you hit “ORF find,” you will see a number of possible ORFs determined by translation of the sequence in all possible reading frames. Can you tell which ORF corresponds to the EGFP gene based on the length you determined from the Clontech site? Double click on the green box for the ORF most likely to be the EGFP gene. This will highlight the ORF and give you its sequence. (Hint: if the sequence starts with “M V S K,” then you have the right one!). Leave this window open and go to step 4 or try the second way to search for EGFP, described in the paragraph that follows.
- An alternate way to find the sequence of the EGFP gene is to search the government database. Open a new browser window to the NCBI link. To limit your output, you should search “EGFP expression” rather than just “EGFP” and restrict the search to the "Nucleotide" sequences that are retrieved. The sequences you retrieve this way are listed by accession # (usually 2 letters and a handful of #s). Choose one in which the word EGFP appears in the short description that follows the accession #. Scroll down to “Features” to find the coding sequence link (“CDS” in blue). Click on it to retrieve the sequence of the EGFP gene and then go to step 4.
- In this step you will identify the EGFP ORF in your MSWord document and highlight its start (ATG) and stop (TAA) codons. Begin by copying the first 6 bases of the sequence (that is, atg _ _ _ ) into the “Find…” feature from the Edit menu of the Word program. Very important (!): Make sure there are no spaces between or after the letters or your search won’t work. Change the color of the start codon to blue. Repeat the “Find…” process to identify the stop codon for EGFP and change it to blue as well. Finally you should change the color of the sequence in between the start and the stop codons to red. Now you are ready to design primers for this ORF!!
Part 2: Choosing the landing sequence
You will be designing two primers today, one in the “forward” direction that reads toward the EGFP gene and one in the “reverse” direction that anneals to the opposite strand at the end of the gene and reads back into it. Each of the PCR primers will have two parts. The “landing” sequence will anneal to the gene and the “flap” sequence will be used to introduce restriction sites for cutting and cloning the product. Start by identifying the landing sequence for your forward primer.
- A few weeks from now you will be detecting recombination between an N-terminally truncated EGFP and a C-terminally truncated version. The primers you are designing today will be used to make the N-terminal truncation. We will call this truncation D32N, since it deletes 32 amino acids from the N-terminus. The landing portion of your forward primer must begin at the sequence corresponding to the 33rd amino acid. How many bases are needed to encode 32 amino acids? Use the “word count” feature that is found under the “Tools” menu to select the right number of characters in your MSWord document, starting with the ATG. Next underline a 20 base sequence that begins just after this length. This will be the landing sequence in your forward primer.
- There are three important considerations for the landing sequence. First, the sequence must be unique. Clearly a very short landing sequence (like TTT) would anneal to too many places during the PCR. You are assuring specificity by starting with a sequence that is 20 bases long. The second consideration is the temperature required for this sequence to base pair. The melting temperature depends on both the length of the landing sequence and the GC content. Finally there are secondary structures that the primer can adopt. A well-designed primer will have short hairpins (if any), its melting temperature will be around 60°C, and if possible its GC content will be about 50%. There are several websites to help you evaluate these aspects of your primer. Try to copy the 20 bases of landing sequence into the IDT website. Leave the defaults for stems and loops as they are and then analyze your sequence. If your melting temperature (Tm) is not 60°C try adding or deleting bases from your landing sequence and repeating the analysis. Remember that the 5’end of the landing sequence must not change or you will not delete the first 32 amino acids of the protein. When you are happy with the landing sequence, leave it underlined in your MSWord document, note the GC content and go on to the design of the primer’s flap!
Part 3: Choosing the flap sequence
The “flap” sequence in your primer will not anneal to the EGFP ORF. Instead, it will be used to introduce restriction sites for inserting the PCR product into an expression vector. At which end of the landing sequence do you want to put the flap? Remember that you are designing the primer that will read toward the EGFP sequence. Talk to one of the teaching faculty if you are uncertain about where the flap belongs. You will be assembling the components of the “D32N-fwd primer 5’- ” at the bottom of your MSWord document. There are several things to consider as you design the flap sequence.
- First consider the restriction site that you will use for cloning, in this case XbaI. Find the XbaI recognition sequence in the NEB catalog using the NEB website. Write the sequence down at the bottom of your MSWord document.
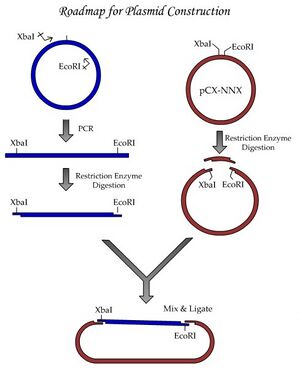
- Add the recognition sequence for the XbaI restriction enzyme to the landing sequence. You can reason to figure out which end of the landing sequence to add to, but if you are not still sure which is the proper end, check the reagents list at the end of this protocol. In general restriction enzymes won’t cut the very end of the DNA fragment, so next you will have to add some random sequence to the 5’ end of the primer. An extra 6 bases should be enough to allow the XbaI enzyme to cut your product. Add the 6-base tail “CATTAG” to the 5’ end of the XbaI restriction site.
- When designing primers, it’s always a good idea to plan ahead and include extra restriction sites that may be used after you have made your clone to check that the clone is correct and that it has been inserted into the plasmid in the correct orientation. We will include a BamHI site just after the XbaI site for these purposes. Use the NEB catalog to find the BamHI restriction site and include it in your primer sequence. Choose a reasonable location for the BamHI site relative to the XbaI and landing sequence. You can check your work by comparing your sequence to the primer sequence in the reagents list for today.
- Finally we should put a stop codon into our primer. The stop codon should follow the BamHI sequence and it is included to prevent any upstream ATGs from adding sequence that will be fused to the EGFP product. There are three stop codons you could use. Choose one. The NEB catalog has the genetic code as part of its reference material. Do not write “U” into your primer sequence since primers are made of DNA. What will you use for “U”?
- There are two steps to finish documenting the primer you’ve designed. First, you should paste the landing sequence that you chose earlier to the 3’ end of the flap sequence. Leave the landing sequence underlined to distinguish it from the flap. This final primer should appear at the bottom of your document. You should also paste it just above the landing sequence in the body of the text, to emphasize its purpose.
- You’re almost done with your first primer! Go back and reanalyze your primer to find its length, Tm, and GC content. Copy this information below the primer’s sequence at the bottom of the MSWord document.
Part 4: Designing the reverse primer
You’re half way done designing your primer pair! To design the second primer that you need for PCR, you’ll be repeating parts 2 and 3. However, this primer will anneal to the opposite strand of DNA and will direct synthesis of EGFP in the “reverse” direction, from the end of the gene to the start. In some ways the design of this primer is easier than the design of the forward primer. You are not making a deletion at the 3’ end of the gene so the landing sequence is easier to find. Also, you have just designed one primer so you are practiced. In another way, though, the design of the reverse primer is harder since you need the reverse complement of the sequence you have been working with. Here’s some step by step guidance for this primer’s design but be sure to rely on your partner for help since there is no substitute for a second pair of eyes to catch mistakes.
- Start by copying the last line of coding sequence from your MSWord document to the bottom of the page. Now, with the help of your partner, type the sequence of the complement. This sounds easy, and it is, but it’s also incredibly easy to make a mistake, so double check your work. The new line should end CATT-5’. Use this line of sequence to design the landing portion of your second primer.
- As a first draft of your primer’s landing sequence, begin with the last 20 bases of the EGFP sequence (17 bases and the stop codon, TAA). Underline that sequence and check the Tm as you did before and adjust the length at the 3’ end so the Tm is at least 60°C. Underline the entire landing sequence that you finally decide on.
- To design the flap sequence, you should add a new restriction site that will be used to verify and orient the clone later. Choose the EcoRV sequence from the NEB catalog and add that to the 5’ end of the landing sequence.
- Next add the cloning site, EcoRI this time, to the 5’ end, just after the EcoRV site.
- Finally add a 6-base tail sequence (CATTAG) to the 5’ end of the EcoRI restriction site. This will give the enzyme some room to cut the PCR product.
- The convention for DNA sequences is to write them in the 5’ to 3’ direction so you now must reverse the order of the bases in your primer. This does NOT mean to find their complement but rather to recopy the sequence so the most 5’ base is listed first. This (at last!) is your D32N-rev primer sequence. Be sure the landing portion is still underlined. Find the Tm and the GC content of the primer and write it below the primer. Find the portion of the ORF to which this primer anneals and paste the primer below the appropriate sequence in the body of the MSWord document. Print out this final document to hand in before you leave today and be sure to save a copy for your own records.
- There are some important further checks for your primer pair that you should be aware of. It is prudent to check that neither primer has aberrant landing sites in the DNA in your reactions. DNA with even short, perfect matches to the 3’ ends of the primers can lead to hybridization and amplification of an undesired sequence. The program “Lalign” which can be found on the 20.109 webpage identifies overlap between sequences. Another useful program is “Genewalker,” also on the 20.109 webpage. It searches for primer hairpins, primer dimers and other confounding elements in primer design. If you have time, you are encouraged to explore these tools.
Part 3: Performing PCR
Assembling the reactions
The power of PCR is its potential to generate many copies of a particular DNA sequence starting with a very few. This is also its Achilles’ heel. It is extraordinarily easy to amplify contaminating DNA sequences, generating undesired products from the reaction. Before you begin this portion of the lab, it is a great idea to wash the barrels of your pipetmen with a paper towel and 70% EtOH. You could also wash your bench area.
All the components necessary for performing PCR are available from the teaching faculty, including primers like the ones you just designed. Your reactions will contain the following:
| Template | 1 ul pCX-EGFP (=100 ng) |
| Forward Primer | 1 ul D32N-fwd (=100 pmol) |
| Reverse Primer | 1 ul D32N-rev (=100 pmol) |
| PCR Master Mix* | 20 ul of 2.5X stock (see REAGENTS LIST) |
| H2O | to final volume of 50 ul |
- The PCR Master Mix contains buffer, dNTPs and Taq Polymerase.
You will assemble two PCR tubes, one complete reaction and another without template. The second reaction serves as a control for contamination.
- Begin by adding the correct amount of water to a 200 ul PCR tube. Add that amount +1 ul to a second PCR tube.
- Next add the primers to each reaction. Be sure to change tips between additions.
- Next add template to the first reaction tube.
- Finally add PCR Master Mix to each tube, pipetting up and down to mix. Leave your tubes on ice until the entire class is ready to load reactions into the thermal cycler.
- The reactions will undergo the following PCR cycle:
- 94° 4 minutes
- 94° 1 minute
- 55° 1 minute
- 72° 1 minute
- repeat steps 2-4 35 times
- 72° 10 minutes
- 4° forever (or until one of the teaching faculty removes the reactions and stores them in the freezer)
DONE!
For next time
- Sketch the expected product from the PCR you performed today.
- You may work on paper or electronically. Either way, prepare a schematic rather than detailing each base.
- Clearly indicate the 5' and 3' end of each DNA strand.
- Be sure to reflect every new feature that you have introduced (e.g., restriction site) or deleted.
- Calculate the nominal (update -- read: expected/hypothetical) length of the PCR product. Please show your reasoning.
Reagents list

- PCR Master Mix (2.5X) from 5 Prime (Gaithersburg, MD)
- 62.5 U/ml Taq DNA Polymerase
- 125 mM KCl
- 75 mM Tris-HCl, pH 8.3
- 3.75 mM Mg(OAc)2
- 500 uM each dNTP
- Std PCR reactions
- ~100 ng template
- ~100 pmole each primer
- 1X concentration of all reagents in 2.5X mix
- denature 94-95°C
- anneal 5°C less than lowest primer hyb temp
- extend 1’/kb to be amplified
- D32N-fwd
- 5’ CATTAGTCTAGAGGATCCTAAGAGGGCGAGGGCGATGCCACC 3’
- D32N-rev
- 5’ CATTAGGAATTCGATATCTTACTTGTACAGCTCGTCCATGC 3’
