'Round-the-horn site-directed mutagenesis
| back to protocols | ||
‘Round the Horn Site-directed mutagenesis
Submitted by Sean Moore
Background
I was in graduate school and had to make several codon substitutions at the same position in a cloned gene. I came up with this protocol and called it "Around-the-Horn", a phrase used in baseball meaning to throw the ball through all of the base positions in a circle. The phrase originally referred to "Rounding Cape Horn of South America" a very difficult, but rewarding journey ("Round-the-horn" is not difficult). Subsequently, a group published a paper describing the process, but I was first, take full credit, and have used it in ways not described by others.
I was used to doing "Quickchange" (Stratagene) wherein two complementary oligos containing the desired mutation are used to prime extensions all the way around the plasmid. Quickchange is a linear amplification (not PCR) and each round of extensions is performed on the plasmid template. There are several problems and limitations with Quickchange:
- The size of the mutation is limited to a few base pairs.
- Each primer has to be long to provide sufficient annealing on both sides of the mutation (money).
- Non-optimal extension conditions will result in "end-filling" wherein the polymerase fills the recessed 3' end of the product instead of extending the primer on the template (this is especially a problem as the reaction progresses and is why only 12 or so cycles are recommended). The blunt-end products won't give you any transformants and also mislead the researcher into thinking their reaction went great because they see a product on a gel, but the product is a dead end.
- For each different mutation at a given position, a new primer pair has to be ordered (mo' money).
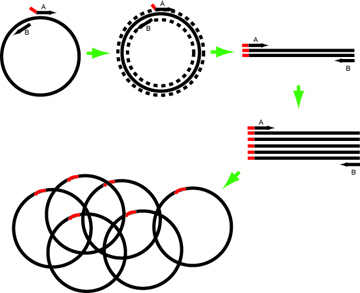
'Round-the-horn is a PCR-based mutagenesis. The mutations are contained in one or both of the primers. The primers are phosphorylated so that the PCR product can be ligated into a circle and used to transform cells. The procedure has the advantages that the primers are smaller, a visible product on a gel means your reaction worked and must contain the encoded mutations, only one primer needs to be changed to change the mutation at the same site. If you are concerned with mutations elsewhere in your plasmid, you should sub-clone the segment of interest into a "fresh" vector (this is the case for any site-directed protocol). Finally, as opposed to standard site-directed mutagenesis, this procedure exponentially amplifies the plasmid, leading to increased yields, increased transformation efficiencies, and the potential to create a large library with randomized residues.

Citing
This protocol can be cited directly OWW, but I get frequently asked for the first paper to use it. When I was nearing the end of my graduate work, I made the first mutations in the P22 scaffolding protein; found in this reference:
PMID: 12239300
However, if my shoddy memory serves correctly, there is another publication that came out shortly before mine, also from my graduate lab, the technique was used to introduce point mutations in HIV CA. I recall advising our technician, but I may be wrong. It is simply listed as "PCR mutagenesis".
PMID: 12507478
Primer design
In this example, the Forward primer (primer A in the image above) has intended mutation at its 5’ end. Design such that the annealing portion has Tm ~60-63º.
e.g.,
5’-NNNACGTACGTACGTACGTACG-3’
The reverse primer in this example resembles the complementary strand and abuts the site of mutation.
                       5'-NNNACGTACGTACGTACGTACG
…ACGTACGTACGTACGTACGTACGTACGTACGTACGTACGTACGTACGTACGT…
…TGCATGCATGCATGCATGCATGCATGCATGCATGCATGCATGCATGCATGCA…
       CATGCATGCATGCATGCAT-5'
- If the change needed is large, both primers can have mutant 5’ ends. Alternately, two rounds of PCR can be performed to build the desired PCR product.
- Primers without mutations at their 5' ends can be spaced apart on the template with a gap between them to make deletions of any desired size.
- You can amplify a low-copy plasmid with primers that introduce cloning sites for receiving an insert. The PCR product becomes the "vector" component of the ligation reaction. In this case, you don't need to phosphorylate the primers because the restriction digest of the ends will leave 5' phosphates. An advantage using PCR to prepare your vector is that background "vector re-ligation" reactions are practically eliminated.
- Remember to transform bacteria that have no restriction system as the plasmid will be unmodified. This is not essential, but really helps.
Primer Phosphorylation
- Primer stock should be at 100 μM in water or TE.
- For each primer, mix:
- 37 μL water
- 5 μL 10 Kinase reaction buffer (comes with PNK)
- 1 μL 50 mM MgSO4 (comes with most polymerases)
- 5 μL primer (10 μM final)
- 1 μL 100 mM ATP
- 1 μL PNK
- Incubate at 37°C for 30-60 minutes.
- Heat each reaction to kill the PNK (65°C for 20 minutes or 95°C for 5 min).
PCR
The Mixture
Set up the following 50μL mixture on ice. After mixing, put into pre-heated PCR block. Keep in mind that your particular volumes may be different, some newer fusion polymerases (recommended) use 5X and 2X buffers.
- 40 μL water
- 5 μL 10X polymerase buffer
- 1.5 μL forward primer (0.3 μM final)
- 1.5 μL reverse primer
- 0.5 μL dNTPs (20 mM each)
- 1 μL template (mini-prep’d plasmid)
- 0.5 μL polymerase (not Taq, use Vent, Deep Vent, 9°N, Pfu, or a faster fusion enzyme)
PCR program
- 98°C 1’
- 96°C 30”
- 55-58°C 30” (~5°C below Tm, higher for fusion enzymes)
- 72°C 2’ per kb being amplified (much less if using a fusion enzyme)
- Goto (2) 25-27 more times
- cool to 18°C for a minute or so (there's no need to hold at 4, you just cooked the sample for an hour!)
- end
Product Preparation
Run 5 μL on a gel. I put EtBr in the gel so I can check to see if there is a product within a few minutes. If you see the band, digest the template in the PCR reactions by adding 1 μL of DpnI, mix, and incubate for at least 60 minutes at 37º.
Run a preparative gel of the PCR product, excise the band, and use a kit to extract the product.
Product ligation
- 2.3 μL water*
- 2 μL PCR product
- 0.5 μL 10X ligation buffer
- 0.2 μL ligase
- 5 μL
If there is not much product, replace the water fraction with more PCR product.
Incubate overnight at room temp. These blunt ligations can be pretty slow. Some enzymes (e.g. 9° North and Taq) leave crap on the 3' ends. This greatly reduces the efficiency of the blunt-end ligations.
Transformation
Works best with electroporation or fresh TSS cells. Transform 4 μL into 50 μL cells. Plate all of it. You should get 20 to 1000 colonies. Many times, I have forgotten to phosphorylate the primers before doing the PCR. You can successfully phosphorylate the purified PCR product before ligation, but the ligation/transformation will be less efficient. PNK prefers exposed 5' ends.
Optimizations
We have been using NEB's Q5 enzyme almost exlusively now. A rough estimate of 0.5 ng of template, 300 nM primers, and 2-3 degrees below the NEB recommended anneal. Also, use NEB's GC enhancer and 30 sec/kb.
I have had reactions that just wouldn't produce product (for whatever reason). When doing PCR, it is difficult to predict the yield or quality of a product. The longer the product is supposed to be, the greater the chance of competing reactions taking over. Usually, people will adjust the Mg++ concentration to influence polymerase behavior or adjust the annealing temp to influence primer annealing and polymerase extension.
Keep in mind that when the sample temperature is raised from the annealing temperature (say 55) to the optimal extension temperature (say 72), the oligo would normally melt off of the template. The reason primer extension works is the polymerase slowly extends the oligo during annealing and while the temperature is rising so that when the 72 degree mark is hit, the extended product is long enough to keep the primer attached and the polymerase happy. Therefore, oligo composition, the type of polymerase, the annealing temp, and ramp time can have significant effects on the reaction.
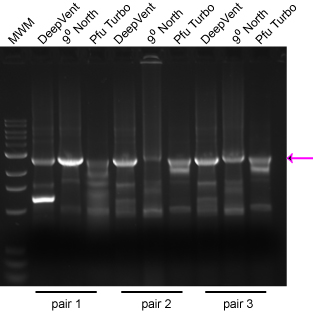
Take the following example: Each reaction had 1 μL of the same mini-prep, and all reactions were done with the same program at the same time. Three different primer pairs were used and three different enzymes. I have found that the surest way to get a successful 'Horn reaction is to set up the reactions with different enzymes (historically Deep Vent and Turbo Pfu, but now an array of fusion enzymes) rather than to set up arrays of Mg++ concentration or a gradient of annealing temps. The desired product is marked with an arrow. Note that the different enzymes gave varied performance simply depending on the primer pair used. Consider the cost of your time repeating steps relative to the cost of the enzyme aliquot. We now use NEB's Q5 enzyme with excellent results, even on >10 kb plasmids.
