3D Printing Techniques-Hanna Scher
3D Printing Techniques
Fused Deposition (Extrusion) Printing
This is the most common and mainstream 3D printing method. Consumer-level 3D extrusion printers are available and very inexpensive; they have many options in the range of just a few hundred dollars. It is an additive process where the object is created by placing melted material layer by layer in a path; thermoplastic polymers are the most common materials due to their ability to quickly melt and cool[1]. This method allows for a myriad of materials to be used. Theoretically, any material that can be melted and cooled to a solid can be used with extrusion 3D printing.
For this process, the material is loaded into the printer, and it is passed on to the extrusion head once the nozzle reaches the correct temperature; the material melts in the nozzle, but the extrusion head allows the layers to be formed in any pattern. The strands are printed layer by layer, and they then cool ultimately creating a solid product. The platform moves down once the layer is complete in order to create a new layer which repeats until the object is done [1].
One drawback of this method as it applies to microfluidics is the resolution of these extrusion printers is typically not low enough to be effective for microfluidic channels, although recent improvements have placed resolution down to the micrometer scale[2]. Additionally, during printing in this method, it is very difficult to get the layers to line up perfectly, making it difficult for this method to contain fluids.

In order to compensate for this drawback, there are several options available for finishing 3D models made using this technique such as exposing the model to a higher temperature so as to re-melt the layers together for a better fit, or using an appropriate chemical gas to partially dissolve the exposed outer layers and smooth them together. Current “affordable” 3D printers can achieve resolutions around 50 microns[3].
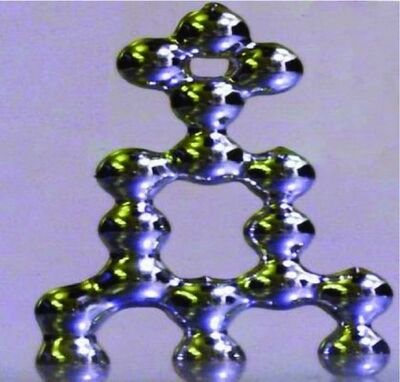
An example technique which has potential to make this method more specific to microfluidic structures is described by Ladd et al. [4]. This research is particularly interesting because this printing occurs at room temperature. A gallium and indium ally with an oxide over layer was able to be extruded through a needle to achieve a resolution of approximately 8 mm. The researchers were able to create wires, arrays of spheres, arches and interconnects.

Selective Laser Melting/Sintering (SLM/SLS)
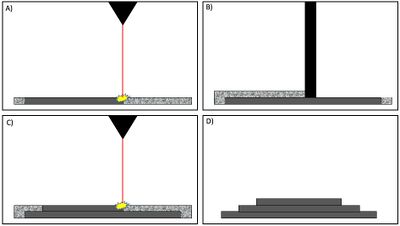
In contrast to extrusion printing where the printed material is extruded from a moving tip, SLS involves using a bed of a powdered material and fusing together a layer of that material in a specific shape using a laser. The particles of powder are formed together from the laser beam[5]. After adding another layer of the powder, it can then be fused on top of the previous layer, almost like a reverse CNC milling process in that an object is constructed by fusing powder together instead of shaving material off a starting block. Although this allows for a very high resolution, one drawback to this approach is that the unbound powder must be removed after the manufacturing process. For the scale of the small capillaries that microfluidics research necessitates, this makes this method somewhat unsuited to microfluidics channels [6]. Using CO2 laser machining of polymethyl methacrylate (PMMA) Romoli et al. were able to adopt the technique to create 3D structures by printing several PMMA sheets and then bonding them together [7]. In addition, this method is much harder to control, for it require a high input of energy of the laser beam and complete melting of the particles which in turn causes issues such as deformation [5].

Ink-Jet Printing
Due to the extremely low cost and availability of ink jet printers, this technique promises to be extremely useful for developing low cost microfluidics solutions. When used in two dimensions, this method typically involves printing hydrophobic boundaries which might be made from wax or polymer onto hydrophilic paper. A recent publication [8] described a technique wherein this method can be used for 3D printing using two different polymer inks. The first is made from SU-8, which forms the channels, while PMMA supports the structure during the curing process but is subsequently removed by washing. A relatively high vertical resolution of 4.6 µm has been reported using this method [8]. The manufacturing steps involve printing an isolation layer. On top is printed a support material using PMMA. The microfluidics channel is then printed on top of the support material, and finally the support material is washed away.
References
- Galicia J, Benes B. Improving printing orientation for Fused Deposition Modeling printers by analyzing connected components. Additive Manufacturing 2018; vol 22: 720-28. DOI:https://doi.org/10.1016/j.addma.2018.06.007
- A. A. Yazdi, A. Popma, W. Wong, T. Nguyen, Y. Pan, and J. Xu, “3D printing: an emerging tool for novel microfluidics and lab-on-a-chip applications,” Microfluid. Nanofluidics, vol. 20, no. 3, p. 50, Mar. 2016. DOI: https://doi.org/10.1007/978-3-319-40036-5_4
- G. Comina, A. Suska, and D. Filippini, “Low cost lab-on-a-chip prototyping with a consumer grade 3D printer” Lab on a Chip, 2014,14, 2978-2982. DOI: 10.1039/C4LC00394B
- C. Ladd, J.-H. So, J. Muth, and M. D. Dickey, “3D Printing of Free Standing Liquid Metal Microstructures,” Adv. Mater., vol. 25, no. 36, pp. 5081–5085, Sep. 2013. DOI: https://doi.org/10.1002/adma.201301400
- Kruth J, Froyen L, Van Vaerenbergh J, Mercelis P. Selective laser melting of iron-based powder. Journal of Materials Processing Technology 2004; vol 149, no 1-3: 616-22. DOI: https://doi.org/10.1016/j.jmatprotec.2003.11.051
- P. H. King, “Towards rapid 3D direct manufacture of biomechanical microstructures,” 2009. EThOS:[[1]]
- L. Romoli, G. Tantussi, and G. Dini, “Experimental approach to the laser machining of PMMA substrates for the fabrication of microfluidic devices,” Opt. Lasers Eng., vol. 49, no. 3, pp. 419–427, Mar. 2011. DOI: https://doi.org/10.1016/j.optlaseng.2010.11.013
- W. Su, B. S. Cook, Y. Fang, and M. M. Tentzeris, “Fully inkjet-printed microfluidics: a solution to low-cost rapid three-dimensional microfluidics fabrication with numerous electrical and sensing applications,” Sci. Rep., vol. 6, no. 1, p. 35111, Dec. 2016. DOI: 10.1038/srep35111
