20.109(F08): Mod 2 Day 5 Probe western, isolate RNA
pic.jpg)
Introduction
Antibodies are useful tools in the lab. Today we'll use antibodies to detect a protein on a blot. This technique, called Western analysis, can give us information about the size and concentration of the protein in the pool that was separated by SDS-PAGE. In our case, we'll use a Western to characterize the TAP-tagged proteins we've generated. Hopefully you're now confident that you've modified the gene of interest with a TAP tag sequence, but you could imagine a case where the genome has the correct TAP-TRP sequence and yet the resulting protein is not seen on a Western blot. Perhaps it's unstable or expressed at such a low level that it's not detectable. Alternatively, you could imagine that there are cellular proteases that might cleave the TAP-tag off the protein we've attached it to, ridding the cell of the fusion we've tried to make. Both of these outcomes are possible (even common!), and would be critically important pieces of data to gather before performing a TAP purification of the tagged complex. Assuming the protein we're interested in is expressed and intact, then in general, the quality of Western results depends on the quality of the antibody we choose.
Luckily a high quality antibody can have a relatively low affinity for its target protein and still be useful for Western analysis, . This is because the target is localized and concentrated on a blot, allowing the antibody to bind using both antibody “arms” thereby strengthening the association. Even an antibody that is loosely bound to the blot under these circumstances may dissociate then re-associate quickly since the local concentration of the target protein is high. The lower limit for protein detection is approximately 1 ng/lane, a value that varies with the size of the protein to be detected and the Western blotting apparatus that is used. For most acrylamide gels, the protein capacity for each lane is usually 200 to 400 ug (that would be 40 ul of a 5-10 ug/ul protein preparation). Thus 1 ng represents a protein that is approximately 0.0005-0.001% of the total cellular protein (1 ng out of 200,000-400,000 ng). Obviously proteins that make up a more significant fraction of the total protein population will be easier to detect.
Many species can be used to raise antibodies. Most commonly mice, rabbits, and goats are immunized, but other animals like sheep, chickens, rats and even humans can be used. The protein used to raise an antibody is called the antigen and the portion of the antigen that is recognized by an antibody is called the epitope. Each antibody can recognize only a small portion of its antigen, typically 5 to 6 amino acids. Some antibodies are monoclonal, or more appropriately “monospecific,” and recognize one epitope, while other antibodies, called polyclonal antibodies, are in fact antibody pools that recognize multiple epitopes. We will be using a polyclonal antibody raised in rabbits against the Protein A from Staphylococcus aureus, but for the sake of completeness, the origin of both polyclonal and monoclonal antibodies are described. If you'd like more information than you find here, you can read Curr. Protoc. Mol. Biol. (2008) 83:10.8.1-10.8.28.DOI: 10.1002/0471142727.mb1008s83 and DOI: 10.1002/0471142727.mb1110s83

To raise polyclonal antibodies, the antigen of interest is first purified and then injected into an animal. To elicit and enhance the animal’s immunogenic response, the antigen is often injected multiple times over several weeks in the presence of an immune-boosting compound called adjuvant. After some time, usually 4 to 8 weeks, samples of the animal’s blood are collected and the cellular fraction is removed by centrifugation. What is left, called the serum, can then be tested in the lab for the presence of specific antibodies. Even the very best antisera have no more than 10% of their antibodies directed against a particular antigen. The quality of any antiserum is judged by its purity (that it has few other antibodies), its specificity (that it recognizes the antigen and not other spurious proteins) and its concentration (sometimes called its titer). Animals with strong responses to an antigen can be boosted with the antigen and then bled many times, so large volumes of antisera can be produced. However animals have limited life-spans and even the largest volumes of antiserum will eventually run out, requiring a new animal for immunization. The purity, specificity and titer of the new antiserum will likely differ from that of the first batch. High titer antisera against bacterial and viral proteins can be particularly precious since these antibodies are difficult to raise; most animals have seen these immunogens before and therefore don’t mount a major immune response when immunized. Antibodies against toxic proteins are also challenging to produce if they make the animals sick.

Monoclonal antibodies overcome many limitations of polyclonal pools in that they are specific to a particular epitope and can be produced in unlimited quantities. However, more time is required to establish these antibody-producing cells, called hybridomas, and it is a more expensive endeavor. Antibody-secreting cells are first isolated from an immunized animal, usually a mouse, and then fused with an immortalized cell line such as a myeloma. The fusion can be accomplished by incubating the cells with polyethylene glycol (antifreeze), which facilitates the joining of the plasma membranes of the two cell types. A fused cell with two nuclei can be resolved into a stable hybridoma after mitosis. The unfused antibody-secreting cells have a limited lifespan and so die out of the hybridoma population, but the myelomas must be removed with some selection against the unfused cells. Production of stable hybridomas is tedious and difficult but often worth the effort since monoclonal antibodies can recognize covalently-modified epitopes specifically. These are invaluable for experimentally distinguishing the phosphorylated or glycosylated forms of an antigen from the unmodified forms.
The mechanics of probing your blot with antibodies is neither complicated nor interesting. The blot will be washed, incubated for an hour with the primary antibody that recognizes Protein A, washed again, then incubated for another hour with a second antibody raised in goats that recognizes rabbit antibodies. This secondary antibody will amplify the primary signal and also enable us to detect where on the blot the antibodies have bound since the secondary antibody has been linked to an enzyme, alkaline phosphatase. Detection is through an enzymatic reaction of the alkaline phosphatase with a substrate that precipitates a colored compound on the blot.
Since the actual manipulations of the Western are not time consuming, we'll also begin work on another portion of this experimental module, namely the microarray analysis of total gene expression. You'll isolate RNA as described below from the trp+ version of the parental strain, NY420 and whichever of the two yeast candidates you have the most confidence in. Finally, you should also take some time to examine and photograph the spot plates you set up last time. Busy but exciting day!
Protocols
Though the details of how to do this are not explicitly described, the spot tests from last time should be assessed. Be sure to ask questions of the teaching faculty if you're not sure how to interpret what you see. You should photograph or scan your plates to include when you write up this work as a research article.
Part 1: Probe Western blot
- You should retrieve the blot that you made last time and pour the TBS-T + milk solution into a 50 ml conical tube.
- Measure 15 ml of the TBS-T + milk in a 15 ml falcon tube.
- Add 15 ul of anti-ProtA antibody to the falcon tube and invert several times to mix.
- Pour the antibody solution over the blot, cover the container, label it with your team color and place it on the platform shaker that's in the chemical hood for 45 minutes-1 hour. During this time, you should work on Part 2 of today's protocol, namely isolating RNA from your yeast cell.
- Pour the primary antibody solution into a conical tube, writing the identity of the antibody and today's date on the tube.
- Give your blot a quick rinse with TBS-T, enough to cover the blot (volume is not critical here).
- Wash the blot on the platform shaker 2 times with TBS-T at room temperature, five minutes per wash. Again the volume of the wash solution is not critical.
- Add secondary antibody (1:1000 Goat-antirabbit-alkaline phosphatase) in 15 ml TBS-T and incubate on the platform shaker at room temperature for 30-60 minutes. During this time, you should continue your work on Part 2 of today's protocol.
- Wash the blot as before (rinse and two washes).
- When you are done washing, mix 250 ul of each of the solutions from the alkaline phosphatase substrate kit into the provided tube of 25 ml 1X developing solution.
- Add developing solution and shake on the platform shaker watching for color to develop. Rinse the blot with water when bands are evident (you should anticipate what size protein you are looking for) but before the background of the blot becomes discolored. One of the teaching faculty will scan the blot and post the results for you.
Part 2: RNA isolation
RNA is strikingly different from DNA in its stability. Consequently it is more difficult to work with RNA in the lab. It is not the techniques themselves that are difficult; indeed, many of the manipulations will seem identical to those used for DNA. However, RNA is rapidly and easily degraded by RNases that exist everywhere. There are several rules for working with RNA. They will improve your chances of success. Please follow them all.
- Use warm water on a paper towel to wash lab equipment, like microfuges, before you begin your experiment. Then wipe them down with “RNase-away” solution.
- Wear gloves when you are touching anything that will touch your RNA.
- Change your gloves often.
- Before you begin your experiment clean your work area, removing all clutter. Wipe down the benchtop with warm water then “RNase-away,” and then lay down a fresh piece of benchpaper.
- Use RNA-dedicated solutions and if possible RNA-dedicated pipetmen.
- Start a new box of pipet tips and label their lid “RNA ONLY.”
Isolating RNA
To isolate the RNA from our yeast cells, we will use a kit manufactured by a company named Ambion. The contents of many solutions in their "RiboPure" Yeast RNA isolation kit are proprietary so we don't know what's in them. Other solutions that they do disclose the contents of are hazardous. The following protocol will make very clear when you're working with anything dangerous and how to proceed. Please be sure to follow all these instructions carefully.
- Decide which two strains you'd like to compare. One strain should be the trp+ version of the parental strain, NY420. The other strain should be one of your TAP-tagged candidates.
- Using the OD600 values that you measured last time, calculate the volume of each yeast strain you'll need in order to collect 1x10^8 cells. Use the fact that a reading of 5 OD600 can be roughly assumed to have 1x10^8 cells/ml. You can check your calculation with one of the teaching faculty if you want to.
- Retrieve the needed yeast cultures from last time, vortex them to resuspend the cells, and move the calculated volume of each strain into properly labeled eppendorf tubes.
- Aspirate the supernatant off the cells, using an RNAse-free pipet tip to cover the aspirator pipet and change tips each time.
- Resuspend each pellet in 480 ul "Lysis Buffer." Pipet the pellet up and down to resuspend it.
- Add 48 ul 10% SDS and with a gloved finger, flick the tubes to mix.
Measuring Zirconia beads - Put on a lab coat, eye protection, and a double layer of gloves. Move your rack of tubes to the chemical hood. Add 480 ul of Phenol:Chloroform:Isoamylalcohol to each sample. NOTE: THIS REAGENT IS VERY TOXIC. Pipet tips should be directly ejected into the PCI waste container stored in the hood. If you believe you have spilled or splashed this reagent, please let one of the faculty know immediately.
- Using the vortex in the hood, vortex each cell lysis mixture for 15 seconds. Leave your tubes in a rack in the hood until you have completed the next step.
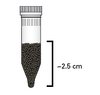
- Retrieve the cold Zirconia beads and two screw capped tubes from the teaching faculty. Pour the beads into the tube to a height of ~2.5 cm (~1 inch) from the bottom of the tube. See the picture here as a guide. Take the tubes and their caps to the hood.
- Back at the chemical hood, transfer the mixture of cells and lysis reagents to the tube of beads. Secure the lid VERY tightly.
- Position the samples horizontally on the vortex adapter with the tube caps toward the center. Beat the cells open by vortexing 10 minutes.
- Transfer the tubes to an eppendorf microfuge and spin for 5 minutes at 13K rpm (full speed) to separate the aqueous phase containing the RNA from the organic phase.
- Reglove and put your lab coat and eye protection on if you've removed them.
- Transfer the aqueous phase (top) to a 15 ml conical tube. Typically the recovered volume should be ~500 ul. Do NOT transfer any of the white layer you may see between the organic and aqueous phases since this cruddy mix of denatured proteins and solubilized lipids will reduce the purity and usefulness of the RNA you're trying to isolate.
- With your gloves on, transfer the tubes that still have the phenol layer into the waste container in the hood. You do not have to empty the tubes, just put them into the waste container.
- To each sample, add a total of 1.9 ml Binding Buffer, a solution that's provided with the purification kit. It may be easiest to add 2x 950 ul.
- Invert 2 times to mix.
- To each sample, add a total of 1.25 ml 100% Ethanol. It may be easiest to add 2x 612 ul. The ethanol should be RNase free.
- Invert 2 times to mix.
- Retrieve 2 filter cartridges and 2 collection tubes from the teaching faculty. Cut the caps off the collection tubes and save them. Label the cartridges with each sample's name.
- Apply 700 ul of each sample to the appropriate cartridge.
- Spin in the microfuge at full speed for 30 seconds.
- Discard the flow through in the sink or in a falcon tube you've set up at your bench to collect waste.
- Repeat steps 20-22 until all the lysate/EtOH mixture has been applied to the columns. BE VERY CAREFUL not to mix up the samples. You will have to START ALL OVER AGAIN if you accidentally add any of the parental lysate to the column with the TAP-tagged lysate.
- Wash the filters by adding 700 ul Wash Solution 1 to each and spin in the microfuge at full speed for 1 minute.
- Discard the flow through and replace the cartridges in the same collection tubes.
- Wash the filters by adding 500 ul Wash Solution 2/3 to each and spinning in the microfuge at full speed for 1 minute.
- Discard the flow through and replace the cartridges in the same collection tubes.
- Repeat the 500 ul Wash Solution 2/3 step so a total of 1 ml of Solution 2/3 has been passed through each filter.
- Once you've discarded the flow through, spin the cartridges once more to dry the filters.
- Transfer the cartridges to a fresh 2 ml collection tube that you've trimmed the cap off of.
- Elute the RNA by adding 25 ul of pre-heated Elution Solution to the center of each filter and then spinning in microfuge for 1 minute.
- DO NOT discard the flow through since this is your RNA. Instead add a second 25 ul aliquot of pre-heated Elution Solution to the center of each filter and respin.

Measuring RNA concentration
- You'll measure a dilution of your RNA samples. Add 5 μl of the stocks to 495 μl sterile water in an eppendorf tube. The water does not have to be RNase-free since the RNA can be degraded and still give legitimate readings in the spectrophotometer.
- Give your undiluted RNA stocks to one of the teaching faculty who will freeze them away until the next time we need them.
- Measure the absorbance of the dilutions at 260 nm using quartz (not plastic) cuvettes. Water in one of the optically paired cuvettes should be used to blank the spectrophotometer, but if another group has done this already, it does not have to be repeated.
- A few things to be aware of when using quartz cuvettes:
- They are very expensive.
- The lab has only one set.
- When you are done using the cuvette, you should carefully clean it by shaking out the contents into the sink and rinsing it once with 70% EtOH, then two times with water. Quartz cuvettes get most of their chips and cracks when someone is shaking out the contents since it is so easy for the cuvette to slip from wet fingers or be hit against the sink. Don’t let this happen to you.
- A few things to be aware of when using quartz cuvettes:
- To determine the concentration of RNA in your sample, use the fact that 40 μg/ml of RNA will give a reading of 1 A260.
| RNA Sample | A260 | Conc of dilute RNA | Conc of undiluted RNA |
|---|---|---|---|
| NY420 | |||
| TAP-tagged strain |
DONE!
For next time
- Prepare a figure of the results from your spot tests. Eventually, this figure will be included in the research article describing your results that you'll hand in at the end of the module. If you'd like an example of a spot test figure from a published article, consider modeling your figure and legend along the lines of Figure 2 from Monehan et al "Fission yeast SWI/SNF and RSC complexes show compositional and functional differences from budding yeast"Nature Structural & Molecular Biology (2008) 15, 873 - 880 here
- Prepare a figure and legend for the Western blot. This figure will also be included in the research article describing your results that you'll hand in at the end of the module. If you'd like an example, consider figure 6 from Laprade et al. "Characterization of New Spt3 and TATA-Binding Protein Mutants of Saccharomyces cerevisiae: Spt3–TBP Allele-Specific Interactions and Bypass of Spt8" Genetics(2007)177: 2007-2017 here
- Calculate RNA volume needed for 2 ug of each sample.
- Please download the midsemester evaluation form found here. Complete the questionnaire and then print it out without including your name to turn in next time. If there is something you'd like to see done differently for the rest of the course, this is your chance to lobby for that change. Similarly, if there is something you think the class has to keep doing, let us know that too.
- If you'll be giving a presentation next time, please email a completed .ppt presentation to nkuldell or astachow AT mit DOT edu. The order of presentation will be determined by the order in which we receive the completed presentations. Also, once you have given your presentation, you should email your instructor again naming/describing 2 things you felt you did well during your presentation and 2 things you feel you can work on. This will be a 2 point FNT assignment that is assigned here to count as Mod 2 Day 6 homework.
Reagents list
- TBS-T Tris-Buffered Saline + Tween
- polyclonal anti-protA, raised in mouse cells
- polyclonal antimouse-AP from BioRad, raised in goat
- BioRad AP detection reagents
- 1 ml 25x detection stock + 24 ml H2O with 0.25 ml solnA and 0.25 ml solnB.
- Ambion RiboPure Yeast RNA Isolation Kit
