M465:Communityanalyses
Antagonistic and Mutualistic Interactions
*NOTE: You must remember to set up fresh nutrient broth cultures for your isolates 1-3 days before lab to do this test!
The microbial community living in your environments is a complex one with many different microorganisms. As is true of any environment, these microbes interact with each other - both functionally and physically. Do selected bacteria from your community help each other or harm each other while trying to find a niche in your community? Today, you will try to answer that question by testing your cultured isolates for examples of mutualism or antagonism (co-operation or competition)by culturing them in controlled communities. Some of these bacteria may prevent the growth of others through the production of chemical inhibitors; others might promote the growth of their neighbors by producing metabolites that are needed. We are going to look for both positive and negative interactions.
PREPARING THE ISOLATES:
You will inoculate 50 µl of log phase (young culture) isolate grown in fresh nutrient broth into the assigned well(s). Once again try to control for similar numbers of organisms in your inoculum by starting with normalized optical density measurements (start with a concentration of 0.5 OD600)
Interaction Assay Set Up

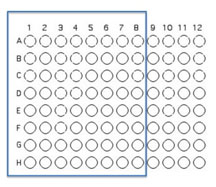
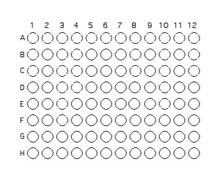
You will use 64 of the wells on a 96 well plate for this assay. Each pair will use 8 unique isolates to test for interactions. Use Excel to keep track of which organisms that will be inoculated into each well as described and illustrated below.
FOLLOW THE TEMPLATE CAREFULLY!!!!!! It is easy to get this inoculation messed up, but don't!

Transfer 50 μL of each of 8 unique isolates to be tested into the illustrated row of wells (A1 is Isolate 1, A2 is Isolate #2 etc through A8)
Beginning with Isolate #2, inoculate a second 50 μl of each of your isolates into the column wells B1, C1, etc. (indicated by the green color).
Add 100 μL of nutrient broth to each of the wells containing your isolates (row wells A1-A8 and column wells B1-H1)
Gently move the 96 well plate in a circular motion to mix.

Transfer 10 μl of the contents of the 7 wells - A2 (containing isolate #2 etc) through A8 to the empty wells in each column as indicated by the yellow arrows. You will need to remove the first tip from a multichannel pipette. If you are using the multichannel pipette, be sure that you work slowly and check that each pipette tip is evenly filled. You may need to tighten the tips by hand, if so be sure to only touch the part of the tip that sits on the multichannel pipette, you wouldn't want to contaminate your wells with human organsisms!
Transfer 10 μl of the contents of wells A1 (containing isolate #1 etc) through H1 to each well in the row as indicated by the red arrows.
Again gently mix the contents of the well by moving the plate in gentle circles.
At the end of these transfers, measure the optical density in each well using the plate reader. Then put your 96-well plate in a plastic tupperware container at 37C to grow. Take measurements on the optical density daily to confirm growth inhibition or stimulation.
Antibiotic Production
Many microbes secrete antimicrobial compounds to help them compete with other microorganisms for habitat. Some of the bacteria that are common antibiotic producers are the Actinomycetes (including Streptomycetes species), many of the Bacillus species, and the fruiting myxobacteria, to name just a few among many, many antibiotic producing bacteria. You can also test for the opposite: the sensitivity of your soil organisms (or known stock bacteria) to manufactured or secreted antibiotics.
(This testing will take 3 weeks.)
Week 1:
Identify how many potential antibiotic producers you might have. Definitely test any isolates that are likely to be Actinomycetes, Myxobacteria, or Bacillus. It's possible that you might discover the next great antimicrobial drug and get very rich by selling the patent for your discovery to a drug company. Remember that the discovery of penicillin was completely accidental.
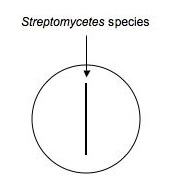
Using aseptic technique, transfer an isolated colony (possible Streptomyces, etc.) that's likely to be an antibiotic producer to a microfuge tube containing 500μL of sterile water. Vortex to mix. Using a sterile swab, dip the swab in the diluted bacteria and make an inoculation (as shown below) down the middle of a plate of nutrient agar. Make a second plate exactly like the first for each isolate to be tested. Label them carefully and incubate the plates for ~1 week at RT.
Week 2
TO BE PROVIDED in LAB 7:
3 fresh cultures of Eschericia coli (Gram negative), Staphylococcus aureus (Gram positive) and grown in nutrient broth.**Make sure you tell your instructors when you will need these cultures!**
PROTOCOL
- Use a sterile swab and aseptically apply a line of inoculation of each of the provided broth cultures of : E. coli and S. aureus. as shown below. Draw a line perpendicular to the antibiotic producer's (Streptomyces) inoculation. Be careful not to touch the antibiotic producer's growth. Using the same swabs, inoculate a new NA plate (one plate for all three cultures)by making a line across the plate for E. coli, Micrococcus and S. epidermidis. Incubate this plate along with your test plate. It will serve as a control to make sure that lack of growth is due to antibiotic sensitivity and not to no living cells in the inoculum.
-

- Incubate for another week.
Week 3
- Examine the plate and look for evidence of inhibition of growth of "test" organisms near the antibiotic producer's midline streak.
- Draw the results and evaluate whether or not there was evidence that an antibiotic was produced by the organism and, if so, which of the bacteria tested were sensitive to it and to what degree. If you found no inhibition of growth, does that mean that your potential antibiotic producer does not secrete an any antimicrobial compounds? Why or why not?


