CAMRI:HowToScan: Difference between revisions

From OpenWetWare
Jump to navigationJump to search
No edit summary
Line 42: Line 42:
==Burning a Backup Disk==
Burning a Backup Disc:  
#. Once you are done scanning and you want to make a back up disk. You need to open the patient browser. You can do this by clicking Patient -> Browser. [[Image:Browser | 900px|]]          OR- Click the[[Image:Folder.jpg|900px|Keyboard shortcut button for Browser]]  button on the bottom right of your keyboard.
#. Once you are done scanning and you want to make a back up disk. You need to open the patient browser. You can do this by clicking Patient -> Browser. [[Image:Browser | 90px|]]          OR- Click the[[Image:Folder.jpg|900px|Keyboard shortcut button for Browser]]  button on the bottom right of your keyboard.
#. This will open the patient browser screen (shown below).
#. Before you select the scan you would like to burn you will need to insert disk into disk drive for burning. To do this click: Transfer->EJECT FROM DVD-R.  
Line 55: Line 55:
#. The status of your disk will be shown on the bottom part of screen, it will show a red circle when recording. Once it says Recording was successful at bottom you can click: TRANSFER-> EJECT FROM DVD-R.
#. Then take your disk and close the disk drive.
== Response Recording ==
Responses are recorded with a fORP system. Link to Jung Hwan's user guide here: [[Media:ButtonBoxConfiguration_MSB1.pdf‎|fORP Configuration]]

Revision as of 14:41, 30 November 2015

Brain picture
CAMRI


Scheduling

To schedule or cancel time on the scanner, you must use use the iLab web site https://bcm.corefacilities.org/service_center/show_external/3684 Click here for detailed instructions.

About CAMRI's Siemens Scanners

The BCM CAMRI has 3 whole-body 3T Siemens Magnetom Trios, labelled 3T-3, 3T-4 and 3T-5. 3T-3 and 3T-4 currently have 8 receive channels, 3T-5 has 32 channels (on January 11, 3T-4 will be upgraded to a Prisma Fit system and will be out of commission for most of January and February.) First, register the patient. A shortcut is to bring up a previously registered patient, and then edit that record.

Troubleshooting

Report all issues to camri@bcm.edu

http://openwetware.org/images/0/01/CAMRI_MRI_Safety_Manual.pdf

There are a few helpful videos that you can watch on YOUTUBE that will help you become a little more familiarized with our systems here at CAMRI. Here are the links: https://www.youtube.com/watch?v=pi1OLUflhTU


Having problems with...

  1. PC or MAC computer? Call Dave Lee at 713.798.5517 during normal business hours (M-F 8a-4p)
  2. Button boxes or response devices? Go to "how to scan" tab. Click on "response recording". Open the document created by Jung Hwan for fORP confirgurations.
  3. MR Scanners? a) Is the error message for a software issue? Restart the scanner. Start by going to SYSTEMS tab at the top of the screen. Click END SESSION. A blue box will appear. Select RESTART SYSTEM. Wait for system to restart. This could take 5-10 minutes. b) Is the error message for a hardware issue? Shutdown the scanner. Start by going to SYSTEMS tab at the top of the screen. Click END SESSION. A blue box will appear. Select SHUTDOWN SYSTEM. Wait for system to shutdown completely. The screen will go black and tell you it is okay to turn off the system. Go the switch on the wall and push the blue button that says SYSTEM OFF. Wait about 10 seconds and push blue button that says SYSTEM ON. The system will come back up. This could take 10-15 minutes. Is the scanner working properly now? If no, call Siemens Service at 1.800.888.7436 and give them functional location number listed on the phone list by the quench button. Also log error message in the log book next to the keyboard.
  4. Visual Simulus? a) Projector? Make sure the switch is turned to PROJECTOR. Turn projector on with remote located in cabinets. If problems persists, please call Dave Lee at 713.798.5517. b) BOLDScreen? Make sure the BOLDScreen is turned on in the scan room. Make sure the switch is turned to BOLDSCREEN. If problem persists, go to "how to scan" tab. Click on "visual stimulus display". Open the link to the Cambridge Research Systems BOLD Screen User Guide for troubleshooting problems.


Stimulus computer and button boxes check list: There are several ways to configure the interface box. Here is a sequence that you can use to make sure it is set up properly:

  1. Connect your desired button box in the magnet room
  2. Push the main rotary knob on the interface box and follow prompts to set it to the desired mode. You must do this every time you scan.
  3. Push the correct button on the switch box to route the outputs of the interface box to your chosen computer.
  4. Start your stimulus software on the computer.

The sequence of operation is important so make sure it is done in this order.


Burning a Backup Disk

Burning a Backup Disc:

  1. . Once you are done scanning and you want to make a back up disk. You need to open the patient browser. You can do this by clicking Patient -> Browser. File:Browser OR- Click theKeyboard shortcut button for Browser button on the bottom right of your keyboard.
  2. . This will open the patient browser screen (shown below).
  3. . Before you select the scan you would like to burn you will need to insert disk into disk drive for burning. To do this click: Transfer->EJECT FROM DVD-R.
  4. . Once the drive opens, insert Blank disk and close it. You will see a message at the bottom of your screen saying that: . Once you see this you are able to burn to it.
  5. . Locate under the Local Database the name of the scan you just did. (It is organized by date so it should be last scan done)
  6. . You can select the entire folder to burn or you can use CTRL and click the individual scans you would like to burn to disk.
  7. . Once you have the folder or individual scans that you would like to burn highlighted click: TRANSFER-> EXPORT TO. Then a dialogue box will pop up with DVD-R highlighted just click EXPORT.
  8. . Once you hit export another box will pop up like this:


  1. . Type whatever you would like to name it under Label on medium. Click Viewing tool if you or your patient will be viewing it on computer. (MOST PEOPLE CLICK VIEWING TOOL)
  2. . The status of your disk will be shown on the bottom part of screen, it will show a red circle when recording. Once it says Recording was successful at bottom you can click: TRANSFER-> EJECT FROM DVD-R.
  3. . Then take your disk and close the disk drive.

Response Recording

Responses are recorded with a fORP system. Link to Jung Hwan's user guide here: fORP Configuration

Visual Stimulus Displays

3T-3 and 3T-5 display visual stimuli on direct view LCD screens.


3T-5 uses a Cambridge Research Systems [32" display with resolution of 1920x1080]. This display requires a video adapter with a DVI-D (dual link) connector. There are currently adapters for Macs connected to the display switcher.

3T-3 uses a [24" display with resolution of 1920x1200]

Link to manual here: Cambridge Research Systems BOLD Screen User Guide The BOLDScreen has a built-in color profile that can make images appear too dark. Instead, use the default color profile as follows:

  1. On the Mac laptop stimulus computer, Click on the Apple, Open "System Preferences"
  2. click on "Displays", select the "Color" Tab
  3. Select the "Color LCD" profile for the second display (the BOLDscreen)

Ricky Savjani has redone the gamma calibration on the 3T-5 BOLDscreen, this can be accessed in PsychToolbox as follows. First, Click here to load the table

 % load in the gamma table
 load CRS_32BOLDSCREEN/gammaTable_Spline_fit.mat
 % after opening a window, call this to load the load the gamma table to to your Screen
 Screen('LoadNormalizedGammaTable', win, gammaTable2*[1 1 1]);

Now, desired intensity levels will be mapped appropriately to the screen.

Rough calculation of image size in degrees of visual angle: roughly 76.5 cm from screen to eyeball height of screen is 13.7 in = 34. 8 cm width of screen is 34.8 * (1024/768) = 46.4 cm atan(23.2/76.5) = 0.29 rad = 16.6 degrees ~30 degrees full width

Audio Stimuli

Misc Notes

Slice Ordering

David Ress' former student Andrew Florens examined the acquisition time stamps and found that axial slices are collected from Superior to Inferior (head to foot). If an odd number of slices is acquired, the slice order is

 1, 3, 5, 7, etc.
 2, 4, 6, 8 etc.

If an even number of slices is acquired, the slice order is reversed:

 2, 4, 6, 8, etc.
 1, 3, 5, 7, etc.


What pulse sequence to use for fMRI

There are a variety of different pulse sequences that can be used for fMRI, including the standard Siemens EPI product sequences; multi-band EPI sequences from MGH and Univ. of Minnesota; and spiral sequences implemented by David Ress.

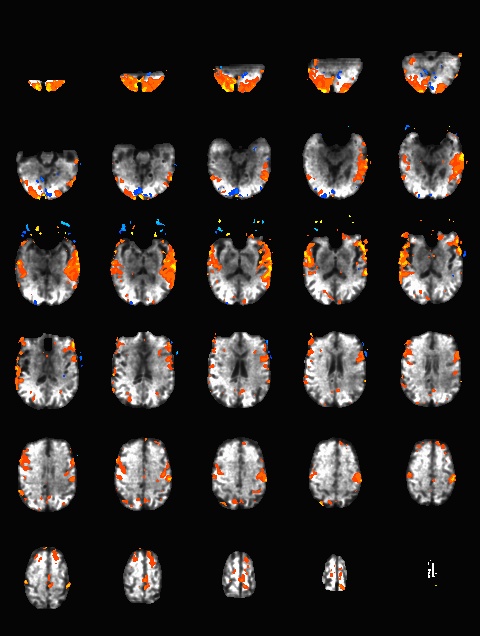
Siemens EPI product sequence with GRAPPA 3, TR = 2 seconds


MGH Blipped CAIPI multi-band EPI with SMS 2, GRAPPA 2, TR = 1.5 seconds Images show activation maps overlaid on tSNR maps (NOT raw EPI images). The task was one run listening to an audiovisual story. mean tSNR is higher with MGH, 171 vs 148 maps. There was more activation with MGH, likely as a result of more statistical power with 160 (TR=1.5) vs. 120 (TR=2) time points. 16432 voxels were activated with the task vs. 15349 voxels (positive activation only, q = 10-7 for both)

Here is another analysis of the same data by David Ress. The results are similar, with the G2, MB2 version winning by around 15% in fSNR over the product sequence. But, the shorter TR will also net you an improvement of ~5% in CNR in a similar length run. It is also interesting, however, that the G3 run had less aliasing artifact, suggesting that shorter acquisition times reconstruct more cleanly.

Siemens EPI product sequence with GRAPPA 3, TR = 2 seconds

MGH Blipped CAIPI multi-band EPI with SMS 2, GRAPPA 2, TR = 1.5 seconds


MGH Blipped CAIPI multi-band EPI with SMS 2, GRAPPA 3, TR = 1.5 seconds

Similar results were obtained with a phantom:


Siemens EPI product sequence with GRAPPA 3, TR = 2 seconds

MGH Blipped CAIPI multi-band EPI with SMS 2, GRAPPA 2, TR = 1.5 seconds


MGH Blipped CAIPI multi-band EPI with SMS 2, GRAPPA 3, TR = 1.5 seconds