Biomod/2014/NTU/Origami
<html> <head> <title>Origami</title> <link href="http://openwetware.org/index.php?title=Biomod/2014/NTU/Templates/css/bootstrap.css&action=raw&ctype=text/css" rel='stylesheet' type='text/css' /> <link href="http://openwetware.org/index.php?title=Biomod/2014/NTU/Templates/css/animate.css&action=raw&ctype=text/css" rel="stylesheet" type="text/css" media="all"> <link href="http://openwetware.org/index.php?title=Biomod/2014/NTU/Templates/css/style.css&action=raw&ctype=text/css" rel='stylesheet' type='text/css' /> <script type="text/javascript" src="http://openwetware.org/index.php?title=Biomod/2014/NTU/Templates/js/jquery.min.js&action=raw&ctype=text/js"></script> <script type="text/javascript" src="http://openwetware.org/index.php?title=Biomod/2014/NTU/Templates/js/slidejs&action=raw&ctype=text/js"></script> <script src="http://openwetware.org/index.php?title=Biomod/2014/NTU/Templates/js/slideproject&action=raw&ctype=text/js"></script> <script> $(function () { $("style[media*='screen']").remove(); $("link[href*='favicon']").remove(); //fix heading var h1 = $(".firstHeading").text().split("/"); $(".firstHeading").text(h1[h1.length-1]); $("tr:odd").addClass("odd"); }); function slideload(){ $('#fadein').fadeIn(6000); } </script> <style>
.body {
 width:100%;
 color: #CCCCCC ;
 max-width: 1280px;
 min-width: 0 ;
 padding-top: 55px;
 margin-left: auto;
 margin-right: auto;
}
- column-content #content {
   padding: 0em;
   margin: 0;
}
- content{
 border: 0px;
 float:right;
 padding: 0em;
 width:100%;
}
- contentSub, #search-controls, .firstHeading, #footer-box, #catlinks, #p-logo, #toctitle ,#top-section ,#column-one ,#footer, #siteSub,#jump-to-nav,.printfooter,.visualClear
{
display:none;
}
- globalWrapper {
 background-color:#fff;
 font-size:100%;
 padding-bottom: 0px;
}
.start:hover{ background-color: #225E94; transition: background-color 0.5s linear; } </style> <link href="http://openwetware.org/index.php?title=Biomod/2014/NTU/Templates/css/slidecss&action=raw&ctype=text/css" rel='stylesheet' type='text/css' /> </head> <body onload="slideload()">
- <a href="http://openwetware.org/wiki/Biomod/2014/NTU"><img src="http://openwetware.org/images/4/4d/Logo1.png" style="left:-50px;"></a>
- <a href="javascript: void(0)">Project</a>
- <a href="http://openwetware.org/wiki/Biomod/2014/NTU/Idea">Idea</a>
- <a href="http://openwetware.org/wiki/Biomod/2014/NTU/Design">Design</a>
- <a href="#">Origami</a>
- <a href="javascript: void(0)">Experiment</a>
- <a href="http://openwetware.org/wiki/Biomod/2014/NTU/Method">Method</a>
- <a href="http://openwetware.org/wiki/Biomod/2014/NTU/Result">Result</a>
- <a href="javascript: void(0)">Discussion</a>
- <a href="http://openwetware.org/wiki/Biomod/2014/NTU/Review">Review</a>
- <a href="http://openwetware.org/wiki/Biomod/2014/NTU/Future">Future</a>
- <a href="javascript: void(0)">Supplement</a>
- <a href="http://openwetware.org/wiki/Biomod/2014/NTU/Protocol">Protocol</a>
- <a href="http://openwetware.org/wiki/Biomod/2014/NTU/Material">Material</a>
- <a href="http://openwetware.org/wiki/Biomod/2014/NTU/Equipment">Equipment</a>
- <a href="http://openwetware.org/wiki/Biomod/2014/NTU/Member">Member</a>
- <a href="http://openwetware.org/wiki/Biomod/2014/NTU/Acknowledge">Acknowledge</a>
Here are the steps in designing the nanojellyfish:
<a id="o1" href="javascript: void(0)">1. Arrange the scaffold</a>
<a id="o2" href="javascript: void(0)">2. Decide the crossover points of the monomer</a>
<a id="o3" href="javascript: void(0)">3. Design the sequence of the tentacles</a>
<a id="o4" href="javascript: void(0)">4. Combine the monomer and the tentacles</a>
<a id="o5" href="javascript: void(0)">5. Combine two monomers into a dimer</a>
1.Arrange the scaffold
The hemisphere of the monomer has to be large enough to engulf the virus, which upon engulfment, would activate the tentacles. To calculate the radius of the hemisphere, we have to consider the radius of the virus (10~100nm) as well as the length of the scaffold (7249 bps). Subsequently, we determine the radius of the hemisphere to be 30nm.
To construct the hemisphere, we make use of the lines of latitude. First, we determine the number of base pairs (bps) for the first line of latitude. Next, we insert five crossovers between adjacent lines to stabilize the hemisphere, whereby crossovers are separated by an integer number of turns. Since a DNA turn consists of about 10~11 bps and spans 3.4nm, the first line is set to be 54 bps long, which approximates to 5 DNA turns.
According to figure 1, we can come up with the following equations:
R*sinΘ = 2.5nm (width of DNA double helix) →Θ = 4.78°  
2πR*sinφ = 3.4*5 →φ = 5.16°
<img src="http://openwetware.org/images/1/1d/Origami1.png" style="left:150px; width:30%; top:-130px;"/>
After figuring out the angles Θ and φ, we deduce that the hemisphere has 17 lines of latitude. Following this, we calculate the number of bps needed for subsequent lines. For the nth line, the circumference would be 2πR*sin(φ+(n-1)Θ). From here, we can deduce the number of turns and bps. However, the actual number of turns does not cohere to what we have calculated. For the first 5 lines, the number of turns has to be multiples of the first to facilitate easy crossover points. The table shows the turns and bps of each line.
<tbody> </tbody>| line | 1 | 2 | 3 | 4 | 5 | 6 | 7 | 8 | 9 | 10 | 11 | 12 | 13 | 14 | 15 | 16 | 17 |
| turn | 5 | 10 | 15 | 20 | 25 | 29 | 33 | 37 | 41 | 45 | 47 | 49 | 51 | 53 | 55 | 55 | 55 |
| bps | 54 | 105 | 156 | 204 | 252 | 297 | 341 | 380 | 427 | 460 | 480 | 506 | 528 | 546 | 559 | 568 | 572 |
2.Decide the crossover points of the monomer
We need to create some crossovers between adjacent lines to maintain the shape of the monomer. There are two types of crossovers. First is the scaffold crossover that is used to connect one line to the next. Second is the staple crossover that is used to strengthen the connective force between adjacent lines. For the first 5 lines, there are a total of 5 crossovers of each line, including 1 scaffold crossover and 4 staple crossovers. For subsequent lines (line 6 onwards), we increase the number of crossovers to 10, including 1 scaffold crossover and 9 staple crossovers, owing to the much longer scaffold.
The crossover has to be inserted into special position of the DNA double helix. Staple crossovers should be separated by an integer number of turns, while a scaffold crossover and a staple crossover should be separated by n+0.5 turns (n is an integer number).
Figure 2 explains the rules of crossovers.
<img src="http://openwetware.org/images/3/3b/Origami2.png" style=" width:80%; left:0; margin-left:10%"/>
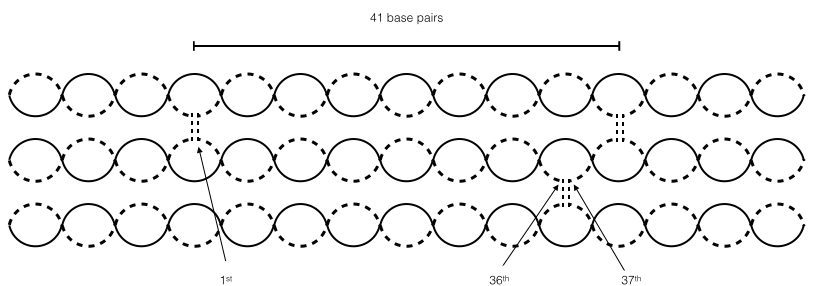
In addition to the crossovers on the same layer, we also have to consider the crossovers on adjacent layers. according to the paper, the position of the crossover of the next layer between two adjacent crossovers is relative to the curvature of the hemisphere1. The degree between the crossover and that on the next line must be about 185° match the curvature of the hemisphere. for example, to determine the position of the crossover on the line 5, we should consider the crossovers on the line 4. There are 41 base pairs between adjacent crossovers on the line 4. We find out that the most appropriate crossover position is at 36th and 37th base pairs because the degree is about 184.4°. (Figure 3)
<img src="http://openwetware.org/images/9/95/Origami3.png" style=" width:80%; left:0; margin-left:10%"/>
Considering these two major factors, we can decide the position of crossovers. Figure 4 shows our result. Each point represents the position of each crossover. The black point is the position of the staple crossover and the purple one is the position of the scaffold crossover. In addition, the figure represents the number of the base pairs between the crossovers.
<img src="http://openwetware.org/images/1/12/Origami.jpg" style="width:70%; left:200px;"/>
Finally, we can design the sequence of the hemisphere by the application, cadnano. Figure 5 shows the result.
<img src="http://openwetware.org/images/e/ed/Origami5.png" style="width:80%; left:150px;"/>
3.Design the sequence of the tentacles
Our nanojellyfish has three kinds of tentacles. One is the aptamer tentacle that is used to bind to the target, H5 protein on the virus. Another is the poly C/G tentacle that can bind to each other and cause the monomers to aggregate when the nanojellyfish is activated. The other is the lock that is used to connect two monomers and become a dimer. All the tentacles have the connecting sequence that can bind to the hairpin on the monomer.
The aptamer tentacle is located at ring 4 of the hemisphere. The sequence contains two parts, connecting sequence and H5 aptamer sequence.
Sequence of the aptamer tentacle
5’ - ATG ACT TCT CCT AGT CA - GAC GGG TAA CGT ATG TTT TAC ATT ACG AAA TTT AGA GCA CCC TTA CAG CGA GAC TCG TTG ACC TGT AGC AGT G - 3’
The poly C/G tentacle is located at ring 12 of the hemisphere. The sequence contains three parts, connecting sequence, complementary sequence of H5 aptamer, and poly C or G.
Sequence of the poly C tentacle
5’ - AGA AGT CAC AAC ACT TC - C ACT GCT TCA GGT CAA GCA GTC TCG GAG TAA GGG X X X X CGT AAT GCA ATA CAT ATG TTA CCC GTC - CCC CCC CCC CCC CCC CCC CCC C - 3’
Sequence of the poly G tentacle
5’ - AGA AGT CAC AAC ACT TC - C ACT GCT TCA GGT CAA GCA GTC TCG GAG TAA GGG X X X X CGT AAT GCA ATA CAT ATG TTA CCC GTC - GGG GGG GGG GGG GGG GGG GGG G - 3’
We make two locks at the edge of the monomer. The sequence contains two parts, connecting sequence and another H5 aptamer or complementary sequence of it.
Sequence of the first lock (H5 atpamer)
5’ - GTT GAG TGT TGT TCC - GTG TGC ATG GAT AGC ACG TAA CGG TGT AGT AGA TAC GTG CGG GTA GGA AGA AAG GGA AAT AGT TGT CCT GTT G - 3’
Sequence of the first lock (complementary sequence)
5’ - CAA CAG GAC AAC TAT TTC CCT TTC TTC CTA CCC GCA CTT TTT TTT TTT TTT TTT TTT TTT TTT TTT TTT TTT T - GCT GAG AGC CAG CAG - 3 ’
Sequence of the second lock (H5 aptamer)
5’ - TCA CTA GCT AAG ACA - GTG TGC ATG GAT AGC ACG TAA CGG TGT AGT AGA TAC GTG CGG GTA GGA AGA AAG GGA AAT AGT TGT CCT GTT G - 3’
Sequence of the second lock (complementary sequence)
5’ - CAA CAG GAC AAC TAT TTC CCT TTC TTC CTA CCC GCA CTT TTT TTT TTT TTT TTT TTT TTT TTT TTT TTT TTT T - GCT GAG AGC CAG CAG - 3’
Obviously, there are some mismatches in the tentacles. We make the mismatches to establish the difference of affinity between the tentacles to avoid inaccurate binding.
4.Combine the monomer and the tentacles
To connect the monomer and the tentacles, we design some special staples that not only bind to the scaffold but also form a hairpin. The purpose of the design is to avoid useless staples bind to the scaffold and block the combination of the tentacles. The sequence of the hairpin is the complimentary sequence of the connecting sequence of the tentacles. When the connecting sequence of the tentacles meet the hairpin, the hairpin will untie and the tentacles can combine to the monomer.
<img src="http://openwetware.org/images/2/25/Origami6.png" style="width:40%; left:120px; top:-20px;"/>
In addition, we have mentioned the protect strand and the complementary sequence of it in the mechanism. They can avoid poly C/G tentacles that don’t attach to the monomer binding to the H5 aptamer tentacles.
Sequence of the protect strand
5’ - C ACT GCT ACA GGT CAA CGA GGC TCG CCG TAA GGG TGC TCT GCG GCC CGT AAT GTA AAA CAT ACG TTA CCC GTC - 3’
Sequence of the complementary strand
5’ - GAC GGG TAA CGT ATG TTT TAC ATT ACG GGC CGC AGA GCA CCC TTA CGG CGA GCC TCG TTG ACC TGT AGC AGT G - 3’
5.Combine two monomers to be a dimer
We have mentioned that the purpose of the lock is to combine two monomers. However, the sequence of all locks is identical, so the monomers may aggregate and not become dimers. Therefore, we design the guide staples to correct the binding position. We decide four guide positions. When the dimer forms, we add the complementary strand to take down the guide staple. Then, the combination of the monomers depends on the locks. Following is the sequence.
Sequence of first guide staple and complementary strand
Guide staple: 5’ - ACT TCA CAG TTC GAA - ACT TCC AAT GGC TAA - 3’
Complementary strand: 5’ - TTA GCC ATT GGA AGT - TTC GAA CTG TGA AGT - 3’
Sequence of second one
Guide staple: 5’ - ATG TTT GTT CCT CAA - AAT CTC ACA CAC TCA - 3’
Complementary strand: 5’ - TGA GTG TGT GAG ATT - TTG AGG AAC AAA CAT - 3’
Sequence of third one
Guide staple: 5’ - TCA GTG TGC TGA CCA - TCA CTA TAT ACT ACA - 3’
Complementary strand: 5’ - TGT AGT ATA TAG TGA - TGG TCA GCA CAC TGA - 3’
Sequence of forth one
Guide staple: 5’ - AAG ATC CAA ACC GCA - ATG TTG GGT CCG CAA - 3’
Complementary strand: 5’ - TTG CGG ACC CAA CAT - TGC GGT TTG GAT CTT - 3’
1.Dongran Han, Suchetan Pal, Jeanette Nangreave, Zhengtao Deng, Yan Liu, Hao Yan(2011). DNA Origami with Complex Curvatures in Three-Dimensional Space, Science 332, 342